CSS Overflow
The overflow property specifies whether to clip the content or to add scrollbars when the content of an element is too big to fit in the specified area.
The overflow property has the following values:
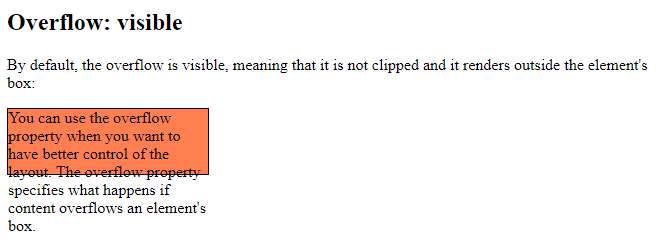
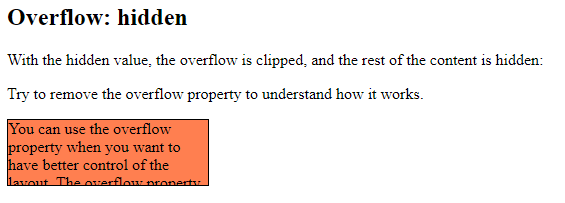
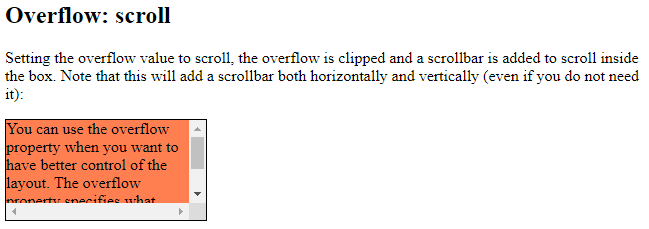
visible– Default. The overflow is not clipped. The content renders outside the element’s boxhidden– The overflow is clipped, and the rest of the content will be invisiblescroll– The overflow is clipped, and a scrollbar is added to see the rest of the contentauto– Similar toscroll, but it adds scrollbars only when necessary
overflow: visible
By default, the overflow is visible, meaning that it is not clipped and it renders outside the element’s box:
Example
<!DOCTYPE html>
<html>
<head>
<style>
div {
  background-color: coral;
  width: 200px;
  height: 65px;
  border: 1px solid;
  overflow: visible;
}
</style>
</head>
<body>
<h2>Overflow: visible</h2>
<p>By default, the overflow is visible, meaning that it is not clipped and it renders outside the element's box:</p>
<div>You can use the overflow property when you want to have better control of the layout. The overflow property specifies what happens if content overflows an element's box.</div>
</body>
</html>
Result:

overflow: hidden
With the hidden value, the overflow is clipped, and the rest of the content is hidden:
Example
<!DOCTYPE html>
<html>
<head>
<style>
div {
background-color: coral;
width: 200px;
height: 65px;
border: 1px solid black;
overflow: hidden;
}
</style>
</head>
<body>
<h2>Overflow: hidden</h2>
<p>With the hidden value, the overflow is clipped, and the rest of the content is hidden:</p>
<p>Try to remove the overflow property to understand how it works.</p>
<div>You can use the overflow property when you want to have better control of the layout. The overflow property specifies what happens if content overflows an element's box.</div>
</body>
</html>
Result:

overflow: scroll
Setting the value to scroll, the overflow is clipped and a scrollbar is added to scroll inside the box. Note that this will add a scrollbar both horizontally and vertically (even if you do not need it):
Example
<!DOCTYPE html>
<html>
<head>
<style>
div {
  background-color: coral;
  width: 200px;
  height: 100px;
  border: 1px solid black;
  overflow: scroll;
}
</style>
</head>
<body>
<h2>Overflow: scroll</h2>
<p>Setting the overflow value to scroll, the overflow is clipped and a scrollbar is added to scroll inside the box. Note that this will add a scrollbar both horizontally and vertically (even if you do not need it):</p>
<div>You can use the overflow property when you want to have better control of the layout. The overflow property specifies what happens if content overflows an element's box.</div>
</body>
</html>
Result:

overflow: auto
The auto value is similar to scroll, but it adds scrollbars only when necessary:
Example
<!DOCTYPE html>
<html>
<head>
<style>
div {
  background-color: coral;
  width: 200px;
  height: 65px;
  border: 1px solid black;
  overflow: auto;
}
</style>
</head>
<body>
<h2>Overflow: auto</h2>
<p>The auto value is similar to scroll, only it add scrollbars when necessary:</p>
<div>You can use the overflow property when you want to have better control of the layout. The overflow property specifies what happens if content overflows an element's box.</div>
</body>
</html>
Result:

overflow-x and overflow-y
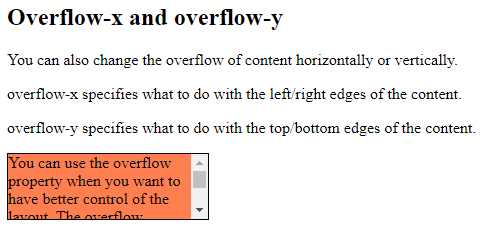
The overflow-x and overflow-y properties specifies whether to change the overflow of content just horizontally or vertically (or both):
overflow-x specifies what to do with the left/right edges of the content.overflow-y specifies what to do with the top/bottom edges of the content.
Example
<!DOCTYPE html>
<html>
<head>
<style>
div {
  background-color: coral;
  width: 200px;
  height: 65px;
  border: 1px solid black;
  overflow-x: hidden;
  overflow-y: scroll;
}
</style>
</head>
<body>
<h2>Overflow-x and overflow-y</h2>
<p>You can also change the overflow of content horizontally or vertically.</p>
<p>overflow-x specifies what to do with the left/right edges of the content.</p>
<p>overflow-y specifies what to do with the top/bottom edges of the content.</p>
<div>You can use the overflow property when you want to have better control of the layout. The overflow property specifies what happens if content overflows an element's box.</div>
</body>
</html>
Result:

