

How to Change the Desktop Background in Windows 7
- Right-click a blank part of the desktop and choose Personalize.
The Control Panel’s Personalization pane appears.
2. Click the Desktop Background option along the window’s bottom left corner.
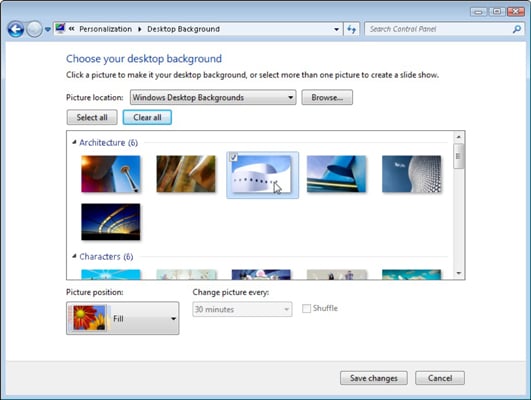
3. Click any of the pictures, and Windows 7 quickly places it onto your desktop’s background.Found a keeper? Click the Save Changes button to keep it on your desktop. If not, click the Picture Location menu to see more choices. Or, if you’re still searching, move to the next step.
4. Click the Browse button and click a file from inside your personal Pictures folder.Most people store their digital photos in their Pictures folder or library.
5. Click Save Changes and exit the Desktop Background window when you’re satisfied with your choices.Exit the program, and your chosen photo stays stuck to your desktop as the background.
Here are some other tips for sprucing up your desktop image:
- Adjust the way the picture looks using the Picture Position option. Windows 7 now gives you Fill and Fit options for enlarging small photos, like those taken with cell phones.
- Borrow any picture on the Internet. Right-click on the Web site’s picture and select Set as Background from the pop-up menu.
- Right-click any photo in your Pictures folder and choose Set as Desktop Background — for a quick wallpaper change.
- If a background photograph makes your desktop icons too difficult to find, try using a single color, instead: In Step 2 above, find Solid Colors on the Picture Location box’s down arrow.
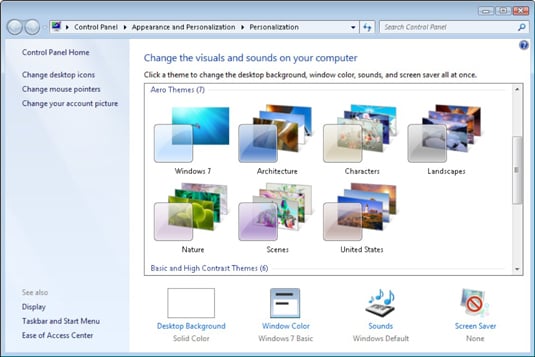
- To change the entire look of Windows 7, right-click on the desktop, choose Personalize, and select a Theme. Themes affect backgrounds, icons, cursors, and sounds so that they coordinate with each other.
How to change a computer screen saver
Screen savers can be useful for locking your computer while you’re away, or displaying your favorite photos as a slideshow. The following sections show you how to change your screen saver and adjust its properties. To proceed, choose your operating system from the list below and follow the instructions.
Windows Vista, 7, 8, and 10
- Press the Windows key, type Change screen saver, then press Enter.
- In the Screen Saver Settings window, click the down arrow.

- Select a screen saver from the drop-down menu.
- Once you’ve chosen a screen saver, you have a few options. To change how long the computer waits before starting the screen saver, click the up or down arrows for the Wait option to your preferred timing. If you’re using the Photos screen saver option, you can change the timing between pictures in Settings, then choose between slow, medium, and fast on the Slide show speed. When you’re finished, click Apply (A) and then OK (B).

Windows XP
- Open the Control Panel.
- In the Control Panel window, click Appearance and Personalization.
- In the Display window, click the Screen Saver tab.
- Under the Screen saver section, click the down arrow on the right side of the first box.
- Select a screen saver (or, if you don’t want to have a screen saver, select None). Adjust any other settings to your liking. Click Apply, then OK.
macOS
- In the menu bar, click the Apple icon to open the Apple menu, and choose System Preferences.

2. Click the Desktop & Screen Saver icon in the System Preferences window.
- On the Desktop & Screen Saver menu, ensure the Screen Saver tab near the top is selected (A).
- Optional: In the left sidebar, you can choose a stock slideshow, or customize how personal photos are displayed (B).
- In the bottom-left corner, next to Start after, choose how long your Mac should wait until the screen saver activates (C).
- Finally, if you didn’t pick a preset slideshow from the left section, you can choose your images by selecting them from the Source drop-down menu (D).
