

Setting up a self-running presentation
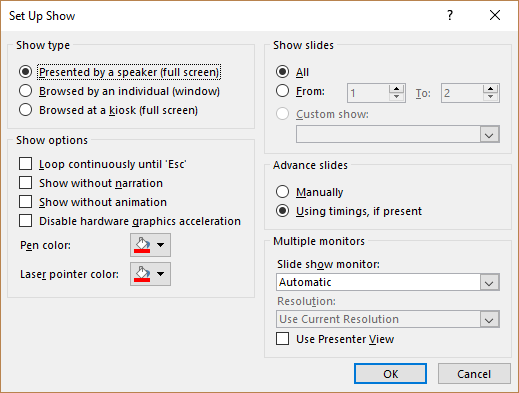
When you set up a self-running presentation, you can choose 3 options in the Set Up Show dialog box depending on your audience:
To set up a PowerPoint presentation to run automatically, but allow those watching the slide show to have control over when they advance slides:
- Click the Slide Show tab in the Ribbon and then click Set Up Slide Show. A dialog box appears.
- Under Show type, select Presented by a speaker (full screen). This is the default setting for slide shows.
- Click OK.
To set up a presentation to run automatically, but those watching the slide show do NOT have control over when slides advance:
- Click the Slide Show tab in the Ribbon and then click Set Up Slide Show. A dialog box appears.
- Under Show type, select Browsed by an individual (window).
- Click OK.
To set up a presentation to run automatically, but those watching the slide show do NOT have control over when slides advance and the presentation repeats until the people watching press Escape (ESC):
- Click the Slide Show tab in the Ribbon and then click Set Up Slide Show. A dialog box appears.
- Under Show type, select Browsed at kiosk (full screen).
- Click OK.
Setting slide timings manually
You can choose to rehearse slide timings or you can manually set the slide timings for your PowerPoint slides using the Transitions tab in the Ribbon.
To set slide timings manually:
- Click the View tab in the Ribbon and then click Slide Sorter.
- Select the slide for which you want to set timing.
- Click the Transitions tab in the Ribbon.
- In the Timing group, under Advance Slide, select the After check box and then enter the number of seconds indicating how long the slide should appear on the screen. If you want the next slide to appear either when you click the mouse or automatically after the number of seconds that you enter (whichever comes first), select both the On Mouse Click and the After check boxes.
- Repeat the process for each slide for which you want to set timing.
Rehearsing and recording slide timings
If you choose Browsed by an individual (window) or Browsed at a kiosk (full screen) in the Set Up Show dialog box, you can rehearse and record timings for animations, transitions and advancing slides.
To rehearse timings, you’ll use the Rehearsal toolbar shown below:
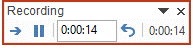
The toolbar includes the following buttons from left to right:
- Next (advance to next slide)
- Pause
- Slide time
- Repeat
- Total presentation time
Click the buttons in the Rehearsal toolbar to perform the following actions:
- Click Next to advance to the next slide.
- To temporarily stop recording the time, click Pause.
- To restart recording the time after pausing, click Pause.
- To set an exact length of time for a slide to appear, type the length of time in the Slide Time box.
- To restart recording the time for the current slide, click Repeat.
To rehearse timings:
- Click the Slide Show tab in the Ribbon and then click Rehearse Timings. The Rehearsal toolbar appears and the timer begins immediately. The presentation appears in full screen recording mode.
- Click the desired buttons. Click Next to advance to the next slide or press the right arrow on your keyboard. To temporarily stop recording the time, click Pause. To restart recording the time after pausing, click Pause. To set an exact length of time for a slide to appear, type the length of time in the Slide Time box. To restart recording the time for the current slide, click Repeat.
- Continue clicking on the appropriate buttons until you are satisfied with the timings. The total presentation time appears on the top right of the Rehearsal toolbar.
- After you set the time for the last slide, a dialog box displays the total time for the presentation and another dialog box appears.
- To keep the recorded slide timings, click Yes. To discard the recorded slide timings, click No.
The presentation appears. If you view the presentation in Slide Sorter View, the slide timing is displayed below each slide.
Recording a slide show with timings
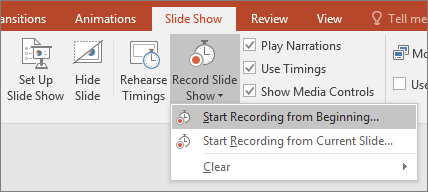
Instead of using the Rehearse Timings button, you can record timings (and narrations or voice over) as you record a show. The Record Slide Show button appears on the Slide Show tab in the Ribbon. When you record a slide show, you can start from the beginning or the current slide:
After you choose to record a slide show, you will have the option of including slide and animation timings as well as narrations, ink, and laser pointer (2010 users will not have the option of recording ink annotations):
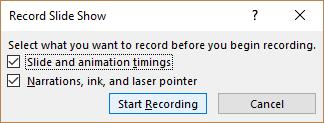
If you select Slide and animation timings, PowerPoint automatically records the time you spend on each slide, including animations and triggers on each slide. If you have already rehearsed timings, they will be replaced.
If you use the pen, highlighter, eraser or laser pointer, those will also be recorded. Pen, highlighter, and eraser recording are available only if you have PowerPoint 2013 (and run updates) or a later version of PowerPoint. In earlier versions of PowerPoint, pen and highlighter strokes are saved as ink annotation shapes. To learn more about including ink, check out the article How to Draw on PowerPoint Slides on the Fly During a Presentation (Using Ink).
To record a slide show and include animations and timings:
- Click the Slide Show tab in the Ribbon and then click the arrow beside Record Slide Show. A drop-down menu appears.
- Select Start Recording from Beginning or Start Recording from Current Slide. A dialog box appears.
- Select the option to include slide and animation timings.
- Click Start Recording. The Rehearsal toolbar appears and the timer begins immediately. The presentation appears in full screen recording mode.
- If you want to record timings, click the desired buttons. Click Next to advance to the next slide or press the right arrow on your keyboard. To temporarily stop recording the time, click Pause. To restart recording the time after pausing, click Pause. To set an exact length of time for a slide to appear, type the length of time in the Slide Time box. To restart recording the time for the current slide, click Repeat.
- Continue clicking on the appropriate buttons until you are satisfied with the timings. The total presentation time appears on the top right of the Rehearsal toolbar.
- After you set the time for the last slide, a dialog box displays the total time for the presentation and another dialog box appears.
- To keep the recorded slide timings, click Yes. To discard the recorded slide timings, click No.
- To end your recording at any time, right-click on a slide and select End Show from the menu.
The presentation appears. In Slide Sorter view, the slide timing is displayed below each slide.
Recording narrations or voice over
In addition to timings, you may want to add narrations or voice over. You can record narrations before you run a presentation or you can record narrations during a presentation and include audience comments. When you add narrations, PowerPoint automatically records your slide timings. Alternatively, you can set the slide timings first. Be sure to test the microphone first. If you do not want narrations throughout your entire presentation, you can record separate sounds or comments on selected slides or objects.
To record narrations, your computer requires a sound card, microphone, speakers and a webcam (optionally). You will also need a microphone connector if the microphone is not part of your computer.
It’s not a bad idea to create a script first in Microsoft Word to improve flow and avoid filler words such as “um”. You may also want to practice before recording although you can always re-record narration.
To record a slide show with narrations:
- Click the Slide Show tab in the Ribbon and then click the arrow beside Record Slide Show. A drop-down menu appears.
- Select Start Recording from Beginning or Start Recording from Current Slide. A dialog box appears.
- In the Record Slide Show dialog box, select the check box for Narrations and laser pointer and, if required, select or deselect the Slide and animation timings check box.
- Click Start Recording. A Rehearsal toolbar appears.
- Speak into the microphone to record a narration.
- To pause the narration, in the Rehearsal toolbar, click Pause. To resume the narration, click Resume Recording.
- To end your slide show recording at any rime, right-click on the slide and then select End Show.
The recorded slide show timings and narrations are saved. If you view the presentation in Slide Sorter view, timings appear beneath each slide. A sound icon also appears in the lower-right corner of each slide that has narration.
If you re-record your narration (including audio, ink, and laser pointer), PowerPoint erases your previously recorded narration (including audio, ink, and laser pointer) when you start recording again on the same slide.
To use ink, eraser, or the laser pointer during your recording, right-click on the slide, select Pointer options and choose the laser pointer, pen, highlighter or eraser. Ink is not available for 2010 users. If you want to display a laser pointer while you’re recording, press Control and your pointer will appear as a small red circle on your screen.
Previewing narration
If you want to listen to the narration on a slide:
- In Normal View, click the sound icon in the lower-right corner of the slide.
- Click Play.
Running a recorded slide show
To run a recorded slide show in Normal View:
- If necessary, on the Slide Show tab in the Ribbon, click Set Up Slide Show. A dialog box appears.
- Under Show type, select the desired option.
- Click OK.
- On the Slide Show tab, click From Beginning or From Current Slide. During playback, your animations, inking actions, laser pointer, audio and video play in sync.
- To end the show, press Escape.
Turning timings or narrations off
You can turn off timings and narrations and then turn them on again at any time.
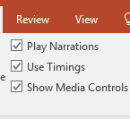
To turn off recorded slide timings, on the Slide Show tab, deselect the Use Timings check box.
To turn off recorded narrations, ink, and the laser pointer, on the Slide Show tab, deselect the Play Narrations check box.
Deleting timings or narration
You can use the Clear command to permanently delete timings or narration from your slide show recording. You have 4 options:
- Delete timings on the current slide
- Delete timings on all slides
- Delete narration on the current slide
- Delete narration on all slides
To clear timings or narrations:
- On the Slide Show tab, click the arrow below Record Slide Show. A menu appears.
- Select Clear and then the appropriate clear option.
Once you have recorded a presentation, you can later save it as a video if you’d like.