Using the View Tab of Microsoft Office Word 2007
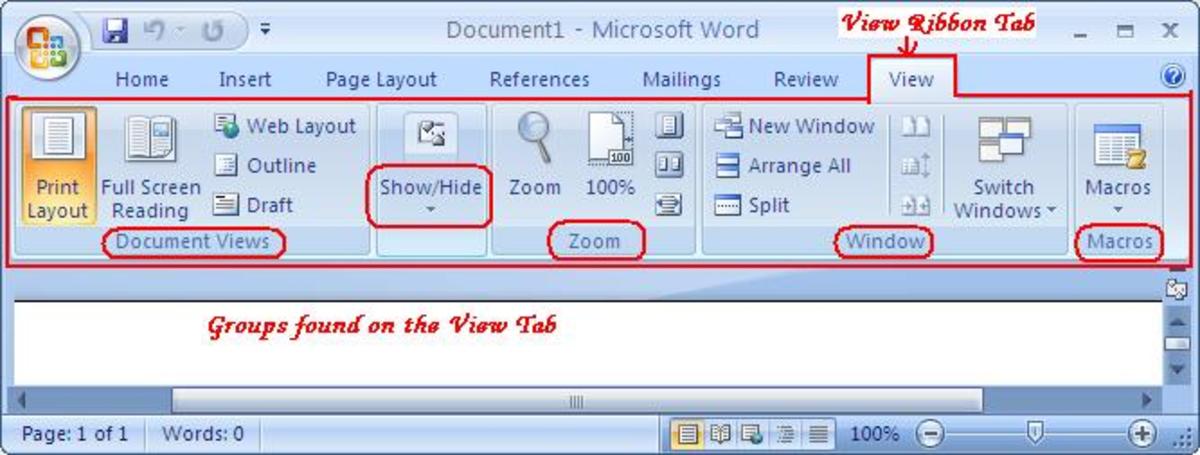
The view tab will be most-used when your document is complete, especially to see what it will look like. These tools are important and you will keep using them from time to time depending on your needs. There are other important commands like the documents view and the show/hide ruler option. These are the groups that we have in the view tab of Microsoft Office Word 2007 and their respective commands.
- Document Views,
- Show/Hide,
- Zoom,
- Window and
- Macros.

Documents View Group
- Print layout: this command will let you view the document as it will appear on the printed page. I personally find it good to use while typing and then checking on how the output will look like. What you see on the screen when using print layout is what you should expect when you print out your work. This tool will thus help you arrange your work they want it to appear.
- Full-screen reading: this allows you to access your document in full screen reading view by hiding most of the toolbars; this helps you to maximize the space available for reading or commenting on the document.
- Web layout: this command will let you view the document as it would appear as a web page.
- Outline: you will be able to view your document as an outline and show the outlining tools.
- Draft: you will be able to view the document as a draft and be able to edit the text. Some elements of your document for instance headers and footers will not be present in draft mode view.
Show/Hide Group
- Ruler: This command is for showing or hiding the ruler used for measuring or lining up objects in the document.
- Gridlines: Gridlines are used for aligning objects in a document. This command will show or hide the gridlines.
- Message bar: This command opens the message bar which helps you to complete any required action in the document.
- Document map: This turns on or off the document map. The document map allows you to navigate through a structural view of the document.
- Thumbnails: You can turn on or off the thumbnails pane using this command. You can use the thumbnails pane to navigate along the document through small pictures of each page. While in thumbnails, you can switch to document maps and vise versa.
Zoom Group
- Zoom: Use this tool to open the Zoom dialog box where you will be able to specify the zoom percentage you want for your page. You can also use the zoom controls in the status bar at the bottom of the window to quickly zoom the document.
- 100%: Use this command to zoom the document to 100% of the normal size.
- One page: This command is used to zoom the page in such a way that an entire page fits in the window.
- Two pages: Use this command to zoom two pages such that they fit in the window.
- Page width: This command zooms the document so that the width of the page matches the width of the window.
Window Group
- New window: This command opens a new window containing a view of the current document.
- Arrange all: Use this command to tile open program windows side-by-side on the screen.
- Split: This command splits the current window into two parts so that you can view different sections of the document at the same time.
- View side by side: Use this command to view two documents side by side so that you can compare their contents.
- Synchronous scrolling: This synchronizes the scrolling of two documents so that they scroll together. In order to use this feature, you must turn on the view side by side command.
- Reset window position: This command resets the window position of the documents being compared side by side so that they share the screen equally. This command can only be used when the view side by side command is activated.
- Switch Windows: You can use this command to switch to a different currently open window.
Macros Group
- Macro: Use this command to view the list of macros from which you can create, run, or delete a macro. By opening the macro dialog, you can be able to view macros, record macros, and pause recording macro.
