

Create Stock Items
- Gateway of Tally > Create > type or select Stock Item > and press Enter.
Alternatively, press Alt+G (Go To) > Create Master > type or select Stock Item > and press Enter. - Name & alias: As in other masters, you can specify multiple aliases for the stock item.
- Under: Select Primary or an existing Stock Group. If you have not created any Stock Group, you can create one in TallyPrime to assign to the stock item.
As always, press Alt+C, to create a master on the fly. Alternatively, press Alt+G (Go To) > Create Master > type or select Stock Items > press Enter. - Units: Select the unit of measurement applicable for the stock item. If the unit is not listed, you can create the unit of measurement in TallyPrime to assign to the stock item.
As always, press Alt+C, to create a master on the fly. Alternatively, press Alt+G (Go To) > Create Master > type or select Units > press Enter.- All the UQCs declared by the government or GSTN are available in TallyPrime by default. You can select based on relevance to the product or commodity. Whenever there is a new UQC declared by GSTN that TallyPrime has not provided, or you are yet to upgrade, you can create a new UQC with the exact name and symbol as defined by GSTN. Altering the defined name or UQC is not possible. However, you can create a new UQC.
- Unit Creation > Unit Quantity Code (UQC) > select New UQC.
- Enter the UQC Name, and press Enter.
- All the UQCs declared by the government or GSTN are available in TallyPrime by default. You can select based on relevance to the product or commodity. Whenever there is a new UQC declared by GSTN that TallyPrime has not provided, or you are yet to upgrade, you can create a new UQC with the exact name and symbol as defined by GSTN. Altering the defined name or UQC is not possible. However, you can create a new UQC.
- Statutory Details: Set the applicable Taxability option for the stock item under Statutory details, The option will depend on the option enabled in the F11 (Features) screen. Click here to see more
- Opening Balance: Specify the opening balance for the Stock Item as on the date of Beginning of Books.
- Quantity: Specify the stock item Quantity.
- Rate: Specify the stock item Rate.
- Value: TallyPrime automatically calculates the value by multiplying the Quantity and Rate. You can also edit the value, TallyPrime automatically refreshes the Rate field accordingly.
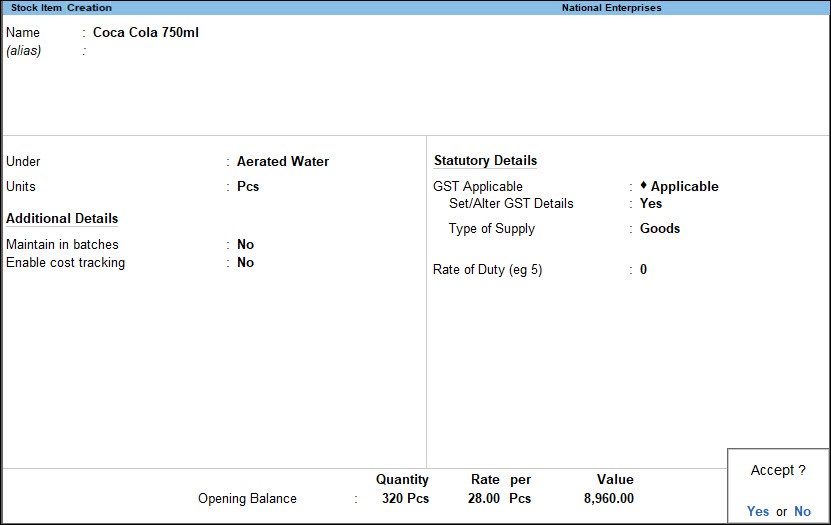
7.Accept the screen. As always, press Ctrl+A to save.