

Record Credit Note for Sales Returns and Increase in Sale Value
In case you have sold goods and some or all of the goods have been returned by your customer, you will need to account for such sales returns. Once you accept the goods that are returned, before or after receiving the payment for the same, you can record the transaction using the credit note feature of TallyPrime.
Sales Returns Transaction
When you accept sales return, record such returns by issuing credit notes.
In this section
- Sales returns before receiving the payment
- Sales returns after receiving the payment
Sales returns before receiving the payment
If you are recording the sales returns before receiving the payment, you can select the reference as Agst Ref while linking the credit note to the sales invoice.Open the credit note voucher screen and specify the buyer details.
Gateway of Tally > Vouchers > F10 (Other Vouchers) > type or select Credit Note > and press Enter.
Alternatively, press Alt+G (Go To) > Create Voucher > F10 (Other Vouchers) > type or select Credit Note.
Press Ctrl+H (Change Mode) and select the invoice mode as per your business needs.
Party A/c Name: Select the party name.
Party Details: Provide the Buyer details. You can also provide the Receipt or Order details as per your invoice requirements. You can also enter the Original Invoice No. and Date against which this sales return is being recorded.
If you do not see the Party Details screen with options for Original Invoice No. and Date, press F12 (Configure), and set Provide Receipt, Order, and Export/Import details to Yes.
As always, you can press Ctrl+A to save and proceed.
Select the Sales ledger to allocate the stock items.
Provide the stock item details.
As in other transactions, you can create the item on the fly by pressing Alt+C.
Select the stock item.
Enter the Quantity. The Rate will be auto-filled, based on the rate entered in the previous transaction. However, you may choose to enter the Rate. The Amount appears automatically.
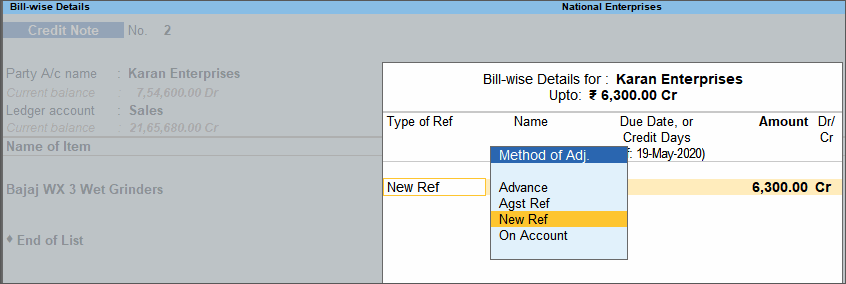
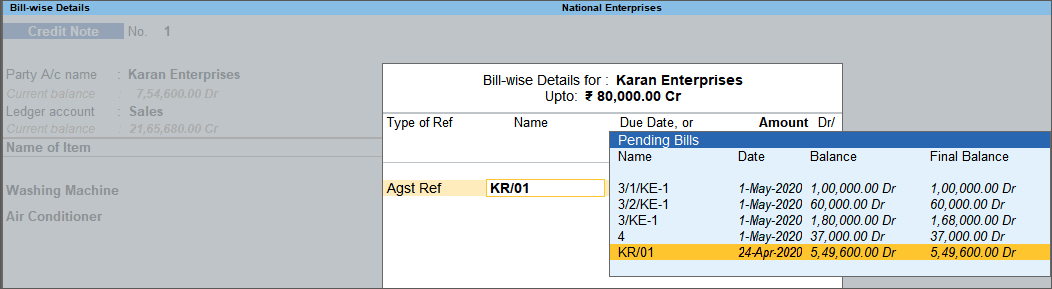
Select the bill-wise details.
Press F12 (Configure) > set Use default Bill-wise details for Bill Allocation to No.
Henceforth, you can select the bill references in the Bill-wise Details screen, until you change the option in F12 (Configure) of the invoice.
Select Agst Ref, as the payment has not been received against the sales.
Provide Narration, if needed.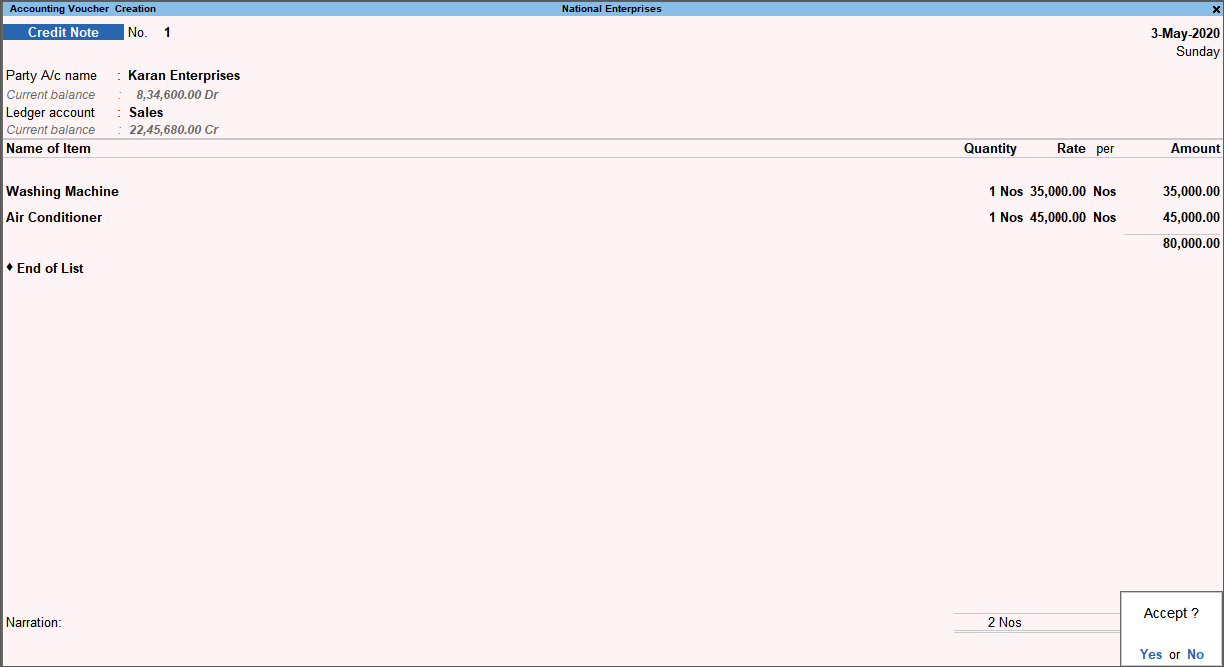
What you see on the screen can vary based on your choices. Press F12 (Configure) to change the options and F11 (Features) to enable or disable features.
Accept the screen. As always, you can press Ctrl+A to save.
The credit note will appear in the Credit Note Register.
Sales returns after receiving the payment
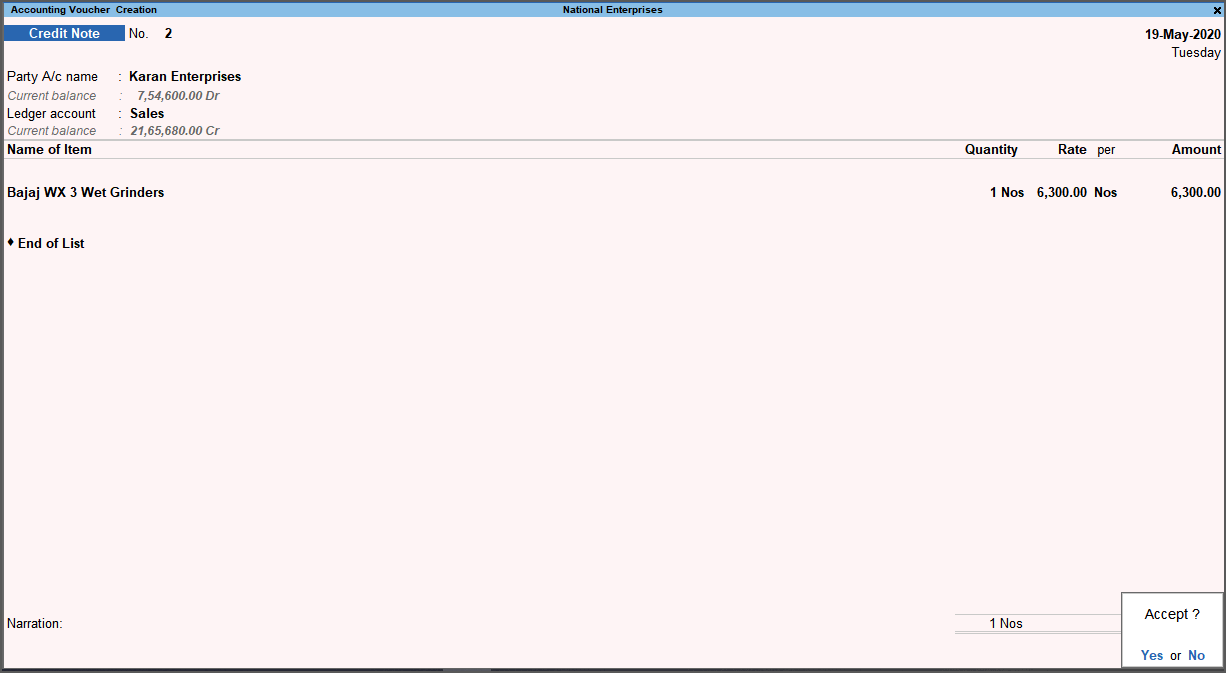
If you are recording the sales returns after receiving the amount, you can select the reference as New Ref while recording the credit note. When you provide the reference of the sales invoice, the credit note will be linked to it. Hence, when you raise a sales invoice on a later date, you can record it against this credit note.
- Open the credit note voucher screen and specify the buyer details.
- Gateway of Tally > Vouchers > press F10 (Other Vouchers) type or select Credit Note > and press Enter.
Alternatively, press Alt+G (Go To) > Create Voucher > F10 (Other Vouchers) > type or select Credit Note. - Press Ctrl+H (Change Mode) and select the invoice mode as per your business needs.
- Party A/c Name: Select the party name.
- Party Details: Provide the Buyer details. You can also provide the Receipt or Order details as per your invoice requirements. You can also enter the Original Invoice No. and Date, against which this sales return is being recorded.
If you do not see the Party Details screen with options for Original Invoice No. and Date, press F12 (Configure), and set Provide Receipt, Order, and Export/Import details to Yes.
- Gateway of Tally > Vouchers > press F10 (Other Vouchers) type or select Credit Note > and press Enter.
- Select the Sales ledger to allocate the stock items.
- Provide the stock item details.
As in other transactions, you can create the item on the fly by pressing Alt+C.- Select the stock item.
- Enter the Quantity. The Rate will be auto-filled, based on the rate entered in the previous transaction. However, you may choose to enter the Rate. The Amount appears automatically.
- Select the bill-wise details.
- Provide Narration, if needed.
What you see on the screen can vary based on your choices. Press F12 (Configure) to change the options and F11 (Features) to enable or disable features. - Accept the credit note screen. As always, you can press Ctrl+A to save.
You can settle this credit note by raising a sales invoice or payment voucher for the customer. Click here for details on adjusting bill references.
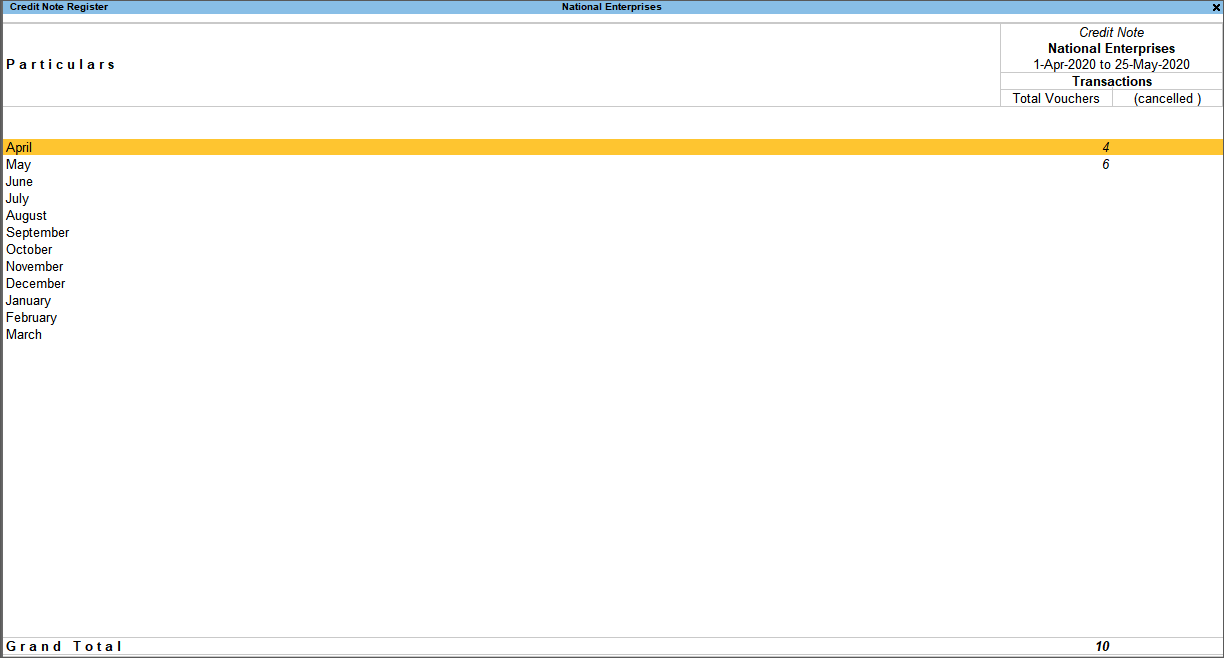
Credit Note Register
You can track the sales returns received from your customers from the Credit Note Register. It displays a monthly break-up of credit notes.
- Press Alt+G (Go To) > type or select Credit Note Register.
Alternatively, Gateway of Tally > Display More Reports > Account Books > Credit Note Register.
- Select the required month and press Enter.
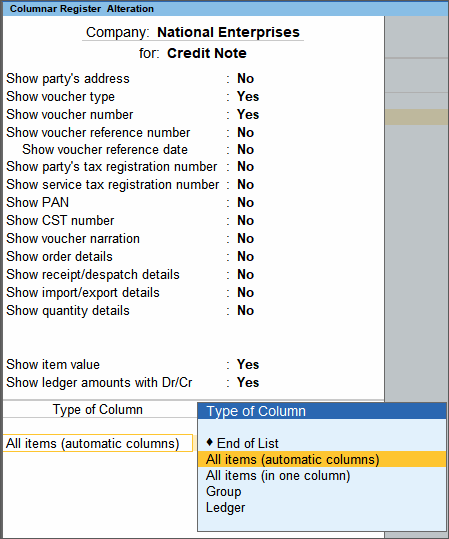
- Press F8 (Columnar) and set the options as required, to view the credit note columnar register.

The columnar Voucher Register of credit notes appears as shown below: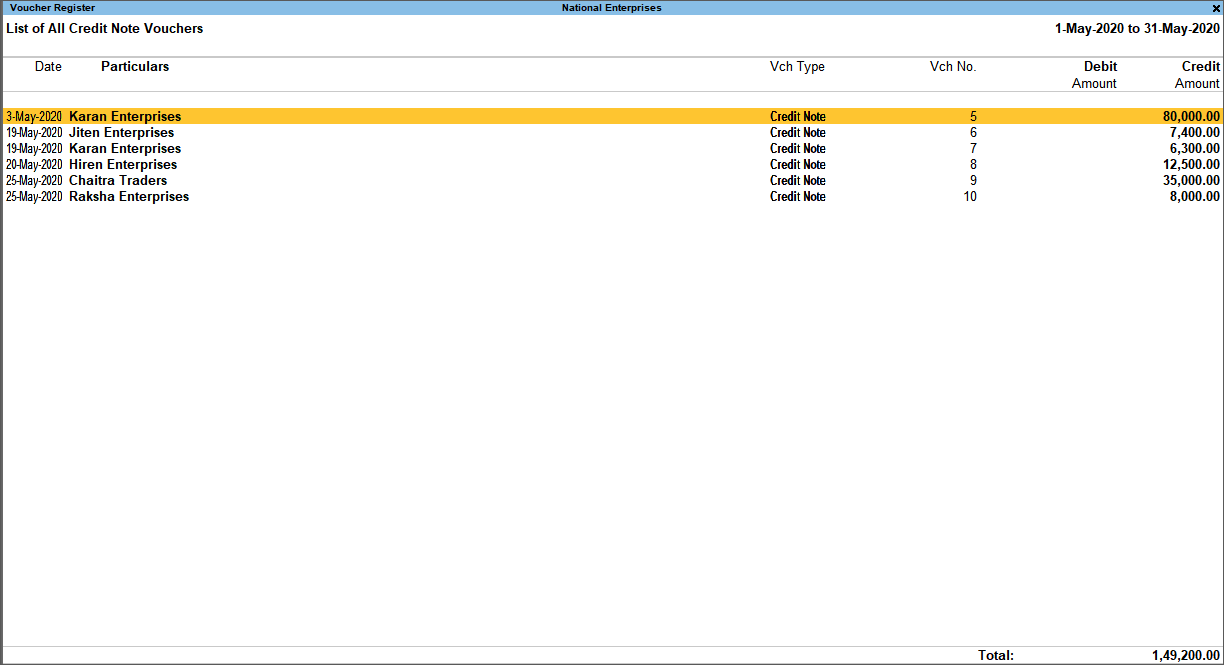
To change the voucher type, press F4 (Voucher Type) in the Voucher Register.
Click here to see the possible F12 configurations for Credit Note Register.
Account for Increase in Sale Value
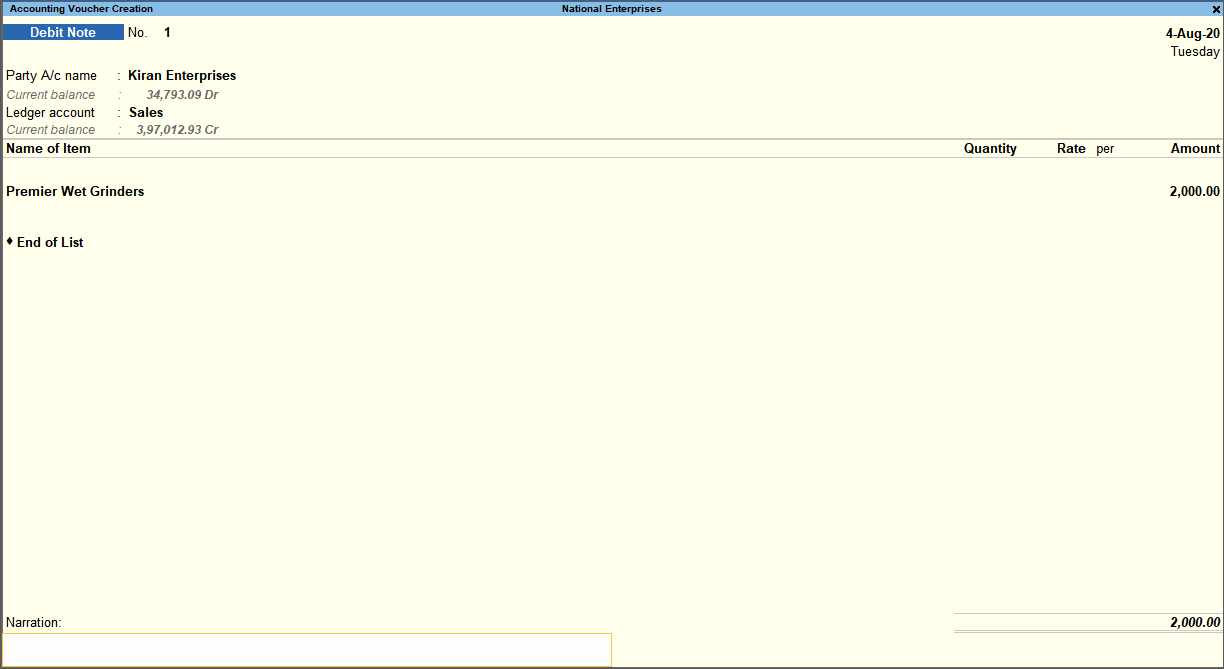
You may want to account for an increase in sale value. For this you can record a transaction in debit note by selecting the sales ledger in invoice mode as well.
- Open the debit note voucher screen and specify the buyer details.
- Gateway of Tally > Vouchers > press F10 (Other Vouchers) > type or select Debit Note > and press Enter.
Alternatively, press Alt+G (Go To) > Create Voucher > press F10 (Other Vouchers) > type or select Debit Note > and press Enter. - Press Ctrl+H (Change Mode) to select the required voucher mode (Item Invoice, in this case).
- Select the Party A/c Name and provide the buyer details. You can also enter the Original Invoice No. and Date, against which this transaction is being recorded.
If you do not see the Party Details screen with options for Original Invoice No. and Date, press F12 (Configure), and set Provide Dispatch, Order, and Export/Import details to Yes.
- Gateway of Tally > Vouchers > press F10 (Other Vouchers) > type or select Debit Note > and press Enter.
- In the Ledger Account field, press Enter on Show More > select the Sales ledger to allocate the stock items.

- Provide the stock item details and enter the amount.
- Select the bill-wise details against which this transaction is being recorded.

What you see on the screen can vary based on your choices. Press F12 (Configure) to change the options and F11 (Features) to enable or disable features. - Accept the screen. As always, you can press Ctrl+A to save.