

Inventory Storage Using Godowns/Locations
In your business, you may be managing the inventory in multiple physical locations, such as shops, warehouses, bins, racks, cabinets, and so on. In this case, you can use the Godowns/Locations capability of TallyPrime. Using Godowns will help you keep a record of inventory moving from one project or manufacturing stage to another. Similarly, you can also track the stock moving in and out of your business premises for consignment sales or job work. You can view stock reports for each Godown and account for the movement of stock between Godowns.
Create & group Godowns: You can create individual Godowns or multiple Godowns in a hierarchy, as in the case of other masters in TallyPrime, such as Ledger Group, Stock Group, Stock Category, and Cost Centre. You can use Godowns/Locations to create a hierarchy for shelves, bins, and even different sections of a warehouse. TallyPrime helps you to see the details of the materials at the top level as well as at each individual level, in a hierarchy of Godowns.
For example, you can simply create Warehouse a, Warehouse B, and Warehouse C, or you can create Southern Region, with Warehouse A and Warehouse B under it, and Eastern Region, with Warehouse C and Warehouse D under it. Then, you can get the total inventory in Southern Region, and the inventory in Warehouse B.
Use multiple Godowns: After creating Godowns, you are prompted to choose one or more Godowns for every movement of inventory. You can put all your stock into a single Godown or use multiple Godowns. For example, you can buy 1000 tons of an item, and split it as 300 tons in Warehouse A, and 700 tons in Warehouse B using the same purchase transaction. This is identical to the way you would allocate Cost Centre details, Order details, and so on.
- Using multiple Godowns will treat your inventory in each Godown as independent lots.
- TallyPrime by default maintains an internal Godown named Main Location.
TallyPrime summarizes details of each location in the Locations/Location Summary report.
Use Godowns/Locations for Inventory Storage
If you are using more than one location, bin, rack, cabinet, and so on, create Godowns/Locations in TallyPrime to track your inventory. Similarly, if you keep inventory in different projects or maintain raw materials and finished goods in separate locations, Godowns/Locations will serve the purpose.
After you have created a Godown/Location, you can allocate inventory to the Godowns of your choice, including the default Godown Main Location.
In this section
- Create Godowns/Locations
- Create multiple Godowns/Locations
- Allocate Stock Items to Godowns/Locations
- Alter, Delete, and Display Godowns/Locations
Create Godowns/Locations
To start allocating your stock items in Godowns, you need to create a Godown first.
- Gateway of Tally > Create > select Godowns > press Enter.
Alternatively, Alt+G (Go To) > Create Master > type or select Godowns > press Enter.
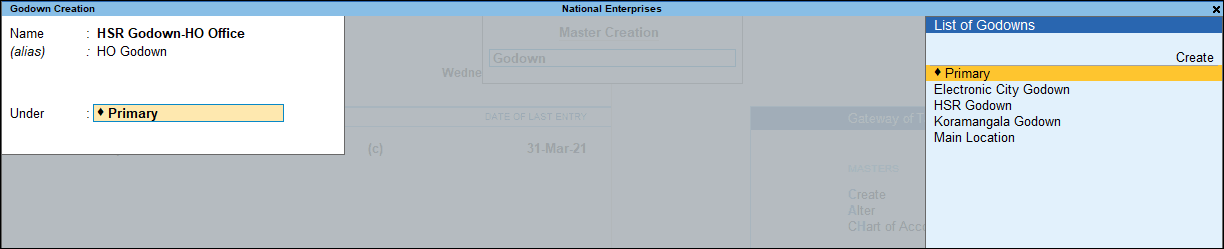
When you create a Godown/Location in Tally Prime for the first time, you are prompted to alter the existing internal Godown (Main Location), where all your inventory is stored by default. - Name & alias: As in other masters, you can specify multiple aliases for the Godown name.
- Under: Select Primary or Main Location.

What you see on the screen can vary based on your choices. Press F12 (Configure) to change the options.
Note: As in the case of other ledgers and groups, Primary is the root under which you can create a Godown. By default, Main Location is available under Primary. When you create a Godown, selecting Primary creates the Godown at the same level as that of Main Location. If you select Main Location, it becomes the parent Godown for the new Godown.
Click to see the
F12 configurations for Godowns.
5. Accept the screen. As always, you can press Ctrl + A to save.
You can create Godowns on the fly or move back and forth when creating Godowns. See more…
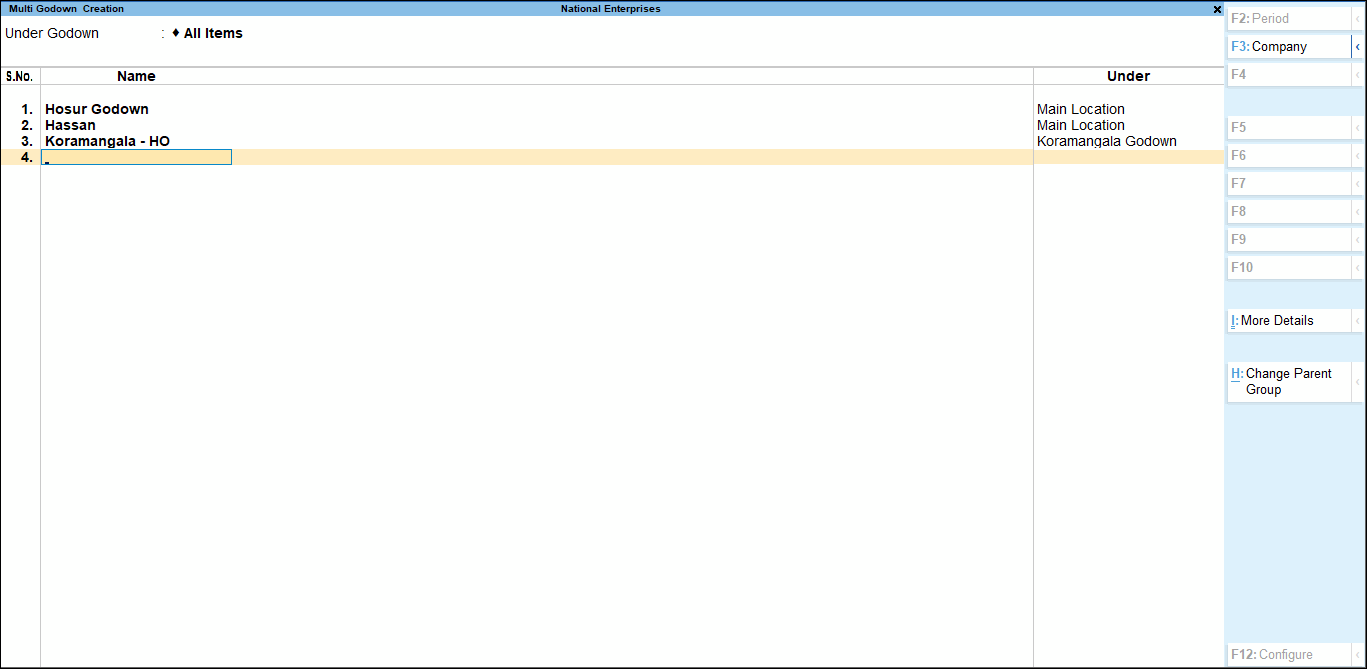
Create Multiple Godowns/Locations
If you have stored your inventory in more than one location, in TallyPrime you can choose to create Godowns one by one, or create multiple Godowns from a single screen. You can choose the parent Godown from the same screen when creating multiple Godowns.
- Gateway of Tally > Create > type or select Chart of Accounts.
- In the Chart of Accounts screen, press Alt+H (Multi-Masters) > and select Multi Create.
- Under Godown:
- If you select Under Godown > All Items, you will be prompted to select the parent Godown for each Godown name that you specify under the Name column.
- If you select any other Godown, say Under Godown > Main Location, this Godown is treated the parent Godown for all the Godowns you create. However, you can change the hierarchy anytime later to suit your business preferences.
A sample Multi Godown Creation screen is shown below:
What you see on the screen can vary based on your choices. Press F12 (Configure) to change the options.
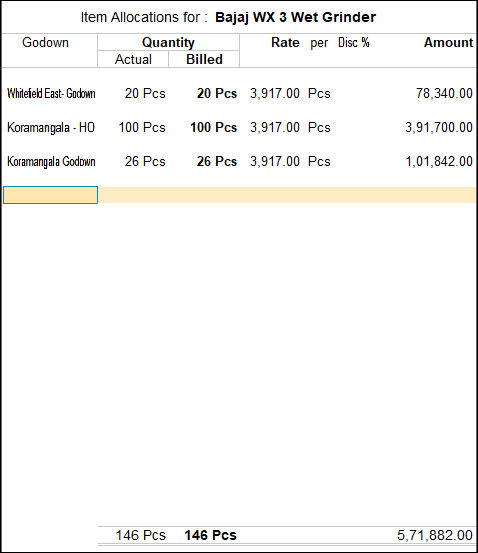
Allocate Stock Items to Godowns/Locations
- Once you have created the required locations, you can allocate your stock items to one or more locations.
- Open the Stock Item Allocation screen.
- To allocate the opening balance of your stock, in the Stock Item Alteration screen, select Opening Balance and press Enter.
- To allocate stock items during voucher entry, in the Voucher Creation screen, select the stock item and press Enter.
- A sample Stock Item Allocation screen is as shown.

- What you see on the screen can vary based on your choices. Press F12 (Configure) to change the options and F11 (Features) to enable or disable features.
- In the Stock Item Allocation screen, provide the Quantity if UoM is defined for the item; otherwise, provide the Amount.The quantities and amount entered in the allocations screen are consolidated and displayed in the voucher. The Opening Balance Quantity or Value specified in the stock item must be completely allocated among the selected locations.
Alter, Display, and Delete Godowns/Locations
Like other masters, you can Alter, Display, or Delete locations.
For more information, click here.
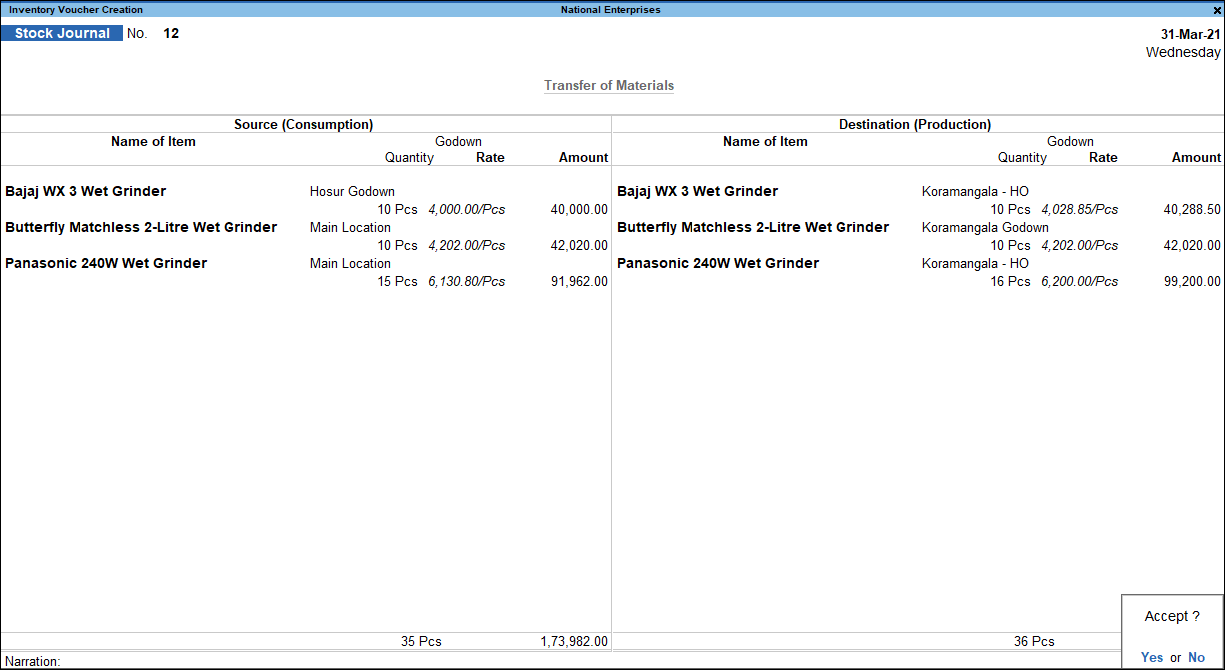
Transfer Inventory between Godowns/Locations
You can move your stock from one Godown/Location to another using Stock Journals. In case you are into manufacturing or job work, TallyPrime provides the flexibility to use specific voucher entry modes of Stock Journal to record transfer of materials between Godowns.
- Gateway of Tally > Vouchers > Alt+F7 (Stock Journal).
- Alternatively, Alt+G (Go To) > Create Voucher > Press Alt+F7 (Stock Journal).
- Under Source (Consumption), specify details of the stock items that you want to transfer.
- Select the stock item and the location from where you want to transfer.
- Specify the Quantity here. Rate and Amount are auto-filled from the stock item. You can alter these values, as needed.
If you have not specified the Opening Balance (Quantity, Rate, and Amount) in the item master, you can enter only the Amount here. - Under Destination (Production), specify details of the stock items.

- Select the stock item and the destination location. For inter-location transfers, select the same stock item as in the Source.
As always, you can create stock items and location on the fly by pressing Alt+C. - Provide Quantity, Rate, or Amount, as needed.
What you see on the screen can vary based on your choices. Press F12 (Configure) to change the options and F11 (Features) to enable or disable features.
Note: You can also select a different stock item as finished goods in case the source stock item is changing form, especially in case of manufacturing. For more information, refer to Manufacturing Journal Voucher.
- Accept the voucher. As always, you can press Ctrl+A to save.
You can configure printing of the stock journal to get the location names and addresses in the voucher when printed. As in all other vouchers, press Alt+P > F12 (Configure) to explore other print configurations.
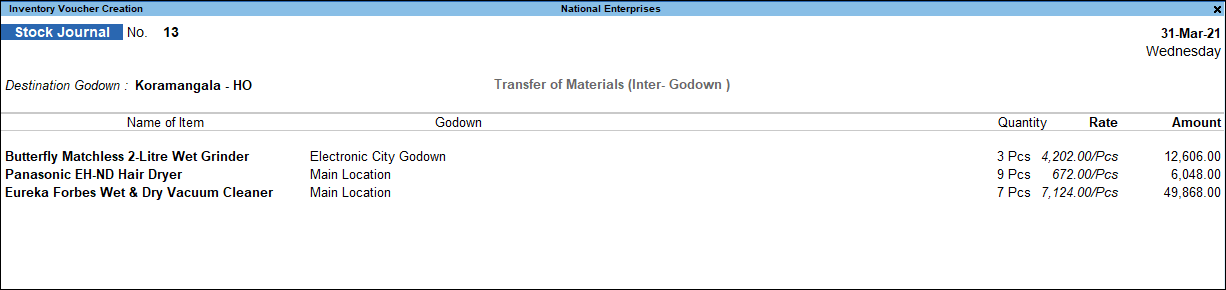
Set up destination Godown: In case you are transferring stock items from one or more locations to a single destination location, you can pre-set the destination Godown by press Ctrl+H (Change Mode):
- In the Stock Journal screen, press Ctrl+H (Change Mode).
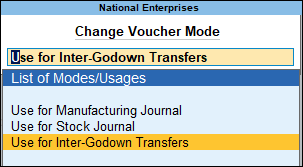
- Set the option Use for Inter-Godown Transfers to Yes.
What you see on the screen can vary based on your choices. Press F12 (Configure) to change the options and F11 (Features) to enable or disable features.
You can print the stock journal voucher with the destination location name appearing on the top of the printed voucher. See Transfer Journal Voucher for more information. As in all other vouchers, press Ctrl + P > Press F12 (Configure) to see other print configurations.
Create Hierarchy of Godowns/Locations for Area-wise Inventory Storage
You can create multiple locations in a hierarchy, to get a consolidated view of your inventory in different regions, zones, warehouses, cabinets, bins, and so on.
To create a hierarchy as shown in the image below: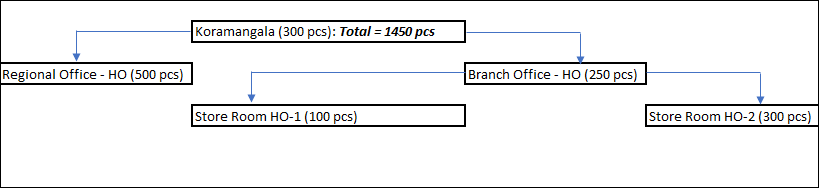
- Create the location Koramangala. When creating locations Regional Office – HO and Branch Office – HO, in the field Under, select Koramangala.
- Similarly, when creating Store Room HO-1 and Store Room HO-2, select Branch Office – HO.
As per this hierarchy, in the corresponding reports: - Branch Office – HO will show 500 pcs – the total stock available in Branch Office – HO, Store Room HO1, and Store Room HO-2.
- Koramangala will show 1450 pcs – the total stock in Koramangala and all other Godowns under it.
In case you want Koramangala to not store any stock:
- Press Alt+G (Go To) > Alter Master > type or select the Godown name > press Enter.
- Set Allow storage of materials to No. With this, Southern Region will not be shown for Item Allocation.
Print Godown/Location Address in Invoices
In case of a sale, stock transfer, or manufacturing, the transporter needs to know the address of Godowns where the materials need to be picked from and/or delivered to. If you have provided the address of the Godowns/Locations, you can print the source and destination Godown addresses in the invoices. This helps in referring to the addresses in the invoice during stock transfers.
- Open the voucher > press Ctrl+P > press C (Configure) to see print configurations.
- Set the Show Godown name and Show Godown address options to Yes.
- Save the configurations and print. As always, you can use Ctrl + A to save.
These configurations will be saved for the selected voucher type and the address will be printed on the vouchers.
Note: In case you do not see the Godown address in the voucher, you need to enter the address in the Godown/Location. Refer to the F12 configurations for Godowns.
A sample of printed Sales Invoice with the Godown address is shown below: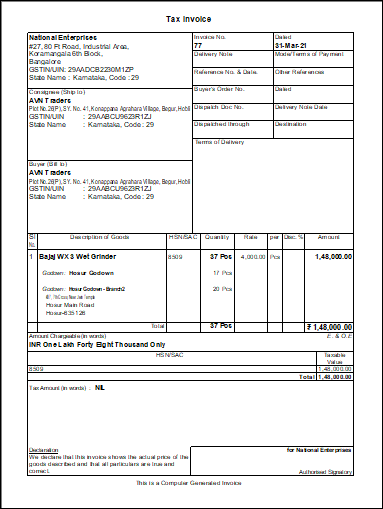
What you see on the screen can vary based on your choices. Press F12 (Configure) to change the options.