

Payment and receipt vouchers are used to account for all the payments and receipts of the company by
way of cash/bank. The transactions can be recorded using single entry or double entry mode, by setting the option.
Record a Payment Voucher
Payment voucher is used to record cash and bank payments. You can record a payment voucher using Single Entry or Double Entry mode.
In this section
- Single entry mode – Cash payment
- Single entry mode – Bank payments
- Double-entry mode – payments
- Provide narration for each ledger in the payment voucher
Single entry mode – Cash payment
- Gateway of Tally > Vouchers > F5 (Payment).
Alternatively, Alt+G (Go To) > Create Voucher > pressF5 (Payment). - Press Ctrl+H (Change Voucher Mode): to select the Single Entry mode.
- Select the Cash ledger in the Account field.
- Under Particulars, select the party or expense ledgers, and enter the corresponding amounts.

6. Accept the screen. As always, you can press Ctrl+A to save the voucher.
Contra entry in Payment voucher
If you need to pass a contra entry using the Payment voucher, you can select the Cash ledger under Particulars.
In the Payment voucher:
- Select Cash as Account.
- Under Particulars, select Show More > select Cash under List of Ledger Accounts.
Note: Cash ledger does not appear for selection by default under List of Ledger Accounts. You need to either select Show More or start typing Cash to see the ledger option.
Single entry mode – Bank payments
- Gateway of Tally >Vouchers > press F5 (Payment).
Alternatively, Alt+G (Go To) >Create Voucher > pressF5 (Payment).- Press Ctrl+H (Change Voucher Mode): to select the Single Entry mode.
- Press F12 (Configure), under Bank Details, set the option Set Ledger-Wise Bank Allocations during Voucher creation to Yes, to view the bank details defined in the party ledgers while paying two or more parties in one payment voucher.
- Select the bank ledger in the Account field.
- Under Particulars, select the party ledgers, and enter the corresponding amounts.
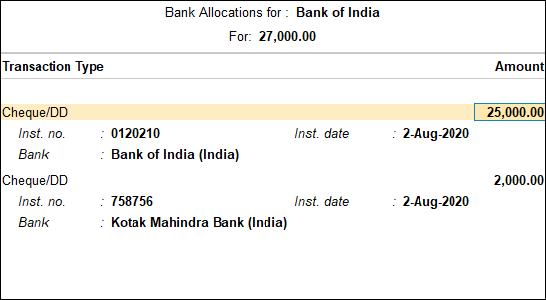
- In the Bank Allocations screen, some of the details appear as defined in the Bank Details screen of the party ledger.
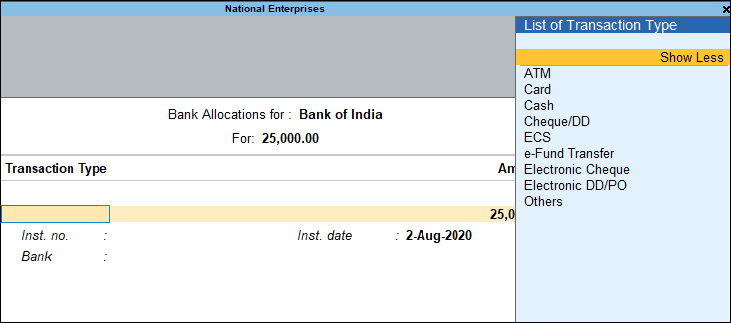
- Select the Transaction Type. If you do not find the required Transaction Type, select Show More in the List of Transactions.
- Navigate to the voucher total field and press enter, to view the Bank Allocations screen. Select the required Transaction Type and enter the Amount for each.
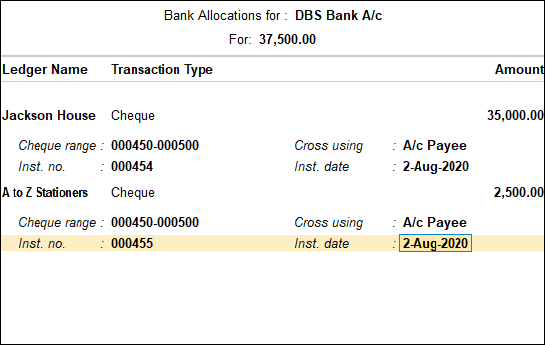
- The fields will appear based on the Transaction Type, and the options enabled using the F12 (Configure) button in Bank Allocations screen.
- Accept the screen. As always, you can press Ctrl+A to save the payment voucher.
Similarly, you can record the transactions in single entry mode for Receipt and Contra vouchers.
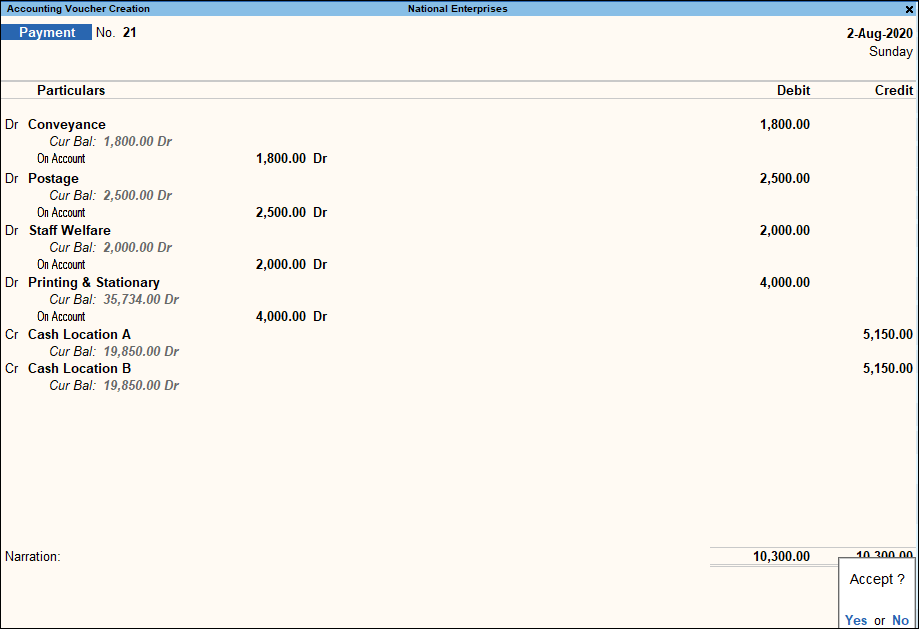
Double entry mode – Payments
When you need to credit more than cash ledger, you can record the payment in double entry mode.
- Gateway of Tally > Vouchers > F5 (Payment).
Alternatively, Alt+G (Go To) > Create Voucher > press F5 (Payment). - Press Ctrl+H (Change Voucher Mode): to select the Double Entry mode.
- Debit the expense or party ledgers and enter the corresponding amounts.
- Credit the cash ledgers, and enter the corresponding amounts.

- Accept the screen. As always, you can press Ctrl+A to save the voucher.
Similarly, you can record the transactions in double entry mode for Receipt and Contra vouchers.
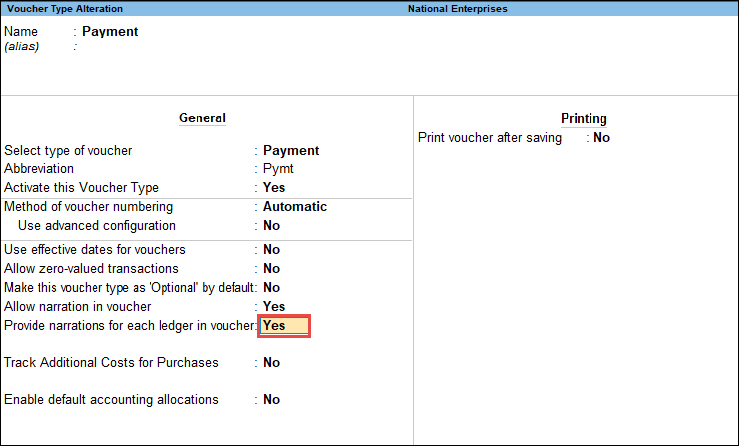
Provide narration for each ledger in Payment voucher
You can enter the narration for each ledger you debit or credit in payment voucher.
- Gateway of Tally > Alter >Voucher Types> type or select Payment >and press Enter.Alternatively, press Alt+G (Go To) > Alter > Voucher Types >type or select Payment >and press Enter.
- Set the option Provide narration for each ledger in voucher to Yes. This option is available for all the accounting voucher types.

- Accept the screen. As always, you can press Ctrl+A to save.
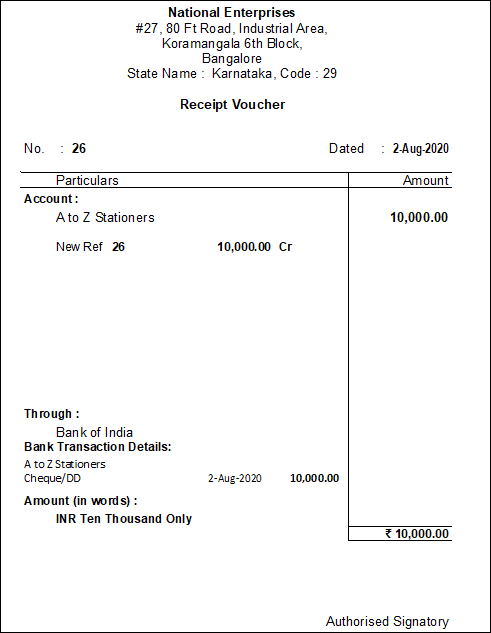
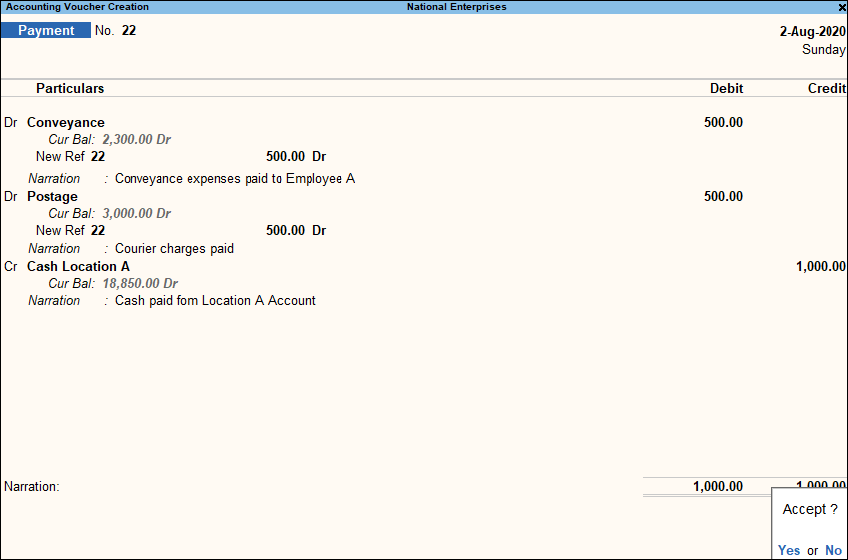
Record Payment Voucher
- Gateway of Tally >Vouchers > press F5 (Payment).
Alternatively, press Alt+G (Go To) >Create Voucher > press F5 (Payment). - Select the Ledgers. The Narration field appears for each ledger.
- Enter the required Narration and the amount for each ledger.

The above voucher has common narration and narrations for each ledger.You can enter single line narration for every ledger, and a common narration for the voucher. - Accept the screen. As always, you can press Ctrl+A to save the voucher.
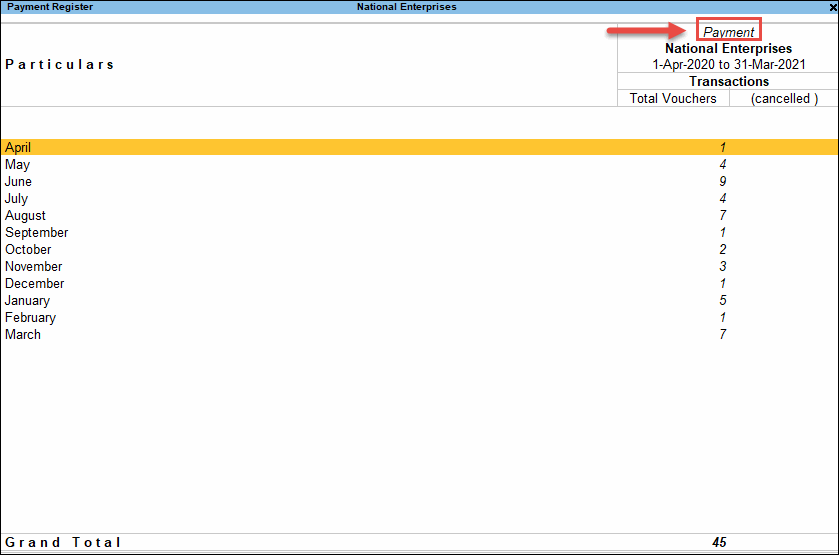
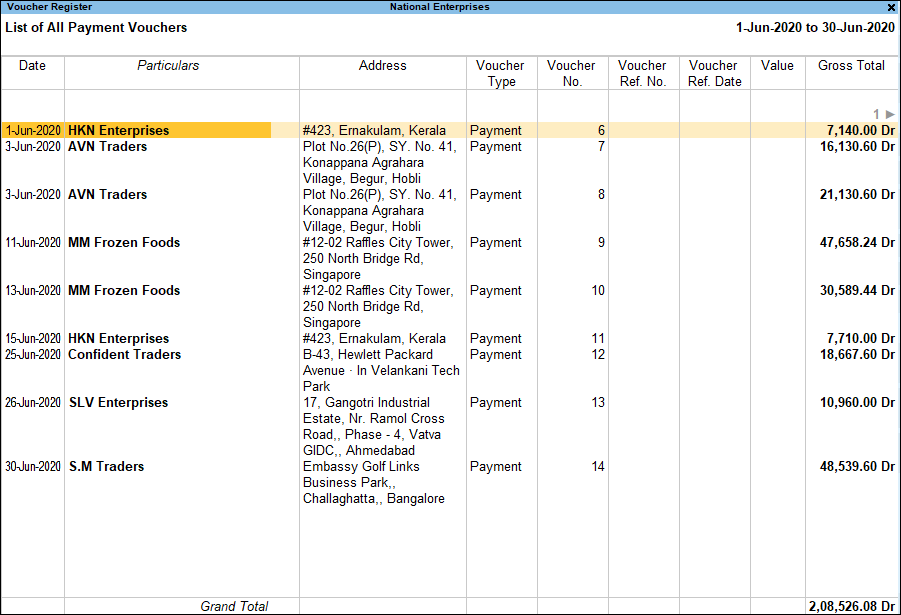
Payment Register
Payment register displays all the payment vouchers recorded for each month.
- Gateway of Tally > Display More Reports > Account Books > Payment Register.
Alternatively, Alt+G (Go To) > type or select Payment Register >and press Enter. - Press F4 (Voucher Type) select required Voucher Type and press Enter.

- Select the required month and press Enter.
- Press F8 (Columnar) and set the options as required, to view the payment columnar register.
The columnar Voucher Register of payment vouchers
appears as shown:
To change the voucher type, press F4 (Voucher Type) at the voucher register screen and select the required voucher type.
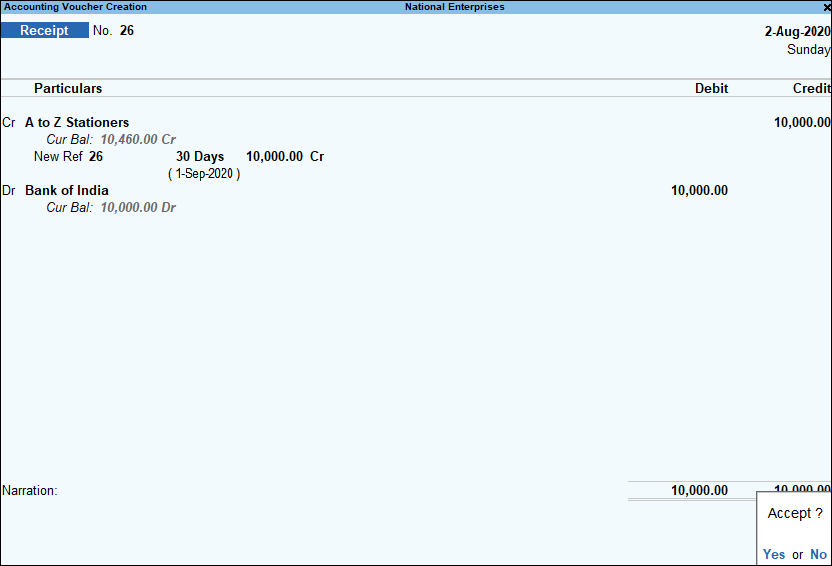
Record a Receipt Voucher
Receipt voucher is used to record cash and bank receipts. You can record a receipt voucher using Single
Entry or Double Entry mode.
In this section
- Single entry mode – Bank receipts
- Double-entry mode – receipts
Single entry mode – Bank receipts
- Gateway of Tally > Vouchers > press F6 (Receipt).
Alternatively, press Alt+G (Go To) >Create Voucher > press F6 (Receipt).- Press Ctrl+H (Change Voucher Mode): to select the Single Entry mode.
- Press F12 (Configure), under Bank Details set the option Set Ledger-Wise Bank Allocations during Voucher creation to Yes,to view the bank details defined in the party ledgers while paying two or more parties n one payment voucher.
- Select the bank ledger in the Account field.
- Under Particulars, select the party ledgers, and enter the corresponding amounts.
- In the Bank Allocations screen, some of the details appear as defined in the Bank Details screen of the party ledger.
- Select the Transaction Type. If you do not find the required Transaction Type, select Show More in the List of Transactions.
- Navigate to the voucher total field and press Enter, to view the Bank Allocations screen. Select the required Transaction Type and enter the Amount for each.
The fields will appear based on the Transaction Type and the options enabled using the F12 (Configure) button in Bank Allocations screen. - Accept the screen. As always, you can press Ctrl+A to save the Voucher.
Similarly, you can record the transactions in single entry mode for Payment and Contra vouchers.
Double entry mode – Receipts
When you need to debit more than cash ledger, or you want to use the debit-credit options, you can record the receipt voucher in double entry mode.
- Gateway of Tally > Vouchers >pressF6 (Receipt).
Alternatively, Alt+G (Go To) > Create Voucher > press F6 (Receipt). - Press Ctrl+H (Change Voucher Mode): to select the Double Entry mode.
- Credit the expense or party ledgers and enter the corresponding amounts.
- Credit the cash ledgers, and enter the corresponding amounts.

- Accept the screen. As always, you can press Ctrl+A to save.
Similarly, you can record the transactions in double entry mode for Payment and Contra vouchers.
Print Receipt Immediately After Saving the Voucher
- Gateway of Tally > Alter >Voucher Types> type or select Receipt and press Enter.
Alternatively, Alt+G (Go To) > Alter > Voucher Types > type or select Receipt and press Enter. - Set the option Print voucher after saving to Yes.
- Accept the screen. As always, you can press Ctrl+A to save.
- Record a receipt voucher and accept the screen.
The Voucher Printing screen appears. Press Enter to print.
If you want to print the bank details in the receipt voucher:- Open the receipt voucher and press Ctrl+P.
- In the Voucher Printing screen, and press C (Configure). The Print configurations screen appears.
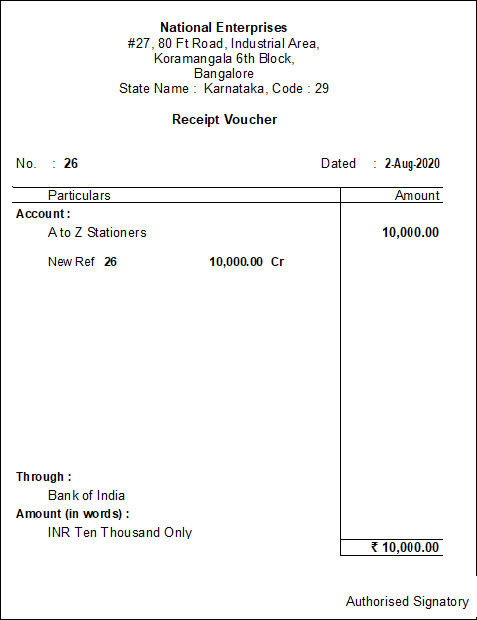
Print Receipt Voucher as a Formal Receipt
You can issue a formal receipt to your customers on receiving the payment against a particular invoice.
- Gateway of Tally > Alter >Voucher Types> type or select Receipt and press Enter.
Alternatively, Alt+G (Go To) > Alter > Voucher Types > type or select Receipt and press Enter. - Set the option Print Formal Receipt after saving to Yes.
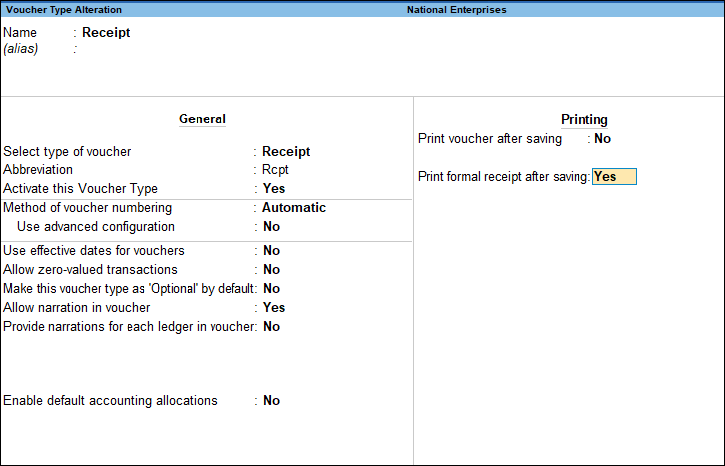
- Accept the screen. As always, you can press Ctrl+A to save.
Record Receipt Voucher
- Gateway of Tally >Vouchers > press F6 (Receipt).
Alternatively, press Alt+G (Go To) > Create Voucher > press F6 (Receipt). - Record a receipt voucher and accept the screen.
The Voucher Printing screen appears with the Report Title as Receipt Voucher.
If you press Enter, the receipt voucher required for company’s books will get printed. - Press Esc to view the Report Title as Receipt.
- If you want to change the report title:
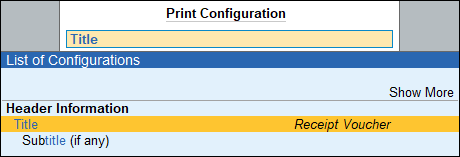
- In the Voucher Printing screen, and press C (Configure). The Print configurations screen appears.
- Type or select Title > change the Title and Sub-title as needed, under Header information. For example, Formal Receipt.
- If you want to change the report title:
- Press Enter to accept the Control on Report Titles screen.
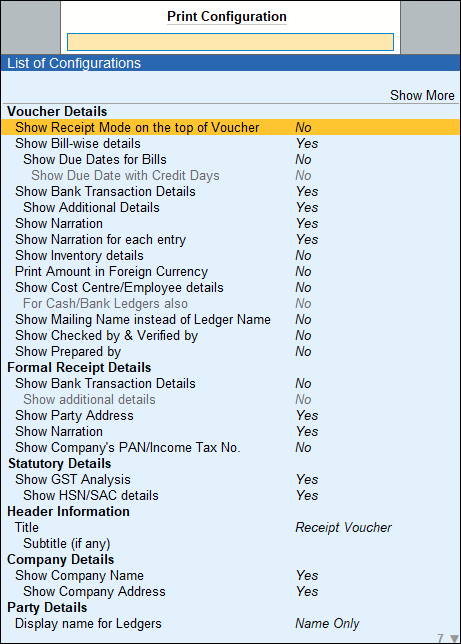
- If you want to print specific details in the formal receipt, press F12 (Configure).
- After setting the options as needed, press Ctrl+A to accept the Printing Configuration screen.
- Press Enter to print the voucher as a format receipt.
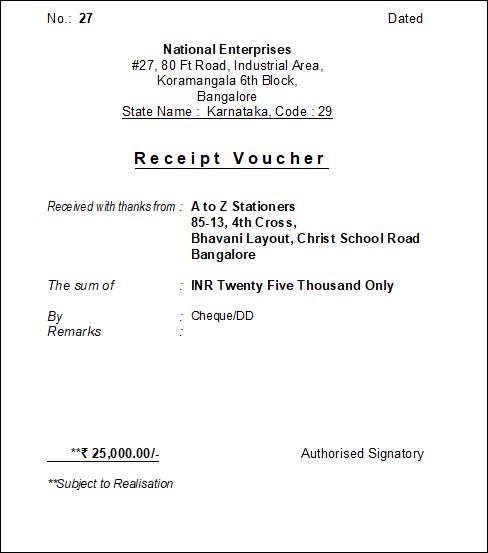
- You can issue this as a formal receipt to your customers.
Note: When a bank ledger is used in a receipt voucher (cheques received, bank transfer and so on), the bank name will appear on the formal receipt in the ‘By’ field.
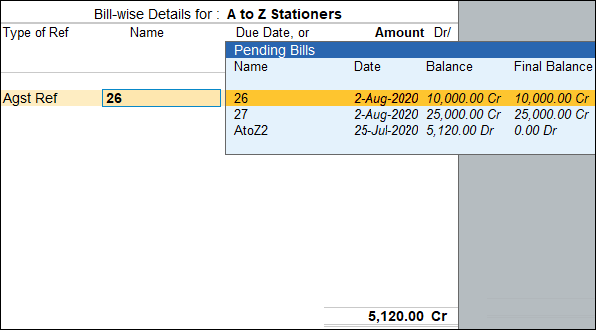
Pre-allocate Bills for Payments or Receipts
In payment, receipt and journal vouchers, you can select the bills against which the transaction is being recorded, even before entering the amount.
- In payment or receipt voucher, press F12 (Configure).
- Set the option Pre-allocate bills for payment/receipt/journal voucher to Yes, to select the bills immediately after selecting the party ledger.
- Set the options Show table of bills for selection and Show final balances of bills to Yes, to view the list of pending bills with Balance and Final Balance amounts.

- On selecting Agst Ref, the List of Pending Bills for the party appears.
- Select the required bills and record the voucher.
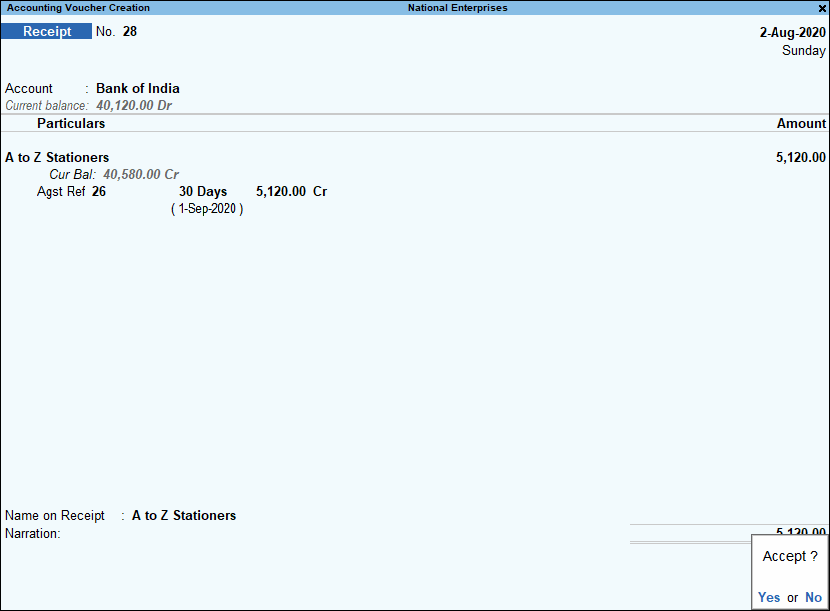
- Accept the screen. As always, you can press Ctrl+A to save.
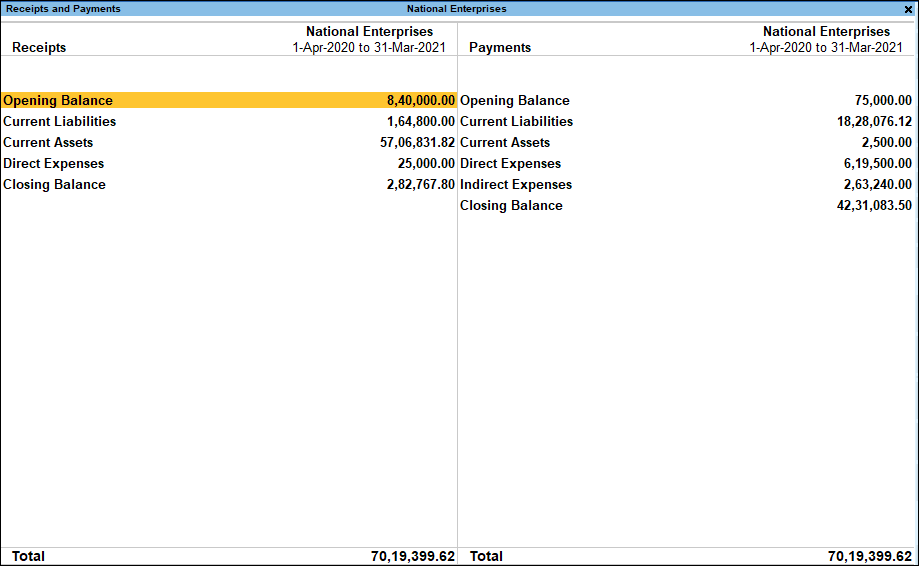
Receipts and Payments Report
Receipts and Payments Account is a report of cash and bank transactions recorded in a specific period. It is used in place of an income and expenditure statement.
- It is a consolidated summary of cash book, prepared for the required period.
- It starts with opening balance of cash and bank, and ends with closing balance of cash
and bank. - It does not take into account outstanding receivables and payables.
- It may be of capital or revenue nature, and relating to the current, previous or subsequent
year, so long as they are actually received or paid.
The Receipts and Payments account displays the information based on default primary
groups. It is updated with every cash or bank transaction or voucher entry.
In this section
- View Receipts and Payments report
- Configure Receipts and Payments report
View Receipts and Payments Report
You can view the Receipts and Payments report for a specified period.Gateway of Tally >(Need to check this)
Alternatively, press Alt+G (Go To) > type or select Receipts and Payments >and press Enter.
The receipts and payments account is generated and updated from the date of opening of books, until the date of the last voucher entry.
Press F2 (Period) to change the period, as needed.
Select the required group and press Enter to view the Receipts and Payments Summary reports. You can further drill down to the Ledger Monthly Summary, ledger vouchers, and finally to the voucher alteration screen.
Note: The Receipts and Payments report appears as per the options set in the F12 Configuration screen.
The Receipts and Payments report, by default, is in a horizontal format. However, you can configure it to view in Vertical format by configuring it using the F12 button. You can view the additional information or toggle to another report using the options available in the Button Bar. Some of the button bar options are:
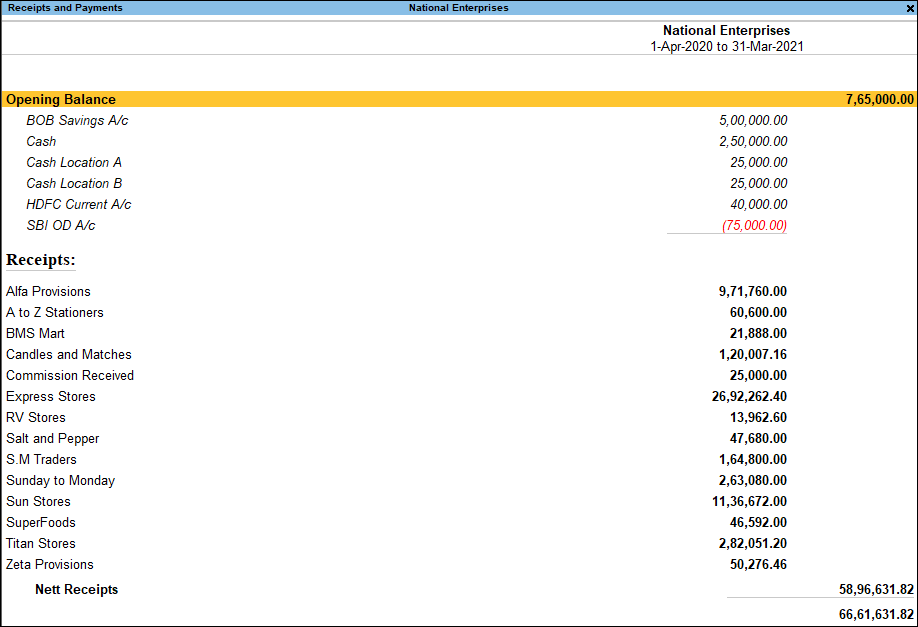
Press Alt+F5 (Detailed): to view the Receipts & Payments account in a detailed format, as shown below: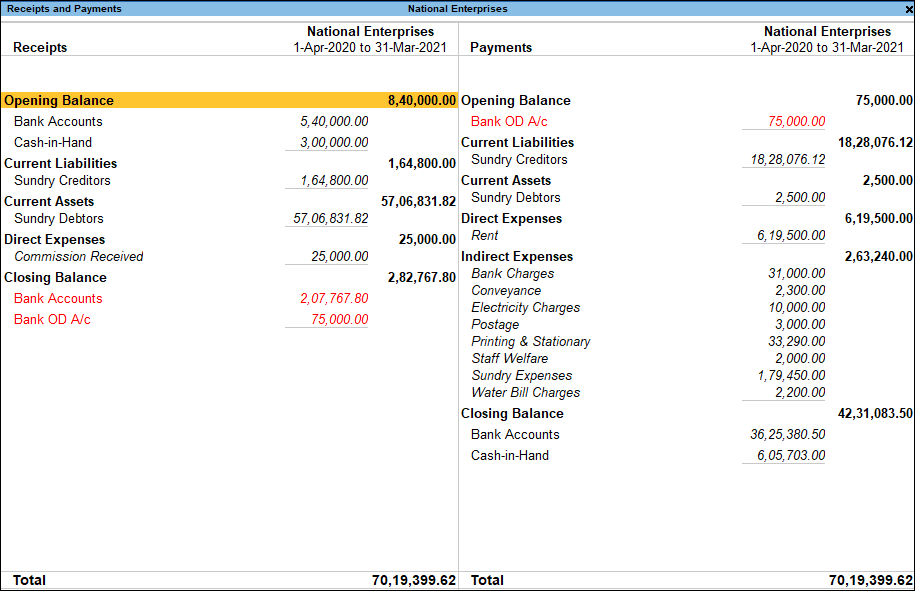
Note: This button toggles between Detailed and Condensed view.
The cash/bank balances under Opening/Closing Balance displayed in Red indicate the negative/credit balances.
Press F2 (Period): Change the date of the Receipts and Payments report.
Press F3 (Company): Select a company from the list to view the Receipts and Payments report of the selected company.
Note: This button will be active only when more than one company is loaded.
Press F5 (Ledger-wise): The receipt and Payments report appears based on the default primary groups.
You can view the report ledger-wise using this option.
Note: This button toggles between Ledger-wise / Grouped.
Press Alt+C (New Column): Select this button for the following:
Display the Receipts and Payments report for a different period, for comparison with the current one.
Display the Receipts and Payments report in a different currency.
Select and compare the reports Receipts and Payments report of different companies.
Configure Receipts and Payments report
You can configure the options for displaying the Receipt and Payments report in the required format.
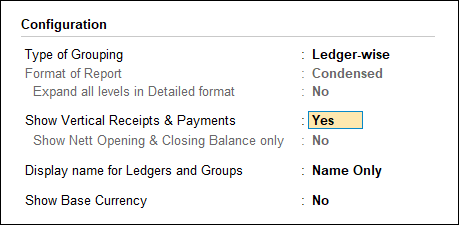
- Press F12 (Configure).

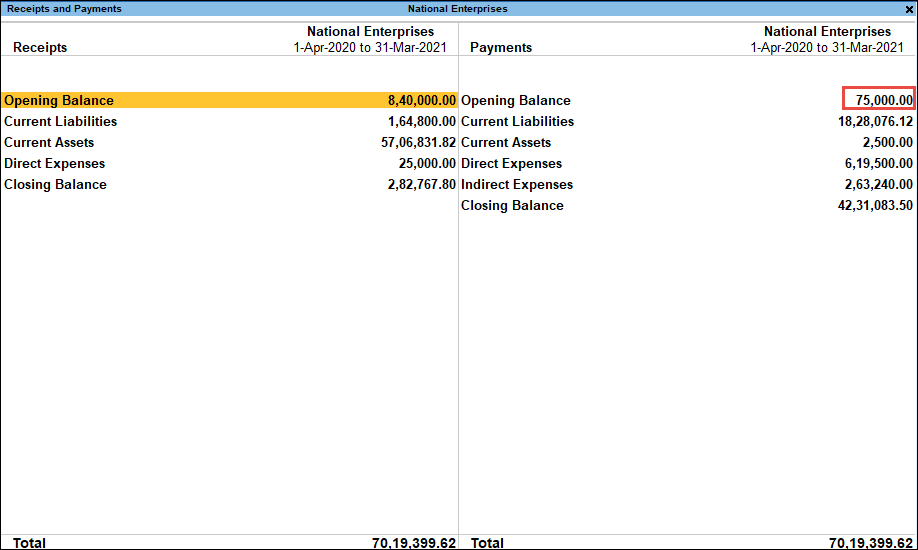
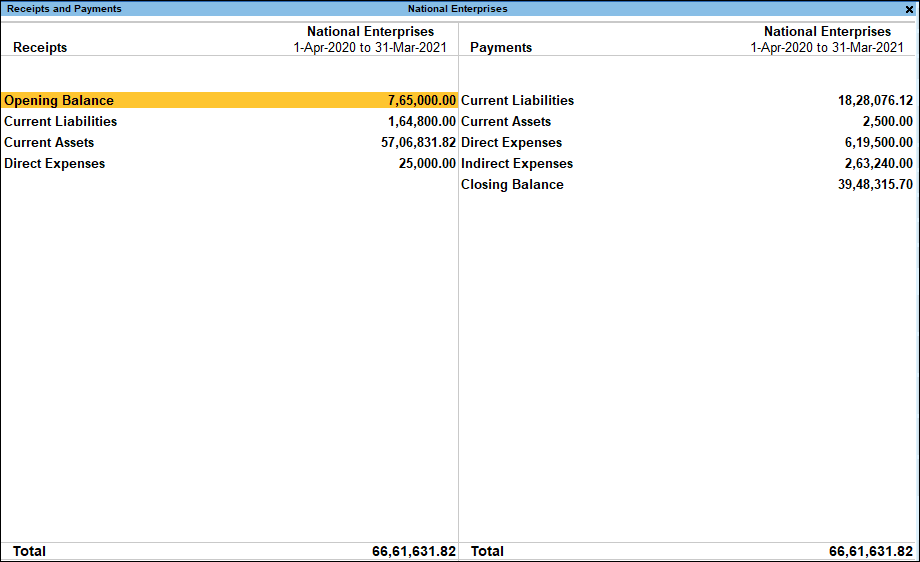
- Set the option Show Vertical Receipts & Payments to Yes, to display the Receipts and Payments report in the vertical format, as shown below:

This vertical format shows the receipts and the payments separately. - Set the option Show Nett Opening & Closing Balance only to No, to display the opening and closing balances of cash/bank accounts on both sides (default), depending upon the credit and debit balances.

Note: This option can be set only for horizontal Receipts and Payments reports. - Set the option Show Nett balance for Ledgers to Yes, to display the net balance for ledgers, as shown below:

- Select the required display style with the option Appearance of Names from the list to view the statement based on the selection made. The default Display Name Style set is Name.
- Select the required scale factor with the option Scale Factor for Values to view the report with different scale factors.
- Set the option Expand All Levels in Detailed Format? to Yes to view the report with sub-groups expanded.
Receipts and Payments Summary Report(Need to check this topic)
This report displays the summary of groups or sub-groups of the selected primary group from the Receipts and Payment report.
In this section
- Cash/Bank Opening/Closing Summary
- Receipts & Payments Summary
- Receipts and Payments Ledger Monthly Summary
Cash/Bank Opening/Closing Summary
- Gateway of Tally >(Need to check this)
Alternatively, press Alt+G (Go To) > type or select Receipts and Payments Summary > and press Enter. - Select the opening or closing balance (for example, select Opening Balance). The Cash/Bank Opening Summary screen appears as shown below:
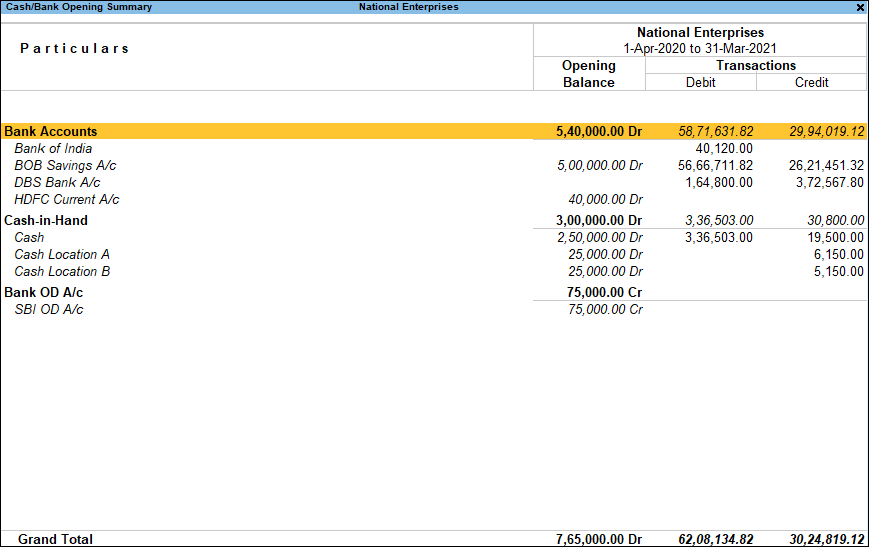
Note: By default, the Opening and Closing Balance displays the detailed report. - Press F2 (Period): to change the period as required.
- Press F5 (Ledger-wise/Grouped): to view the report ledger-wise or grouped.
- Press F12 (Configure): to set the options as needed.
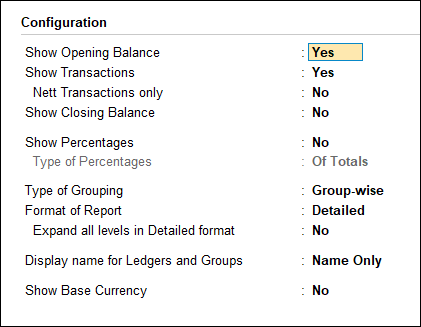
Note: By default, the options Show Opening Balances and Show Closing Balances are set to Yes.
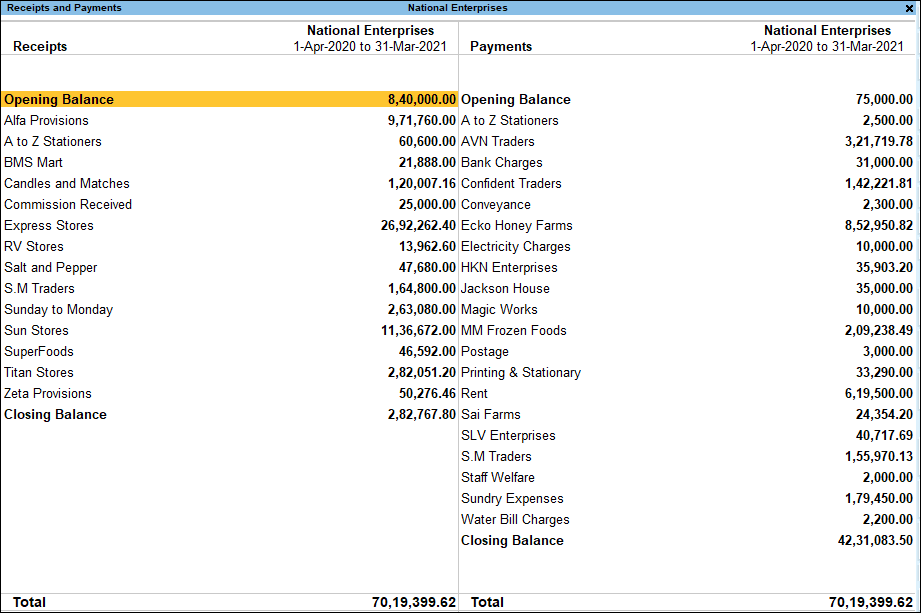
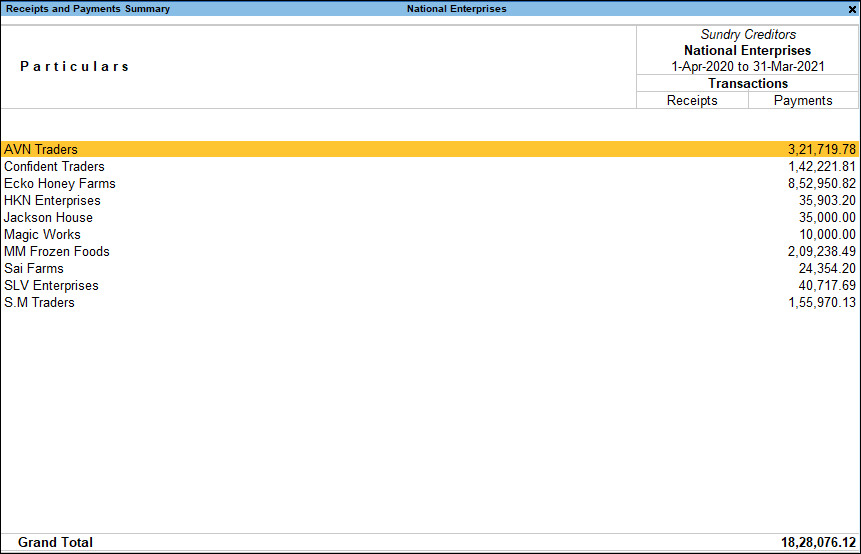
Receipts and Payments Summary
- Select the required primary group from the Receipts and Payments report (for example, Current Liabilities). The Receipts and Payment Summary screen of the selected group appears as shown below:

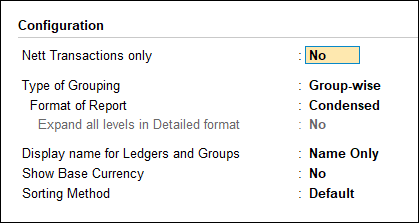
This report displays all the receipt and payment transactions of the groups/sub-groups and ledgers of the selected primary groups for the selected period. - Press Alt+F5 (Detailed/Condensed): to view the reports in detailed/condensed mode.
- Press F2 (Period): to change the period as required.
- Press F4 (Group): to view the summary of the required group.
- Press F5 (Ledger-wise/Grouped): to view the report ledger-wise or grouped.
- Press F8 (Vouchers): to view the voucher list of the selected group.
- Press F12 (Configure): to set the options as needed.

You can further select the required group/sub-group or ledger and drill down to view the Ledger Monthly Summary.
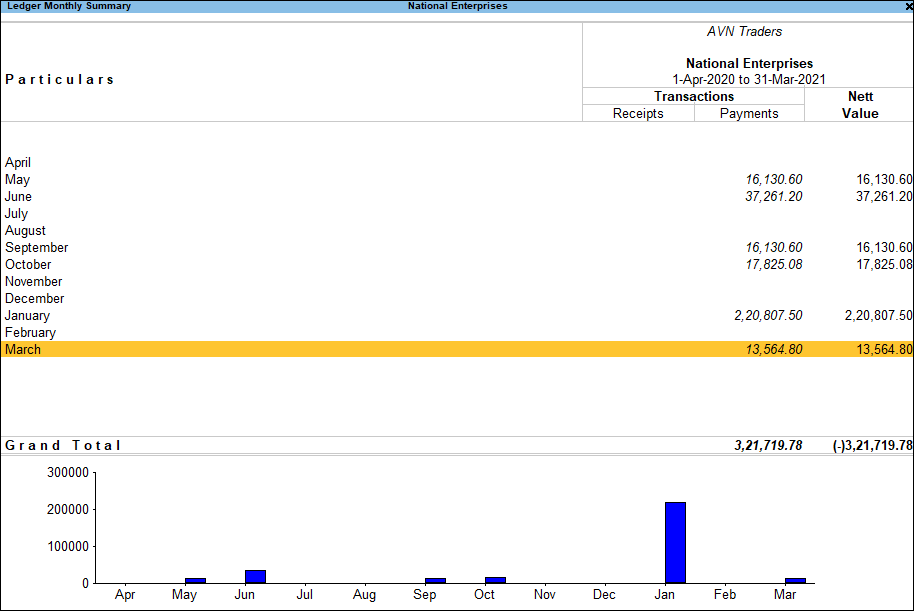
Receipts and Payments Ledger Monthly Summary
- Select the required ledger from the Receipts and Payment Summary report. The Ledger Monthly Summary screen of the selected ledger appears as shown below:

This report displays all the monthly summary of receipt and payment transactions for the selected ledger. - Press F2 (Period): to change the period as required.
- Press F4 (Ledger): to view the summary ledger monthly summary of the required ledger.
- Press F5 (Quarterly/Monthly): to view the quarterly/monthly ledger summary of the selected ledger.
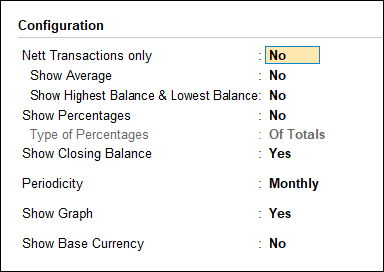
- Press F12 (Configure): to set the options as needed.

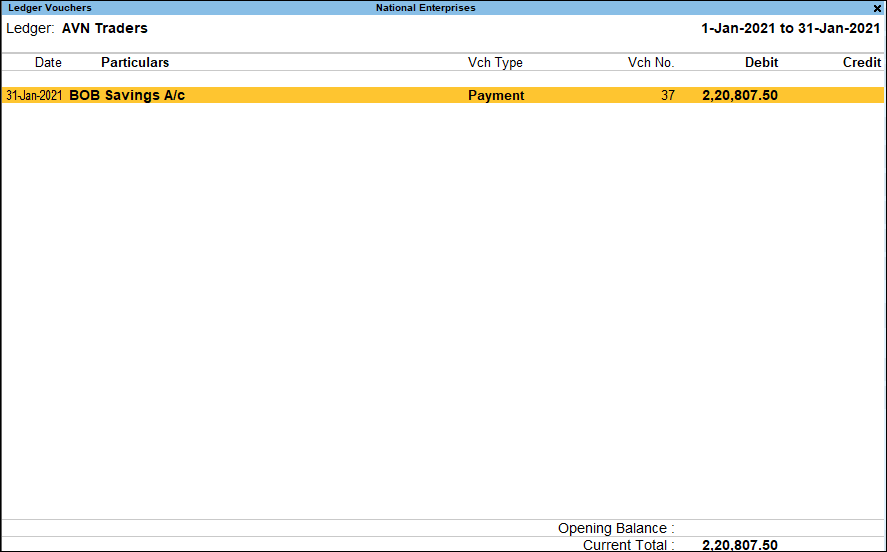
- Select the required month to view the Ledger Vouchers screen, which appears as shown below:

Note: Which is in red needs the confirmation, and some need to check in the latest build.