

Sales of Goods and Services
Every business involves sales of goods or services. The sales transactions in your business may be a simple cash sales, or even sales on credit. For each sales transaction, you will need to keep a record of the items that you sold, the payment that you received, goods returned, and so on. The invoice also serves as a proof of the purchase made by the buyer. Using TallyPrime, you can do all of these and more. Moreover, you can view reports any time you need to understand the sales performance of your business.
Generate sales bills: Record a cash bill or invoice when the buyer makes an instant payment using cash or any other mode, like cheque or credit/debit card. If it is sales on credit, record a credit sale by including the party.
Print invoices: For each sales transaction, the buyer will require a copy of the invoice. At times, you may want to include specific item or service details when you print the invoice, such as configuration of a laptop, motor capacity of an appliance, warranty offered on the item, and so on. Additionally, the buyer may ask for delivery of goods to a specific location. Therefore, you will need to print the delivery address separately on the invoice. TallyPrime handles all such invoicing needs and more.
Record additional charges, discounts, and free items: Your sales transaction may also include additional expenses, such as transportation charges, insurance, discounts, and taxes. Depending on your business practice, you may need to apply discounts on each item or on the total invoice amount. Similarly, if you give free items to your buyers at times, or send samples to a customer, all of these can be recorded and tracked in TallyPrime.
Reports: You can track all the sales bills recorded in TallyPrime using different reports, such as Sales Register, Day Book, and so on. You can view your sales across different periods, filter the data for specific details, configure the reports to view more sales-related details and more.
Record Sales of Goods
For recording sales of goods, you can select cash or bank for cash sales and party ledger for credit sales. You can record sales of goods or items using the Item Invoice mode. TallyPrime provides other modes such as Accounting Invoice mode and As Voucher mode for recording sales of goods or services. You can use the other modes of the voucher interchangeably for recording sales, based on the requirement.
As per your business practice, you can print all the invoices with the necessary details.
- Open the sales voucher screen.
- Gateway of Tally > Vouchers > F8 (Sales).
Alternatively, press Alt+G (Go To) > Create Voucher > press F8 (Sales). - Ensure that the voucher mode is set to Item Invoice mode by pressing Ctrl+H (Change Mode), or you can also confirm the same if you see the Name of Item on the voucher screen.
- If you want to enter the Reference No. and Date for the invoice, press F12 (Configure), and set Provide Reference No. and Date to Yes.
If you do not see this option, set Show more configurations to Yes.
- Gateway of Tally > Vouchers > F8 (Sales).
- Specify the buyer details.
- Party A/c name: Select Cash or Bank for cash sales. For credit sales, select the party name.
- Party Details: If you need Dispatch, Order, or Buyer details to be part of your invoice, provide the relevant details.
If you do not see the Party Details screen, press F12 (Configure), and set Provide Dispatch, Order, and Export details to Yes.- Dispatch & Order Details: You can print these details in the invoice for the buyer’s preference. If you already have a Delivery Note or a Sales Order, the Delivery Note Number and the Order Number are pre-filled.
- Buyer’s Details: In the case of cash sales, specify the buyer’s details as needed in the printed invoice.
Note: Your regular customers may need specific details, such as address with landmark, alternative contact number, and so on, to appear in the invoices they receive. In such cases, you can create party ledgers with the required details, such as Address, State, and so on. In the Buyers field, select the required ledger.
- As always, you can press Ctrl+A to save and proceed.
- Select the accounting ledger to allocate the stock items.
- For Item Invoice, select the Sales ledger.
If you do not see this field on the screen, press F12 (Configure) and set Select common Ledger Account for Item Allocation to Yes.
Set this option as No, to allocate the sale of each item to different accounting ledgers if needed.
- For Item Invoice, select the Sales ledger.
- Provide stock item details.
As in other transactions, you can create the item or ledger on the fly by pressing Alt+C.- For Item Invoice, select the stock item, enter the Quantity. The Rate will be auto-filled, if available for the stock item. However, you may choose to enter the Rate or Amount.
- Select additional ledgers, like transportation charges, insurance, or discount, if any.
- Provide Narration, if needed, and accept the screen. As always, you can press Ctrl+A to save.
What you see on the screen can vary based on your choices. Press F12 (Configure) to change the options and F11 (Features) to enable or disable features. - Print the invoice.
- Press Ctrl+P.
Alternatively, Alt+P (Print) > press Enter on Current. - Press C (Configure) to configure the print options for your invoice, if needed.
- To change the printer, C (Configure) > type of select Printer > and press Enter.
- To print multiple copies of the invoice, select and provide Number of Copies > select Type of Copy (for example, Original, Duplicate, or Triplicate, as needed).
- Press I (Preview) to check the invoice before printing if needed.
- Press P (Print) to print.
To know more about Printer settings in TallyPrime, click here.
- Press Ctrl+P.
Record Sales of Services
For recording sales of services, you can select cash or bank for cash sales and party ledger for credit sales. You can record sales of services and create bills without items using Account Invoice mode. TallyPrime provides other modes such as Item Invoice mode and As Voucher mode for recording sales of goods or services. You can use the other modes of the voucher interchangeably for recording sales, based on the requirement.
As per your business practice, you can print all the invoices with the necessary details.
- Open the sales voucher screen.
- Gateway of Tally > Vouchers > F8 (Sales).
Alternatively, press Alt+G (Go To) > Create Voucher > press F8 (Sales). - Press Ctrl+H (Change Mode) > select Accounting Invoice mode.
- If you want to enter the Reference No. and Date for the invoice, press F12 (Configure), and set Provide Reference No. and Date to Yes.
If you do not see this option, set Show more configurations to Yes.
- Gateway of Tally > Vouchers > F8 (Sales).
- Specify the buyer details.
- Party A/c name: Select Cash or Bank for cash sales. For credit sales, select the party name.
- Party Details: If you need Dispatch, Order, or Buyer details to be part of your invoice, provide the relevant details.
If you do not see the Party Details screen, press F12 (Configure), and set Provide Dispatch, Order, and Export details to Yes.- Dispatch & Order Details: You can print these details in the invoice for the buyer’s preference. If you already have a Delivery Note or a Sales Order, the Delivery Note Number and the Order Number are pre-filled.
- Buyer’s Details: In the case of cash sales, specify the buyer’s details as needed in the printed invoice.
Note: Your regular customers may need specific details, such as address with landmark, alternative contact number, and so on, to appear in the invoices they receive. In such cases, you can create party ledgers with the required details, such as Address, State, and so on. In the Buyers field, select the required ledger.
- As always, you can press Ctrl+A to save and proceed.
Note: For Accounting Invoice, you do not need an accounting ledger since no stock items are involved for allocation.
- Provide service details.
As in other transactions, you can create the ledger on the fly by pressing Alt+C.- For Accounting Invoice, select the service ledger and enter the Amount.
- Provide Narration, if needed, and accept the screen. As always, you can press Ctrl+A to save.

What you see on the screen can vary based on your choices. Press F12 (Configure) to change the options and F11 (Features) to enable or disable features. - Print the invoice.
- Press Ctrl+P.
Alternatively, Alt+P (Print) > press Enter on Current. - Press C (Configure) to configure the print options for your invoice, if needed.
- To change the printer, C (Configure) > type of select Printer > and press Enter.
- To print multiple copies of the invoice, select and provide Number of Copies > select Type of Copy (for example, Original, Duplicate, or Triplicate, as needed).
- Press I (Preview) to check the invoice before printing, if needed.
- Press P (Print) to print.
To know more about Printer settings in TallyPrime, click here.
- Press Ctrl+P.
Sales in Voucher Mode or Double Entry Mode
In as voucher mode or double entry mode, you can record the transactions in terms of debit (Dr) and credit (Cr). This mode enables you to record a sale of goods or services as a debit to cash or accounts receivable and credit to the sales account with item allocation or service ledger. Since a debit in one account balances a credit in another, the sum of all debits (Dr) must be equal to the sum of all credits (Cr) which is taken care of by TallyPrime when you record the transaction in this mode.
TallyPrime provides other modes such as Item Invoice mode and Accounting Invoice mode for recording sales of goods or services. You can use the other modes of the voucher interchangeably for recording sales, based on the requirement.
As per your business practice, you can print all the invoices with the necessary details.
- Open the sales voucher in double entry mode.
- Press Alt+G (Go To) > Create Voucher > press F8 (Sales).
Alternatively, Gateway of Tally > Vouchers > press F8 (Sales). - Press Ctrl+H (Change Mode) > select As Voucher mode.
- Press F12 (Configure) > set Use Cr/Dr instead of To/By during voucher entry to Yes.
Henceforth, whenever you will open the sales voucher in the Voucher mode, you will get Cr and Dr fields instead of By and To, until you change this setting in F12 (Configure).
- Press Alt+G (Go To) > Create Voucher > press F8 (Sales).
- Specify the buyer details in the Dr field.
- Party A/c name: Select Cash or Bank for cash sales. For credit sales, select the party name.
- Party Details: If you need Dispatch, Order, or Buyer details to be part of your invoice, provide the relevant details.
If you do not see the Party Details screen, press F12 (Configure), and set Provide Dispatch, Order, and Export details to Yes.- Dispatch & Order Details: You can print these details in the invoice for the buyer’s preference. If you already have a Delivery Note or a Sales Order, the Delivery Note Number and the Order Number are pre-filled.
- Buyer’s Details: In the case of cash sales, specify the buyer’s details as needed in the printed invoice.
Note: Your regular customers may need specific details, such as address with landmark, alternative contact number, and so on, to appear in the invoices they receive. In such cases, you can create party ledgers with the required details, such as Address, State, and so on. In the Buyers field, select the required ledger.
- As always, you can press Ctrl+A to save and proceed.
- Enter the amount in the Debit field.
- Select the accounting ledger in the Cr field.
- For As Voucher, select the Sales ledger.
- Provide stock item details.
As in other transactions, you can create the item on the fly by pressing Alt+C.- For As Voucher, select the stock item, enter the Quantity. The Rate will be auto-filled, if available for the stock item. However, you may choose to enter the Rate or Amount.
- Provide Narration, if needed, and accept the screen. As always, you can press Ctrl+A to save.
- Print the invoice.
- Press Ctrl+P.
Alternatively, Alt+P (Print) > press Enter on Current. - Press C (Configure) to configure the print options for your invoice, if needed.
- To change the printer, C (Configure) > type of select Printer > and press Enter.
- To print multiple copies of the invoice, select and provide Number of Copies > select Type of Copy (for example, Original, Duplicate, or Triplicate, as needed).
- Press I (Preview) to check the invoice before printing if needed.
- Press P (Print) to print.
To know more about Printer settings in TallyPrime, click here.
- Press Ctrl+P.
Click here to see the possible F12 configurations for Sales Voucher.
Reports | Know Your Sales
In your business, you will require updates on the day-to-day sales, sales returns, and so on to understand the overall sales performance. In addition, you may want to track your sales for different periods, say monthly, quarterly, and so on, to evaluate the sales trend in different periods of time. In TallyPrime, you can refer to different reports on sales, analyse the sales data, and make informed decisions for your business.
In this section
- Day Book
- Sales Register
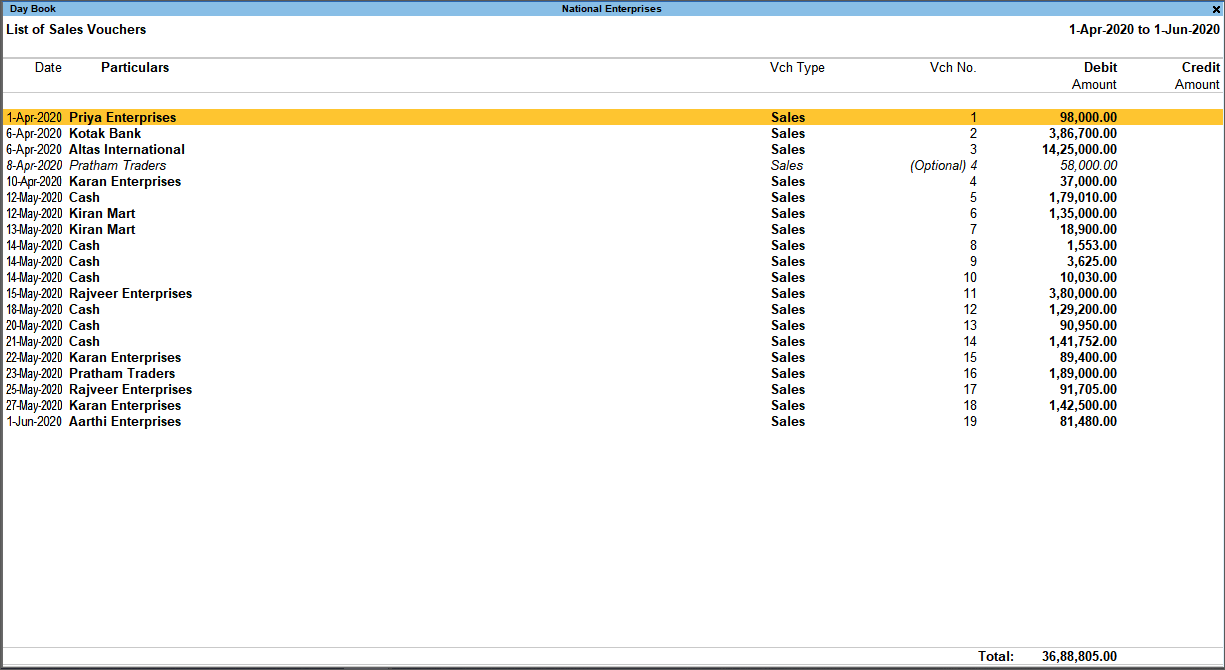
Day Book
This report tracks all your transactions on a day-to-day basis. You can filter this report to check all the sales transactions made on a particular day.
- Press Alt+G (Go To) > type or select Day Book.
Alternatively, Gateway of Tally > Display More Reports > Day Book.
By default, this report displays all the transactions as of the Current Date displayed on the Gateway of Tally screen. - To view the sales recorded for any given day:

The report lists all the sales transactions recorded on the selected date. For more information, refer to the topic Day Book.
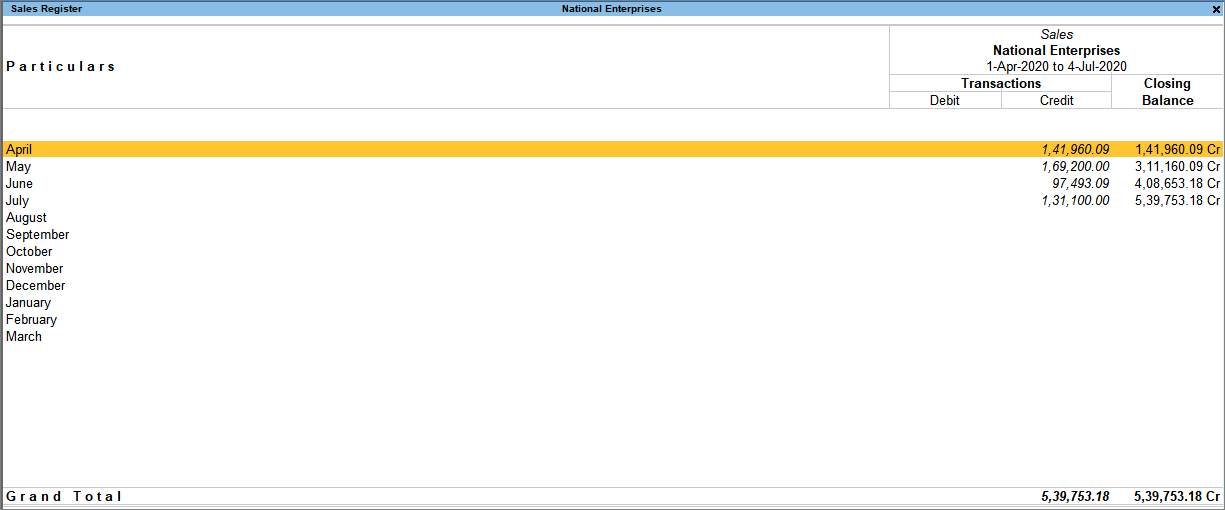
Sales Register
This report provides a comprehensive view of the month-wise sales done in your business. You can drill down from the selected month to view the voucher-wise listing of sales. You can further configure the report to view the data for different periods and represent the sales details in different ways, based on your business needs.
- Press Alt+G (Go To) > type or select Sales Register.
Alternatively, Gateway of Tally > Display More Reports > Account Books > Sales Register. - Scroll Up or Down and press Enter to view the sales vouchers recorded in the selected month.

Receive Money Against Sales
On making a sale, you receive money from your party instantly or at a later date. To settle the amount for which you have made a sales of items or services, you can record a receipt in reference to the sales. In case you have received payment in advance, even before the sales was executed, you can record a receipt. When you make a sale and therefore pass a sales entry against the advance received, you can use the receipt as the reference to settle the advance received. You can also account for payments received after deducting discounts, when recording the receipt.
In this section
- Record Receipt Against Sales – Cash
- Record Receipt Against Sales – Bank
- Record Advance Receipts
- Record Receipts with discount
Record Receipt Against Sales – Cash
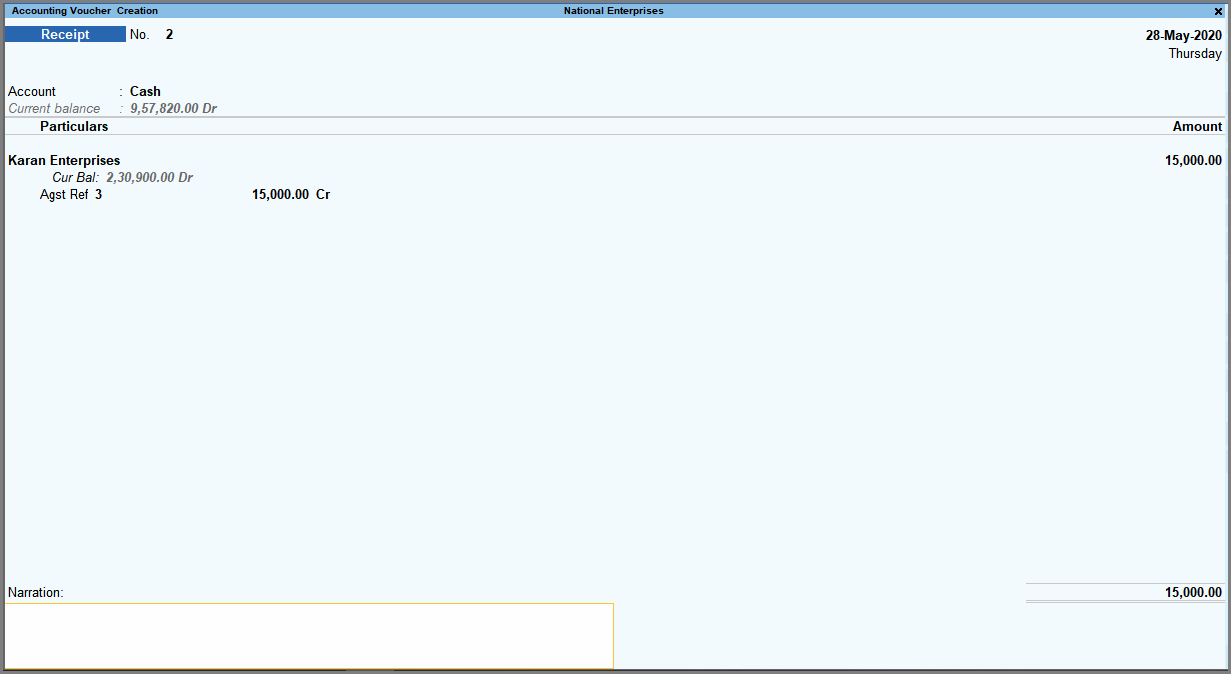
After recording a sales invoice, if you receive cash for the sale value, you will need to settle the sales bill against the cash received. You can do this in TallyPrime by selecting the reference number of the sales invoice in the receipt voucher.
- Open a receipt voucher and enter the cash received.
- Gateway of Tally > Vouchers > F6 (Receipt).
Alternatively, press Alt+G (Go To) > Create Voucher > press F6 (Receipt). - Account: Select cash ledger.
- Particulars: Select the party ledger from whom cash is received.
- Amount: Enter the cash received.
- Gateway of Tally > Vouchers > F6 (Receipt).
- Select the sales bill against which the cash is received.
- Accept the voucher. As always, you can press Ctrl+A to save.

Note: If you want to set a default account for all your receipt vouchers, you can create a voucher type with the option Enable default accounting allocation set to Yes, and record the transactions. In this case, the vouchers appear in the single entry mode.
You can settle sales bills against cash receipts by selecting Agst Ref as the Method of Adj.
Record Receipt Against Sales – Bank
After recording a sales invoice, if you receive a cheque or money in the form of online bank transfers, you will need to settle the sales bill against the amount received. You can do this in TallyPrime by selecting the reference number of the sales invoice in the receipt voucher.
- Open a receipt voucher and enter the amount received.
- Gateway of Tally > Vouchers > F6 (Receipt).
Alternatively, press Alt+G (Go To) > Create Voucher > press F6 (Receipt). - Account: Select bank ledger.
- Particulars: Select the party ledger from whom the amount is received.
- Amount: Enter the sale value received.
- Gateway of Tally > Vouchers > F6 (Receipt).
- Select the sales bill against which the amount is received.
- Provide the details of receipt in the Bank Allocations screen.

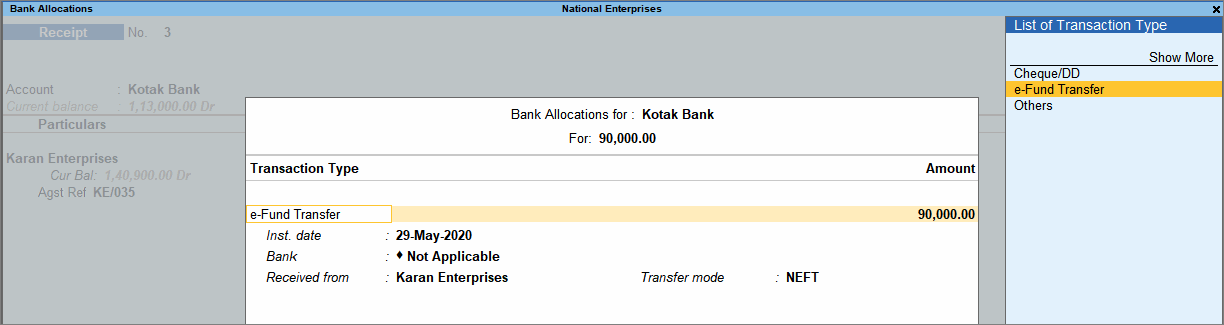
Note: In the Bank Allocations screen, press F12 (Configure) > set Show transfer mode and Show received from to Yes, to view the Transfer mode field.
- Accept the screen. As always, you can press Ctrl+A to save.
- Accept the voucher. As always, you can press Ctrl+A to save.
You can settle sales bills against money received from bank transfers by selecting Agst Ref as the Method of Adj.
Note: If you want to record the same transaction in double entry mode, press Ctrl+H (Change Mode) and select Double Entry.
Record Advance Receipts
When you receive an advance against a sale that would happen on a future date, you will need to account for this advance amount while raising a sales invoice. You can do this in TallyPrime by selecting the reference number of the receipt voucher in sales invoice.
- Open a receipt voucher and enter the amount received.
- Gateway of Tally > Vouchers > F6 (Receipt).
Alternatively, press Alt+G (Go To) > Create Voucher > press F6 (Receipt). - Account: Select cash or bank ledger.
- Particulars: Select the party ledger from whom the amount is received.
- Amount: Enter the amount received.
- Gateway of Tally > Vouchers > F6 (Receipt).
- Specify the reference details for the advance amount received.
- Accept the voucher. As always, you can press Ctrl+A to save.
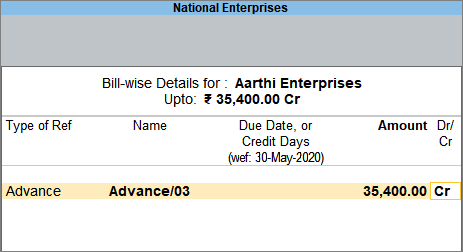
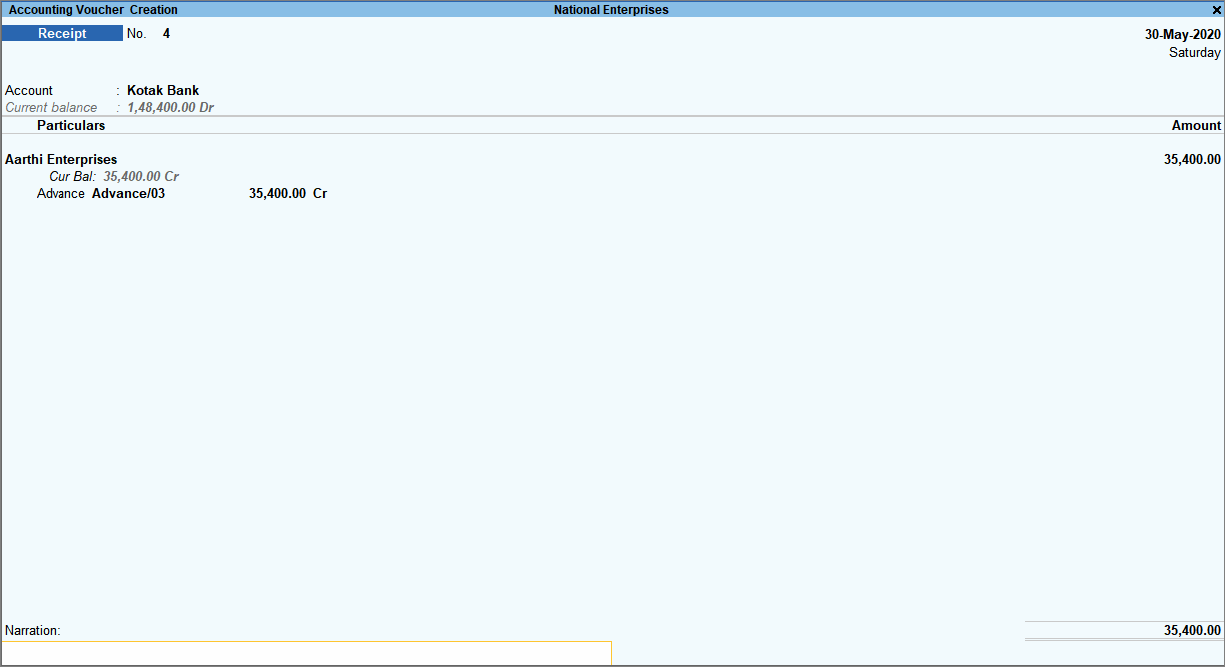
You can settle the advance receipts against the sales bills, by selecting this bill reference (as Agst Ref) in the sales invoice.
Record Receipts with discount
You may want to give a discount when the party settles all the bills in one-go. In TallyPrime, you can select all the bills that are settled by the party, and provide discount by selecting the discount ledger.Open a receipt voucher and enter the amount received.
Gateway of Tally > Vouchers > F6 (Receipt).
Alternatively, press Alt+G (Go To) > Create Voucher > press F6 (Purchase).
Account: Select cash or bank ledger.
Particulars: Select the party ledger from whom the amount is received.
Amount: Enter the amount received.
Select the sales bills against which the amount is received.
Select Agst Ref as the Method of Adjustment.
Select the sales invoice reference details.
Allow discount on the voucher.
Select the discount ledger grouped under Indirect Expenses (with Type of Ledger set to Not Applicable).
Enter the discount amount with a minus sign.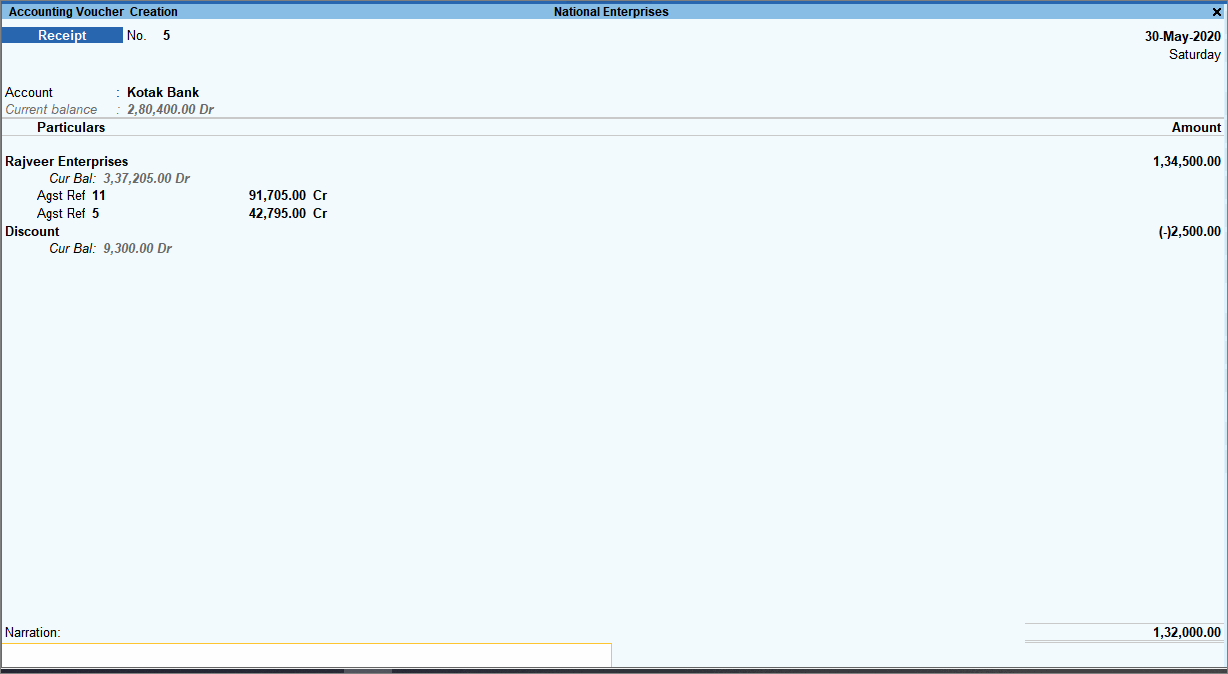
Enter the bank details if the amount is received via bank transfers.
Accept the voucher. As always, you can press Ctrl+A to save.
You can use this procedure to settle bills against receipts and allow discount on the total value as well.
You can record the same transaction in double entry mode.
1. Credit the party ledger.
2. Debit the bank/cash ledger.
3. Debit the discount ledger.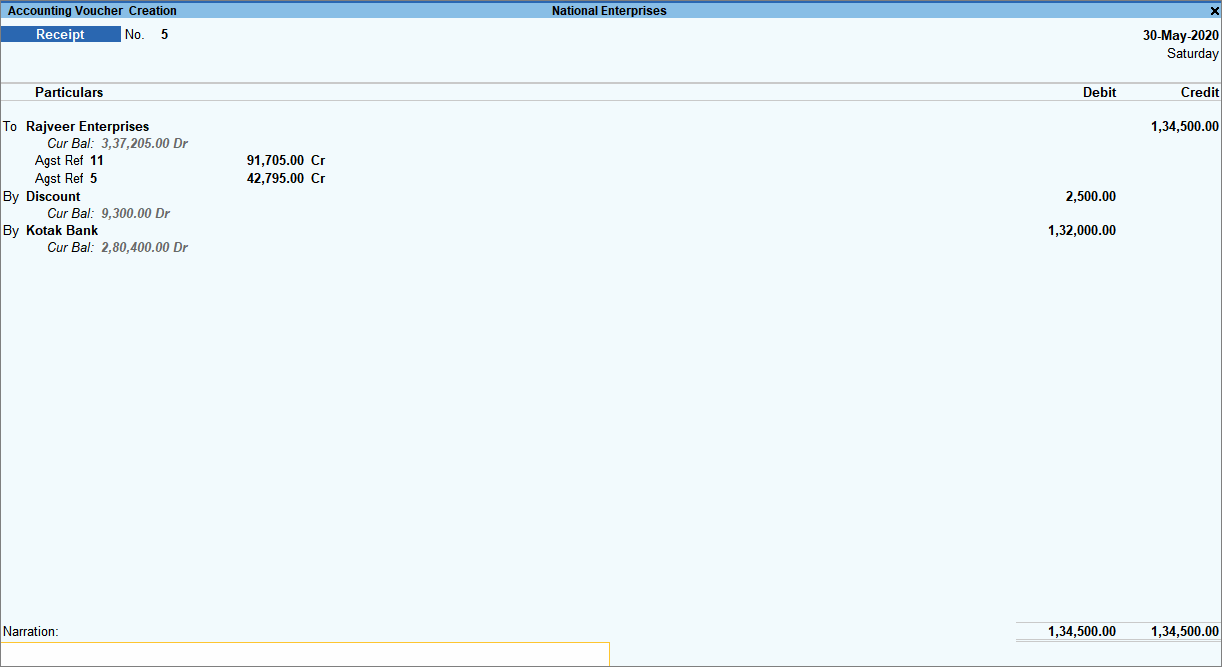
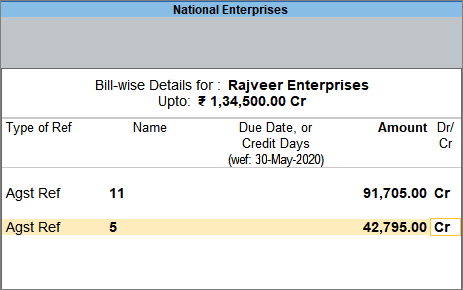
Sales Against Advance Receipt
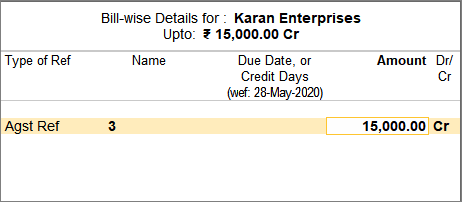
If you had received payment in advance and have done the sale to your party now, you will certainly need to account for the sale and settle the advance amount received. Based on your business, if you have done sales in phases or at one go, you can use the reference of the advance received when recording a sale, until the entire receipt value is settled.
- Ensure that the party master is enabled to Maintain balances bill-by-bill, and in the F12 configuration of sales voucher, the option Use default Bill-wise details for Bill Allocation is set to No.
- Specify the sales details in the sales voucher. On completing the voucher entry, once the invoice total is ready, the Bill-wise Details screen appears.
- In the Bill-wise Details screen, specify the reference of advance received.
- Accept the invoice. As always, you can press Ctrl+A to save.

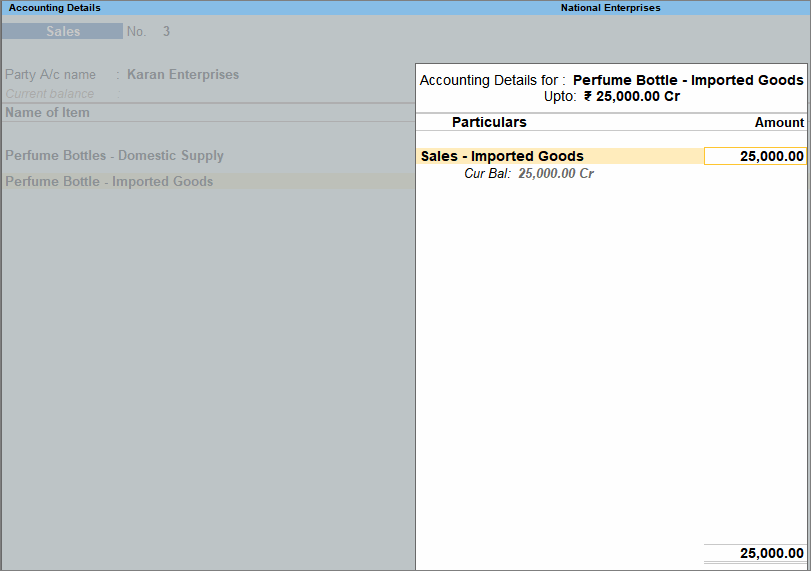
Change Ledger for Item Allocation
In case your business transactions are maintained based on different sales conditions, it will be necessary to link the transactions to their corresponding sales account. For example, you manage domestic goods sales and imported goods sales separately. By default, TallyPrime allocates all items to a single common ledger in a sales transaction. You can create two different sales ledgers and allocate the stock items
to the respective sales ledger when recording a sales transaction.
- In the sales invoice, press F12 (Configure) > set Select common Ledger Account for Item Allocation to No to allocate items to different ledgers.
Henceforth, you can select one or more accounting ledgers in the Accounting Details screen, for every item, until you change the option in F12 (Configure) of the invoice. - Allocate multiple sales ledgers for stock items.
- Select the item of domestic supply, enter the quantity and rate.
- Select the sales ledger created for the sale of domestic supply. The amount will appear.
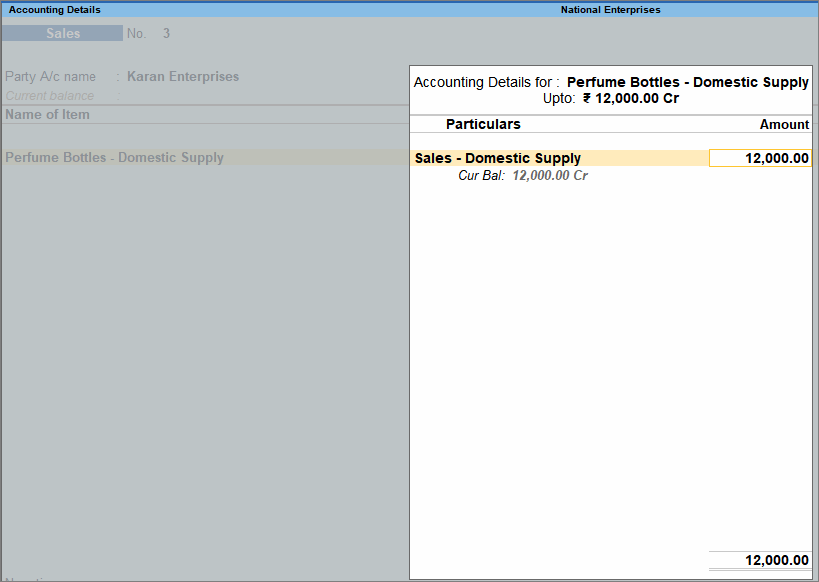
- Select the imported goods, enter the quantity and rate.
- Select the sales ledger created for the sale of imported goods. The amount will appear.

The invoice appears as shown: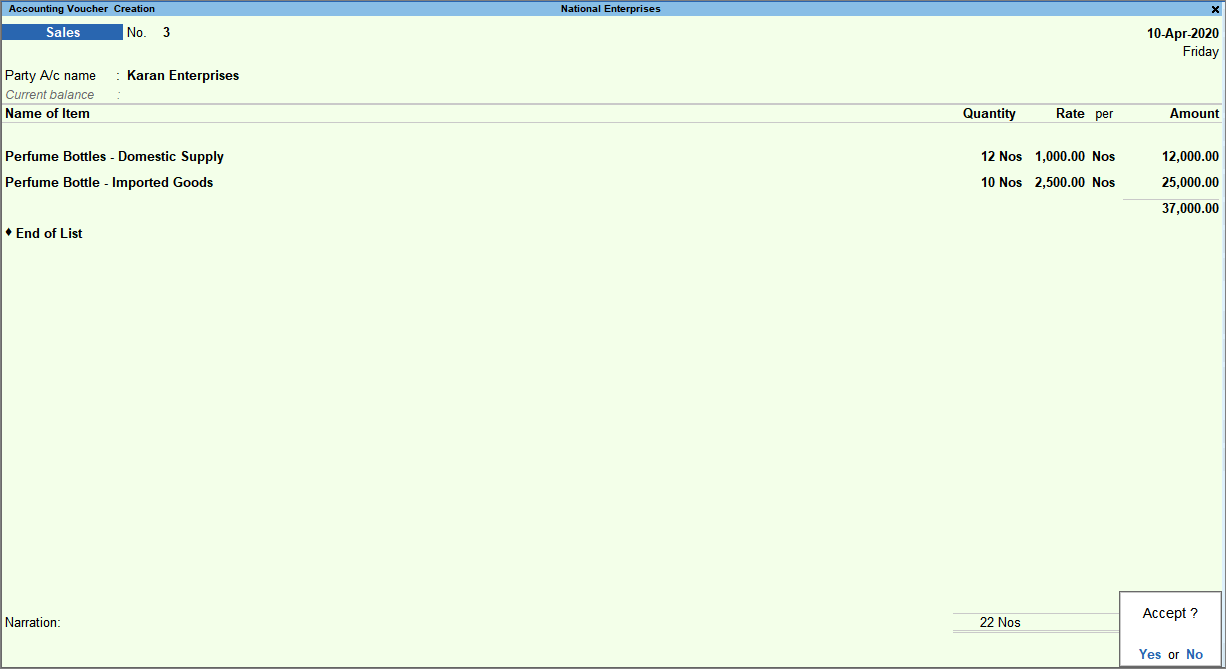
- Accept the screen. As always, you can press Ctrl+A to save.
In reports, you can view summary of all the domestic goods sales and imported goods sales separately.
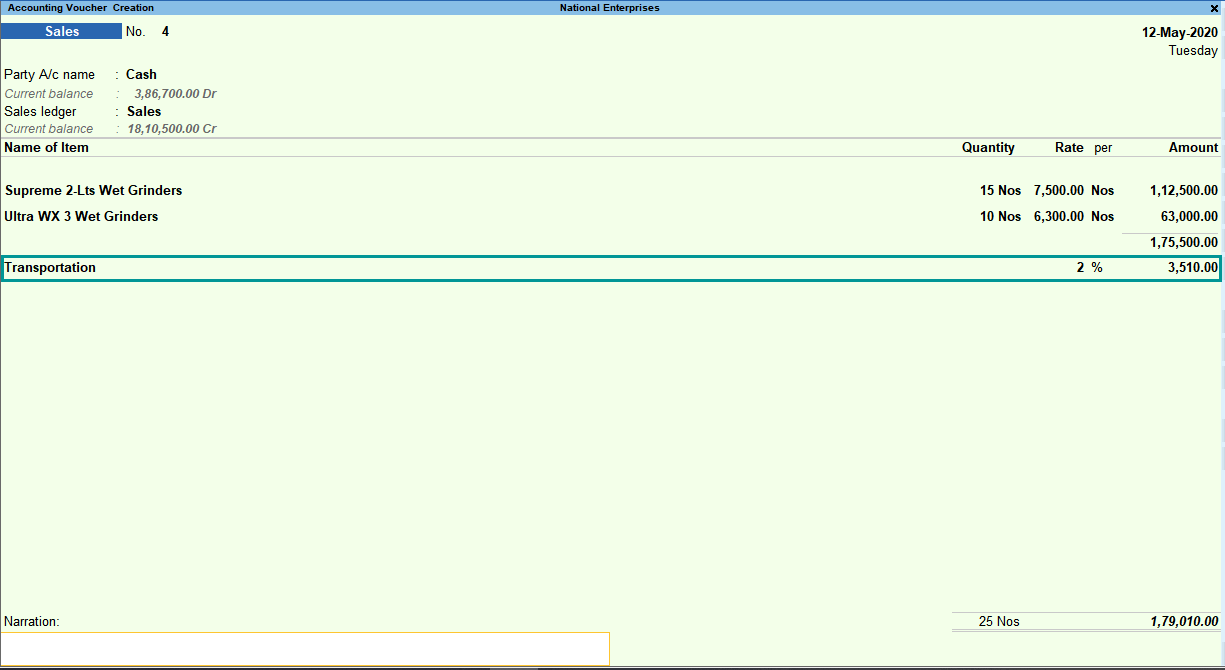
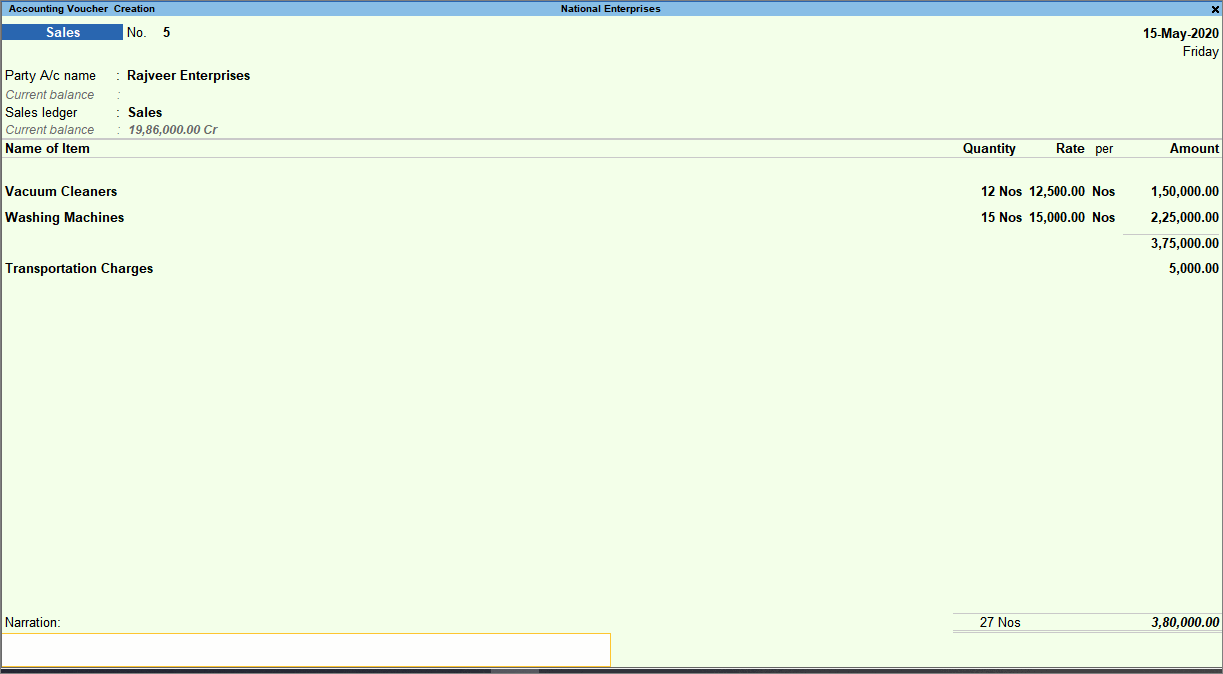
Sales with Additional Charges
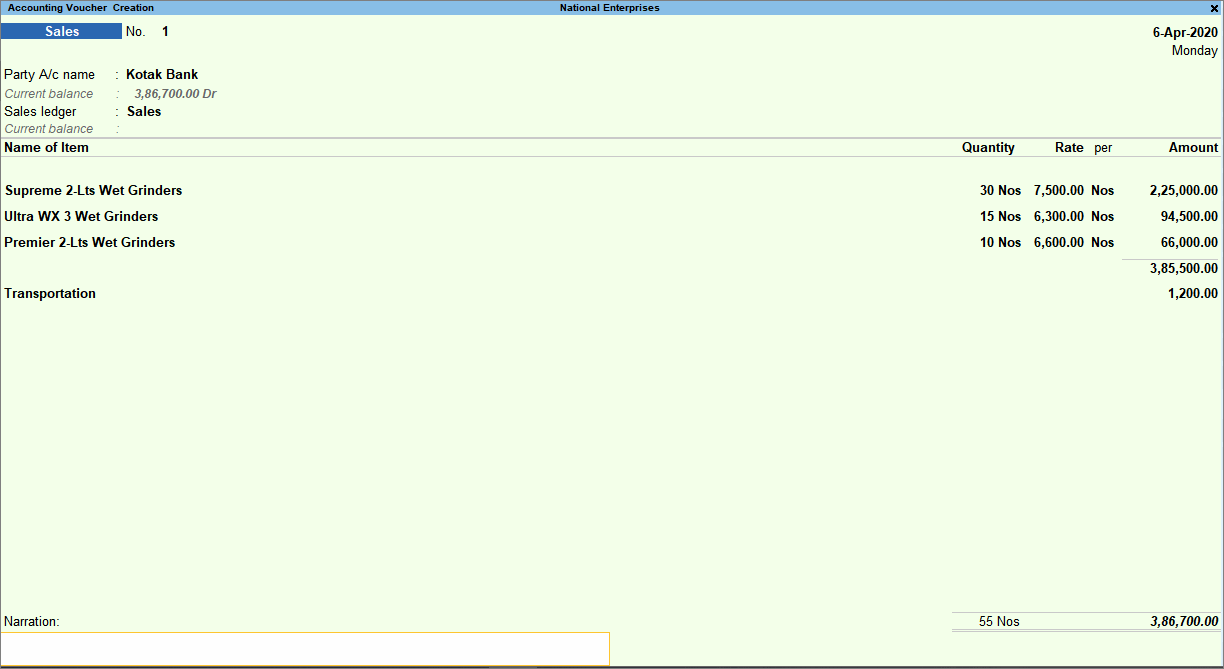
Sales of certain items attract additional charges, such as transportation, packaging, and insurance. You can account for such charges in the sales invoice.
In this section
- Additional charges without cost centre
- Additional charges with cost centre
Additional charges without cost centre
In sales invoice, you can account for additional charges like transportation, packaging, and insurance.
- In the sales invoice (Item Invoice), after you have selected all the stock items, press Enter twice to skip one line.
Alternatively, press Enter > Spacebar > and select End of List.
This takes you to the next line in the screen where you can now select ledgers for additional charges.
In the case of Accounting Invoice, you can directly select the ledger, as no stock items are involved. - Provide details of the additional charges.
- Select the ledger for additional charges created under Indirect Expenses, say Transportation or Visiting Charges.
- Enter the charges applicably.
In Item Invoice, enter the percentage (%) under Rate. TallyPrime applies the rate on the total item amount and displays the charges against the selected ledger. Alternatively, you can enter the Amount.
In Accounting Invoice, enter the Amount.
- Enter the remaining details and accept the screen. As always, you can press Ctrl+A to save.
What you see on the screen can vary based on your choices. Press F12 (Configure) to change the options and F11 (Features) to enable or disable features.
The invoice total displayed at the bottom of the invoice is the sum of the amounts for the stock items and the additional charges.
Additional charges with cost centre
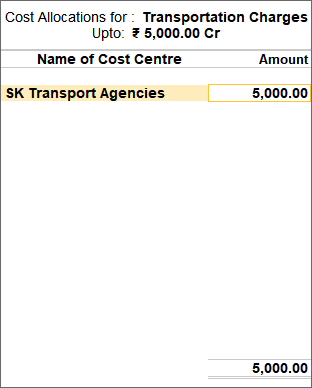
In the sales invoice, you can use cost centres to allocate the additional charges, such as transportation, packaging, and insurance.
- Enable the additional charges ledger for cost centre applicability.
- Gateway of Tally > Alter > Ledger > and press Enter.
Alternatively, press Alt+G (Go To) > Alter Master > Ledger > and press Enter. - Select the additional charges ledger.
- Press F12 (Configure) > set Apply Cost Centres for Ledgers to Yes.
If you do not see this option, ensure that Enable Cost Centre is set to Yes in the F11 (Features) for your company. - Set the option Cost Centres are applicable to Yes.
- Press Ctrl+A to save the ledger.
- Gateway of Tally > Alter > Ledger > and press Enter.
- In the sales invoice (Item Invoice), select the sales ledger in which the option Cost centres are applicable is set to No. After you have selected all the stock items, press Enter twice to skip one line.
Alternatively, press Enter > Spacebar > and select End of List.
This takes you to the next line in the screen where you can now select ledgers for additional charges.
In the case of Accounting Invoice, you can directly select the ledger, as no stock items are involved. - Provide details of the additional charges.
- Select the ledger for additional charges created under Indirect Expenses, say Transportation or Visiting Charges.
- Enter the charges applicably.
- In Item Invoice, enter the percentage (%) under Rate. The rate gets applied on the total item amount and displays the charges against the selected ledger. Alternatively, you can enter the Amount.
- In Accounting Invoice, enter the Amount.
- Select the cost centers for the additional charges ledger.

- Press Ctrl+A to save and proceed.
- Enter the remaining details and accept the screen. As always, you can press Ctrl+A to save.
What you see on the screen can vary based on your choices. Press F12 (Configure) to change the options and F11 (Features) to enable or disable features.
The invoice total displayed at the bottom of the invoice is the sum of the amounts for the stock items and the additional charges.
Sales of Items with Discounts
You may give discounts to buyers on the total item amount or on each item separately depending on your business policy. TallyPrime caters to both the requirements.
In this section
- Sales discount on total item amount
- Sales with trade discount
Sales discount on total item amount
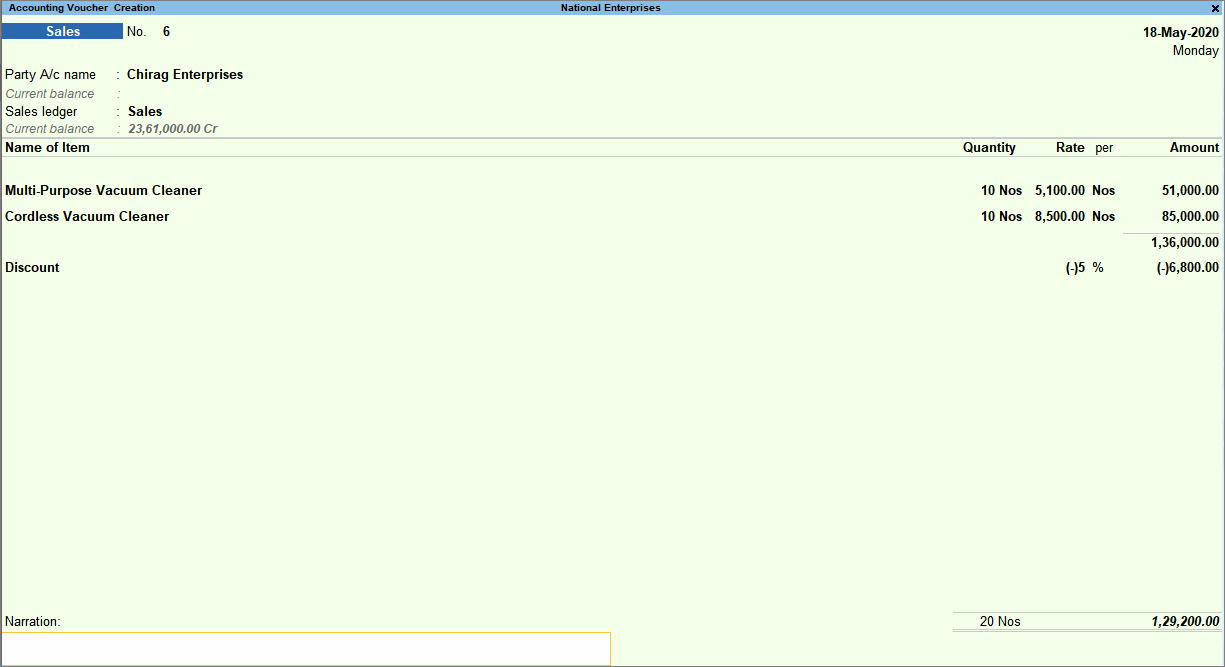
If you give discounts to your buyers, say on purchase of items worth Rs. 10,000 or more, you can account for such discounts while recording your sales invoice.
- In the sales invoice, after you have selected all the stock items, press Enter twice to skip one line.
Alternatively, press Enter > Spacebar > and select End of List.
This takes you to the next line in the screen where you can now select the discount ledger.
In the case of Accounting Invoice, you can directly select the ledger, as no stock items are involved. - Provide details of the discount.
- Select the ledger for discount created under Indirect Expenses, say Discount.
- Enter the discount percentage (%) under Rate as a negative number (in minus, for example, -10%). TallyPrime applies the discount on the total item amount and displays the discount amount against the selected discount ledger.
Alternatively, you can enter the Amount.
- Enter the remaining details and accept the screen. As always, you can press Ctrl+A to save.
What you see on the screen can vary based on your choices. Press F12 (Configure) to change the options and F11 (Features) to enable or disable features.
TallyPrime calculates the invoice total by subtracting the discount from the total amount for the items.
If your sales includes additional charges, such as transportation, and you want to calculate the discount after including such charges, press F12 (Configure) > set Calculate Tax on Current Subtotal to Yes.
Henceforth, when you select the discount ledger, the discount will be applied on the total amount after including any additional charges, until you change the option in F12 (Configure) of the invoice.
Sales with trade discount
You may give discounts on each item to your buyers depending on the quantity or demand of the item. To record a sale with such trade discounts, in TallyPrime you can show the discount percentage against the quantity of the item. You can also enter the discount percentage or amount for each selected item, and show the total discount using a ledger account. See more…
In this section
- Display discount percentage against each item – without using ledger account
- Display discount percentage and amount on item rates – using ledger account
Display discount percentage against each item – without using ledger account
- Press F11 (Features) > set Use Discount column in invoices to Yes.
If you do not see this option, set Show more features to Yes.
Henceforth, you will see the Disc % column in every sales invoice. - In the sales invoice, after you have provided the Quantity and Rate, enter Disc % for the selected item.
The Amount for the given quantity of the stock item is displayed after deducting the discount, without showing any change in the Rate.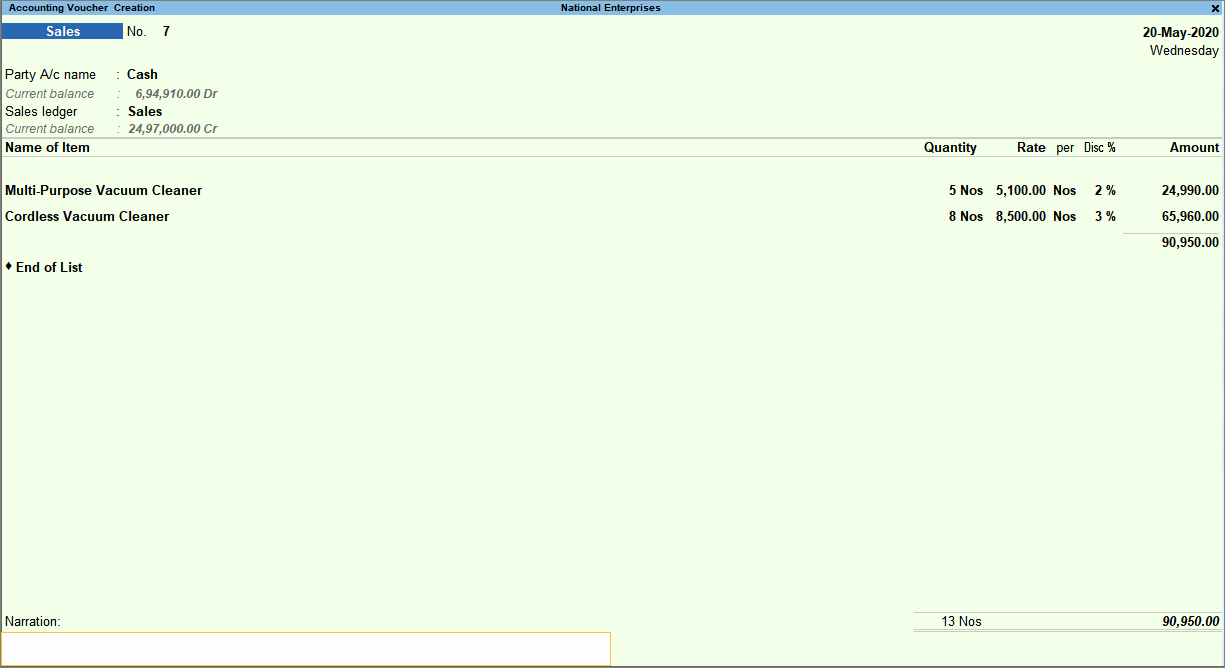
What you see on the screen can vary based on your choices. Press F12 (Configure) to change the options and F11 (Features) to enable or disable features. - Enter the remaining details and accept the screen. As always, you can press Ctrl+A to save.
The invoice total is displayed after deducting the discount given.
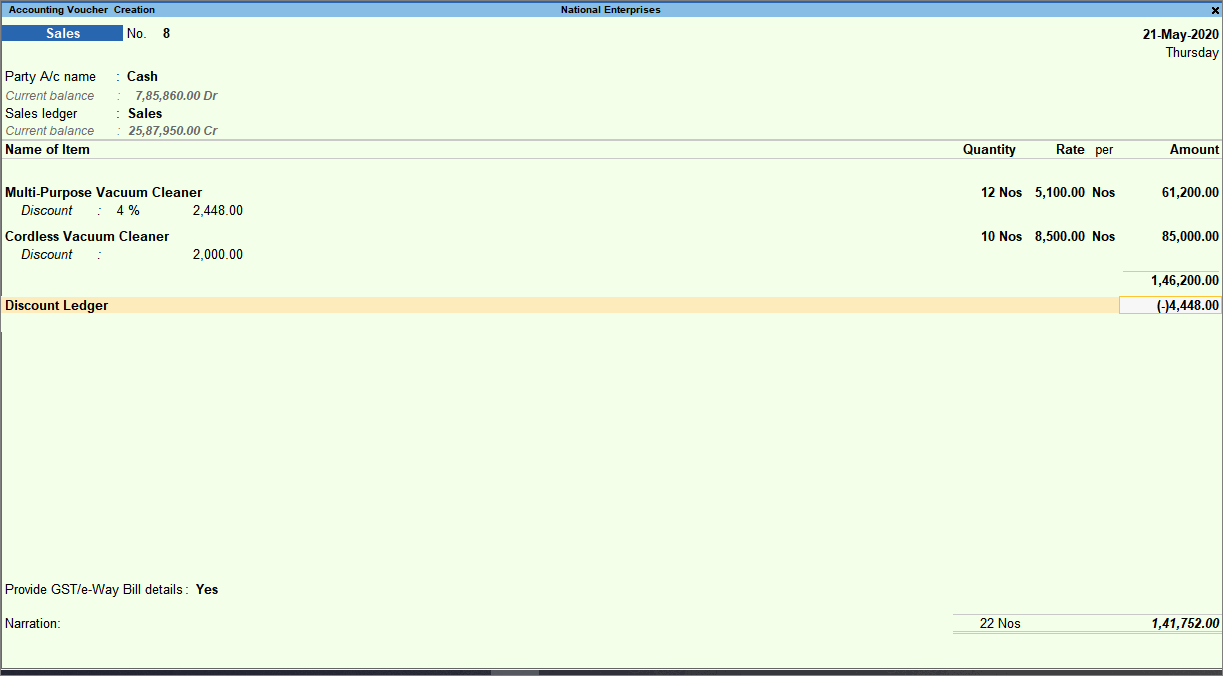
Display discount percentage and amount on item rates – using ledger account
- In the sales invoice, press F12 (Configure) > set Provide Cash/Trade Discount to Yes.
If you do not see this option, set Show more configurations to Yes.
If the option does not appear, press F11 (Features) > enable the statutory options applicable for your business. - After you have entered the Amount of the stock item, in the Discount field, enter the discount percentage for that item.
Alternatively, press Enter to leave the first field blank and enter the discount amount in the next field.
The Rate per stock item and the Amount for the given quantity of the stock item are displayed after deducting the discount. - Select the discount ledger created under Indirect Expenses.
Ensure that in the discount ledger, the option Type of Ledger is set to Discount.
What you see on the screen can vary based on your choices. Press F12 (Configure) to change the options and F11 (Features) to enable or disable features. - Enter the remaining details and accept the screen. As always, you can press Ctrl+A to save.
The total discount amount is displayed against the selected discount ledger. This amount is the sum of the discounts displayed under each stock item.
Sales with Free Items
Considering your business relationship with regular buyers, you may give a few items for free when you make a sale to them. For example, if a buyer has placed an order for 10 pcs of an item, you may want to bill him for only 8 pcs and give 2 pcs without any additional cost. Alternatively, you may bill him as per the requirement and give 2 pcs of the same item or a different item for free. In TallyPrime, you can account for such sales in different ways during voucher entry.
In this section
- Use Actual and Billed quantities
- Use zero-valued transaction
Account for free items using Actual and Billed quantities
- Press F11 (Features) > set Use separate Actual and Billed Quantity columns in invoices to Yes.
If you do not see this option, set Show more features to Yes.
Henceforth, you will see the Actual and Billed columns under the Quantity column in every sales invoice. - Actual: Enter quantity sold to the customer.
- Billed: Enter quantity to bill to the customer.
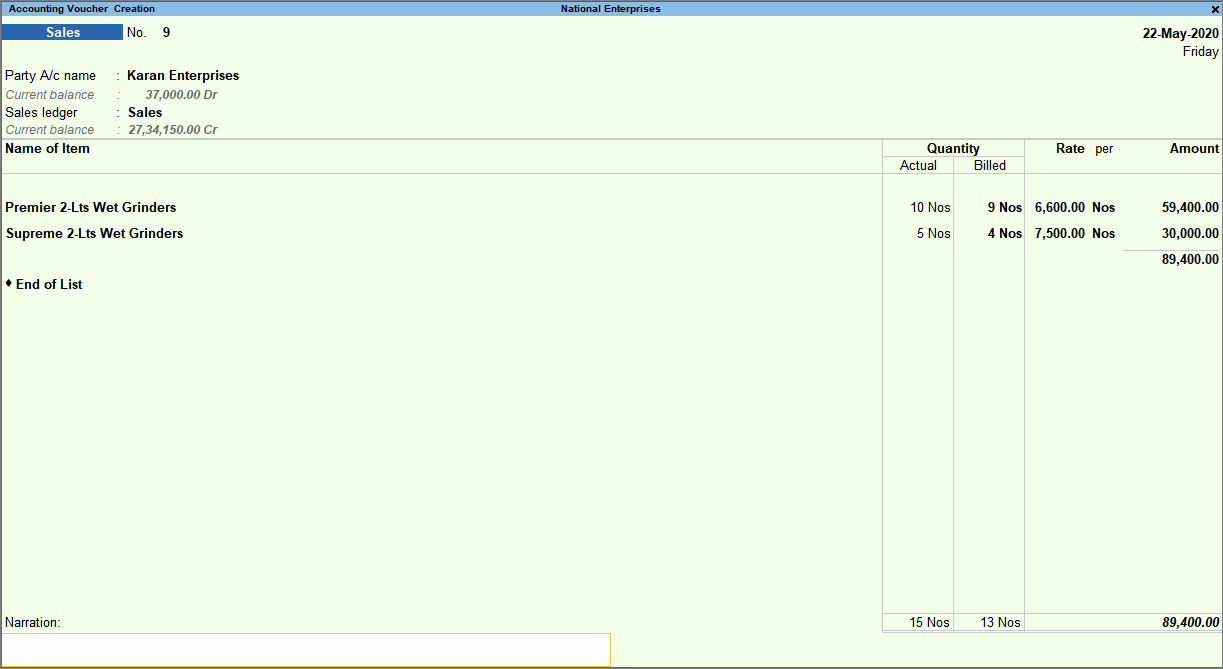
What you see on the screen can vary based on your choices. Press F12 (Configure) to change the options and F11 (Features) to enable or disable features. - Enter the remaining details and accept the screen. As always, you can press Ctrl+A to save.
The total amount calculated is based on the billed quantity; however, the items handed over to the buyer are based on the actual quantity, which includes the number of free items.
Account for free items using zero-valued transaction
- Gateway of Tally > Alter > Voucher Type > type or select Sales > and press Enter.
Alternatively, press Alt+G (Go To) > Alter Master > Voucher Type > type or select Sales > and press Enter. - Set the option Allow zero-valued transactions to Yes.
Henceforth, you can enter stock items without entering the Rate (zero value) in every sales invoice. - In the sales invoice, provide details of the items – Quantity, Rate, and Amount – to be billed.
- Select the same item again or a different item and enter the Quantity that you want to give for free. Leave the Rate and Amount fields blank.
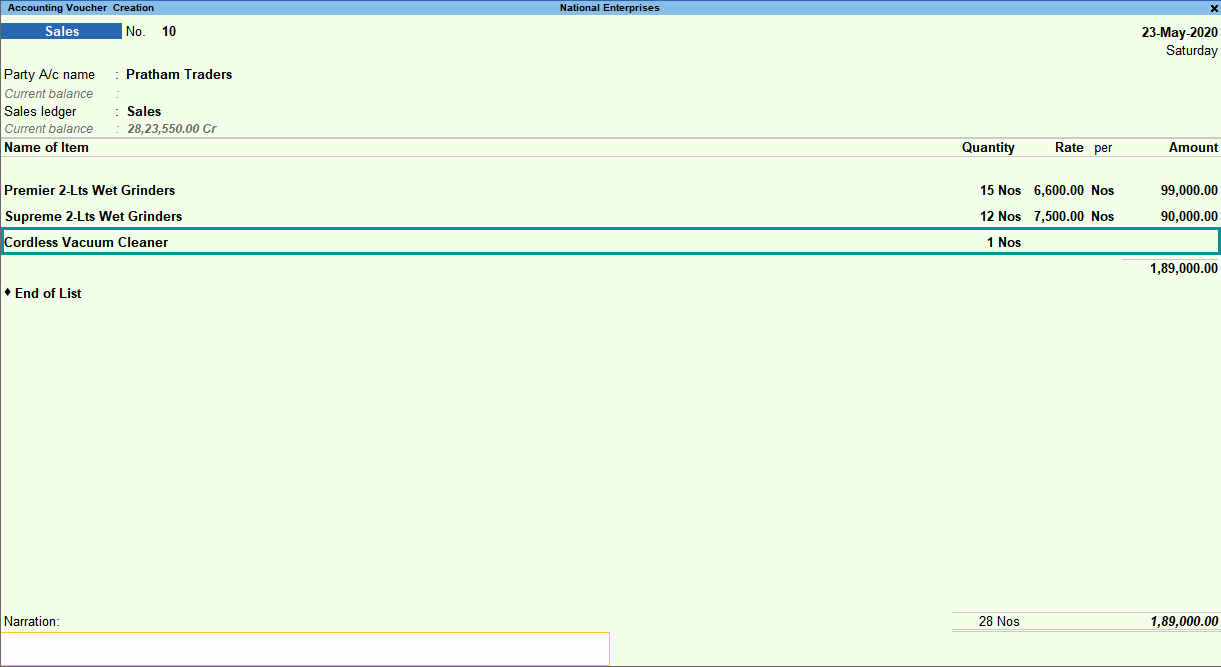
What you see on the screen can vary based on your choices. Press F12 (Configure) to change the options and F11 (Features) to enable or disable features. - Enter the remaining details and accept the screen. As always, you can press Ctrl+A to save.
The invoice generated displays the billed items with the Amount details, along with the total quantity supplied to the buyer.
Note: TallyPrime also provides you the flexibility to record sales transactions only for zero-valued items, such as free items or samples sent to customers.
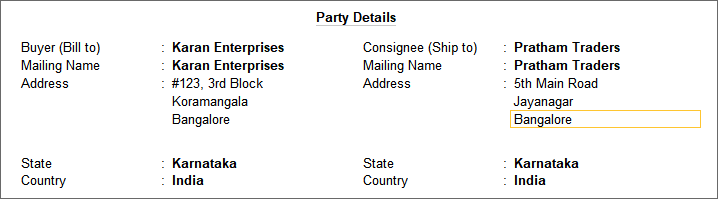
Specify Separate Buyer (Bill to) and Consignee (Ship to) details
In certain cases, you may have to deliver goods to a location different from the customer’s address. Hence, you will need to print the address of that location – the consignee address – in your invoice where the goods must be delivered. While making a sales entry in TallyPrime, you can add the buyer and consignee details, such as name and address, and print the same in the invoice.
- In the Party Details screen having the Buyer (Bill to) section, press F12 (Configure) > set Provide separate Buyer and Consignee details to Yes.
Henceforth, you can add both the consignee and buyer details in every sales invoice, until you change the option in F12 (Configure) of the invoice. - Enter the Consignee and Buyer details.

What you see on the screen can vary based on your choices. Press F12 (Configure) to change the options. - Accept the screen. As always, you can press Ctrl+A to save.
When you print the invoice, the consignee name and address get printed, where the consignment or goods need to be delivered.
Faster Data Entry using Voucher Class
As you are already aware of how to record Sales, now let us see how to do data entry faster and reduce error.
To know more about how to set up voucher class feature in sales voucher for faster data entry, click here.