

Voucher Types in TallyPrime
There are 24 pre-defined voucher types in TallyPrime for accounting, inventory, payroll, and orders. You can create more voucher types under these pre-defined voucher types as per your business needs.
For example, for cash payments and bank payments, the predefined voucher type is Payment Voucher. You can also have two or more sales voucher types in TallyPrime for different kinds of sales transactions. For example, credit sales, cash sales, and so on.
For a voucher type, you can:
- Activate / Deactivate voucher type as per your business need.
- Use different voucher numbering methods.
- Specify the prefix and suffix details for numbering the vouchers.
- Use the effective dates for the vouchers.
- Mark some vouchers to open as optional vouchers by default.
- Use common narration or narration for each ledger selected in the voucher.
- Enable the option to print immediately after saving the vouchers.
Activate / Deactivate Voucher Types in TallyPrime
In TallyPrime you can activate/deactivate voucher types as per your business need from the voucher type creation/alteration screen.
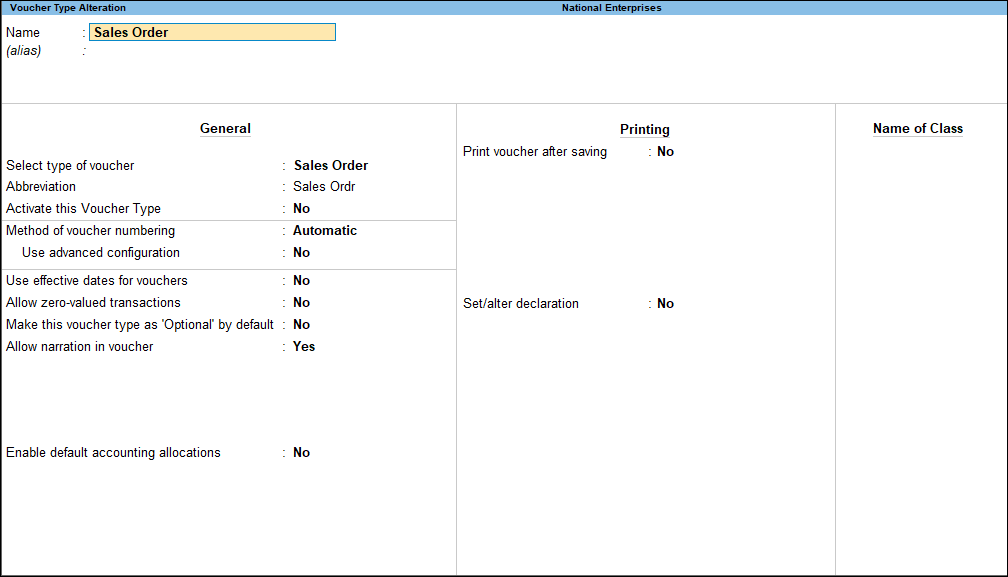
To activate / deactivate voucher type.
- Gateway of Tally > Alter > Voucher Type > type Sales Order > it will open the below mentioned screen.

View the Pre-Defined Voucher Types in TallyPrime
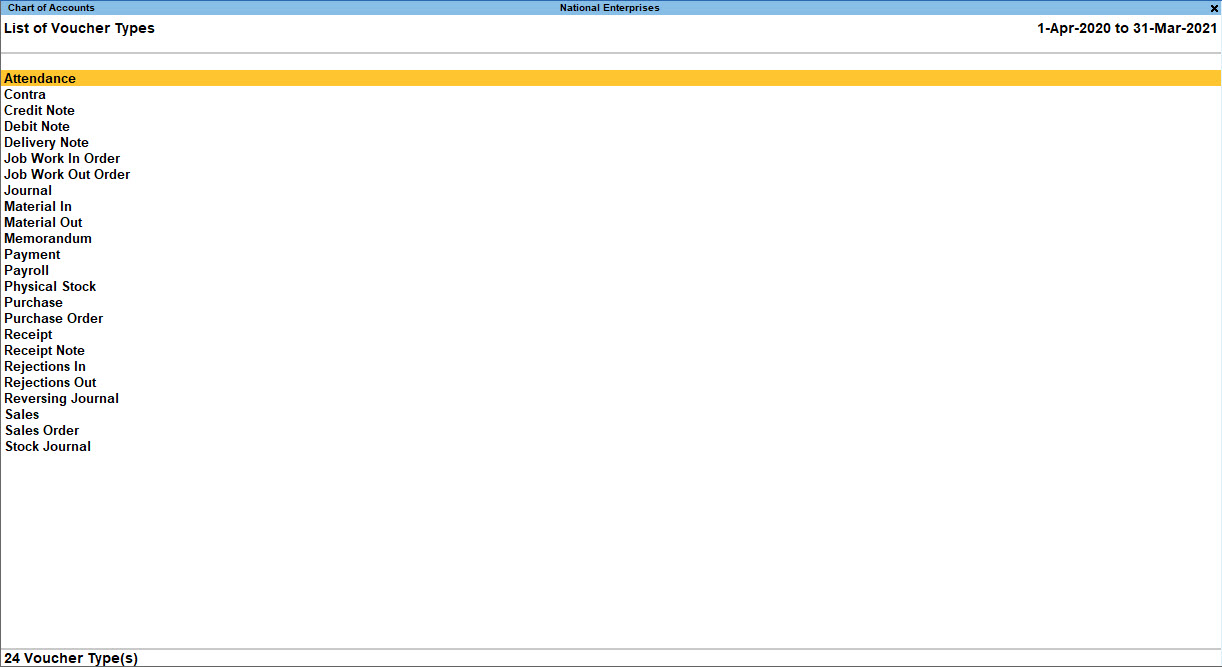
- Gateway of Tally > Chart of Accounts > type or select Voucher Type.
Alternatively, press Alt+G (Go To) > type or select Chart of Accounts > Voucher Type.
The screen appears as shown below: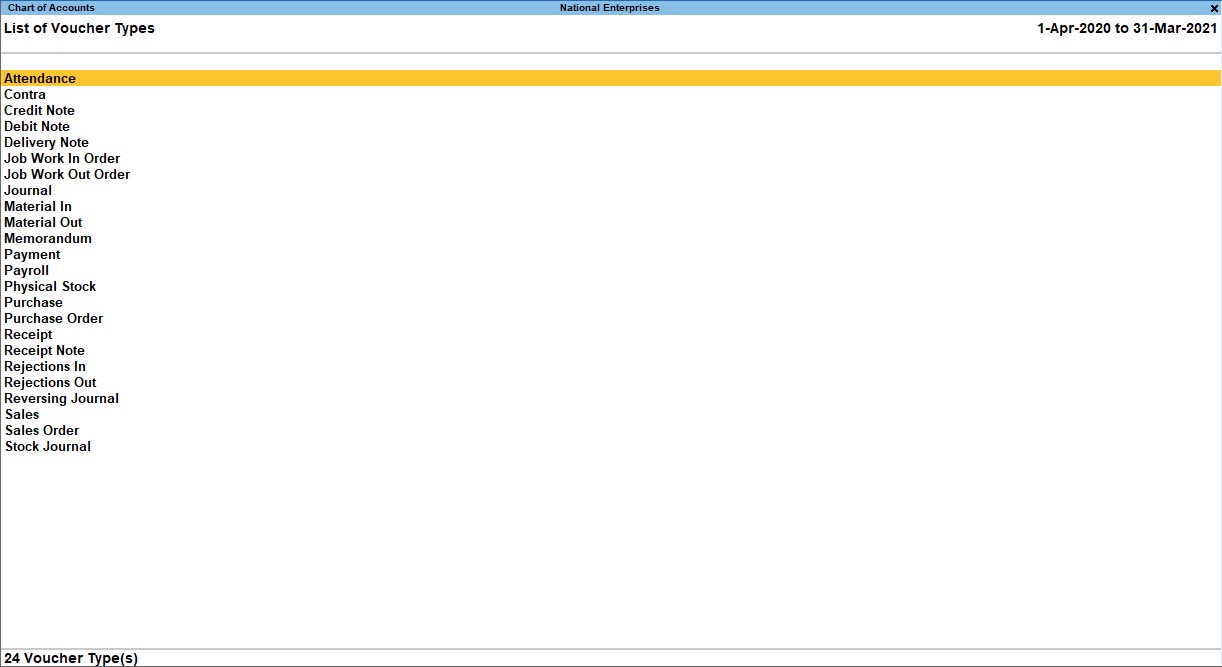
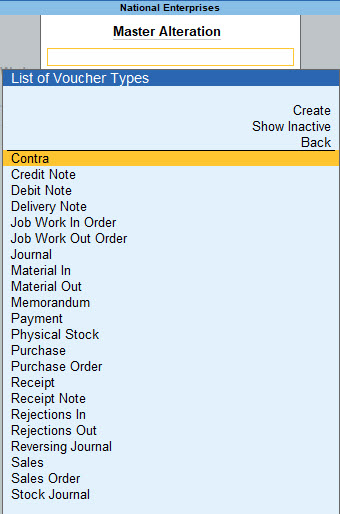
- You can also go to Gateway of Tally > Alter > Voucher Type.
Alternatively, press Alt+G (Go To) > type or select Alter Master > Voucher Type.
The List of Voucher Types appears as shown below: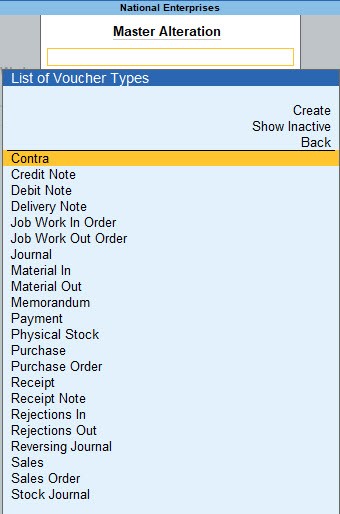
Define Voucher Numbering
You can select the required Method of voucher numbering from the voucher type creation/alteration screen.
In this section
Methods of voucher numbering
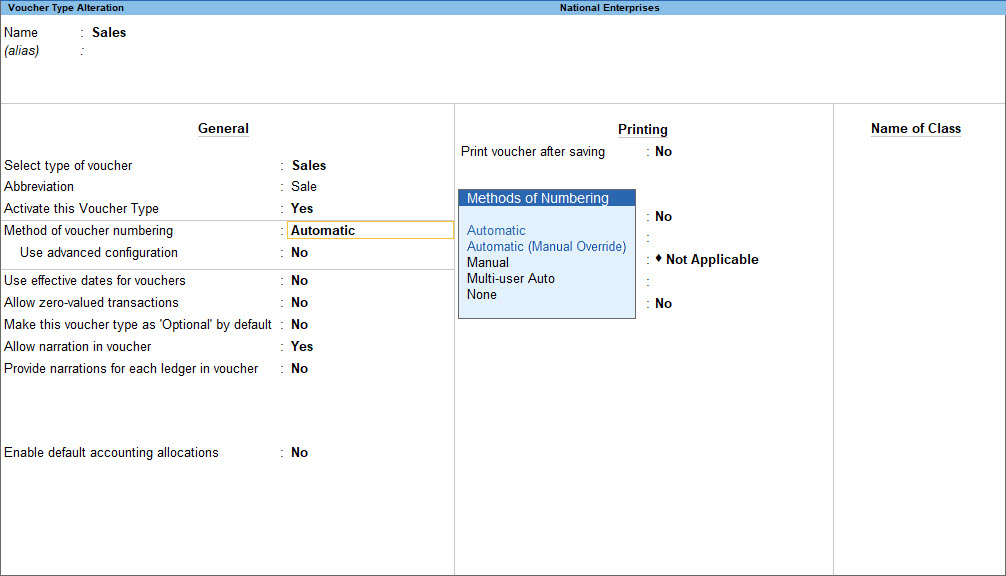
- Gateway of Tally > Alter > Voucher Type.
Alternatively, press Alt+G (Go To) > type or select Alter Master > Voucher Type.
The Methods of Numbering list appears as shown below: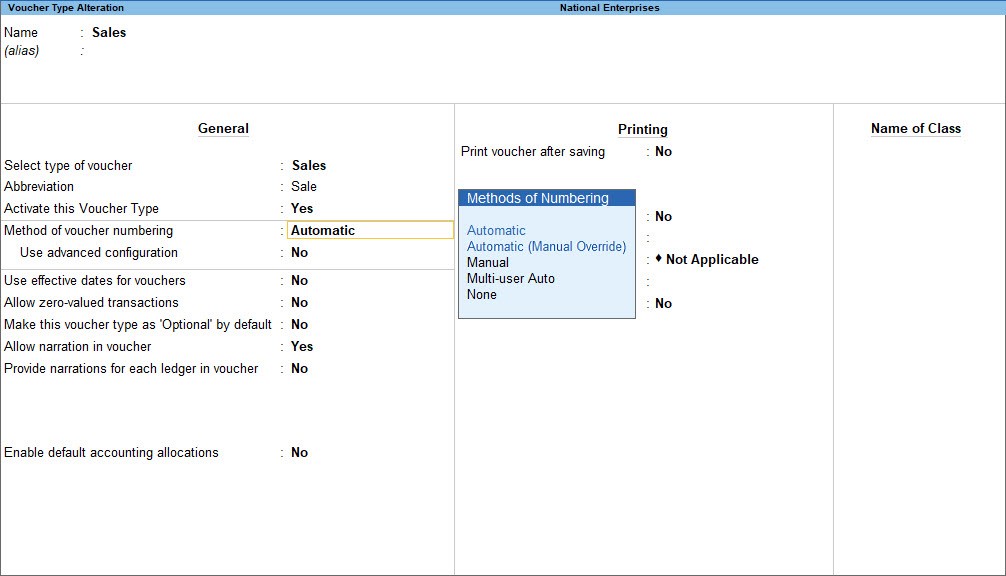
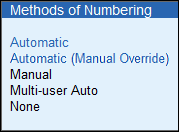
You can use any of the following methods of voucher numbering:
- Automatic: Select this if you want to automate the number for vouchers.
- Enable Use advanced configuration to define the prefix and suffix for the voucher numbers.
- Automatic (Manual Override): Select this if you want to automate the number for vouchers, and manually override the automated number, if required. For example, if the voucher is auto-numbered as 10, you can manually change it to 21. The next voucher number will be 22.
- You can set Prevent duplicates to Yes, to avoid duplicate voucher numbers during entry. You can enable this option only if you have not recorded any transactions using this voucher type.
- Manual: Select this to manually enter the voucher number in each voucher.
- You can set Prevent duplicates to Yes, to avoid duplicate voucher numbers during entry. You can enable this option only if you have not recorded any transactions using this voucher type.
- Multi-User Auto: Select this option to enable the allotment of subsequent voucher numbers in a multi-user environment.
- None: Select None to disable the voucher numbering.
Multi-user auto voucher numbering
The multi-user auto voucher numbering feature works effectively in a multi-user environment when multiple users are working on the same company data and recording vouchers.
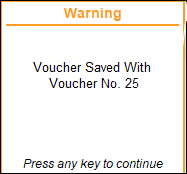
For example, let us consider three users – Mohan, Ram, and Shyam. All of them are trying to record a sales voucher. The voucher on each of their system is numbered as 25. When Mohan saves the voucher first, his voucher gets saved as 25. But when Ram and Shyam attempt to save the voucher, the message “Voucher Number 25 already used! The new number will be xx!” appears.
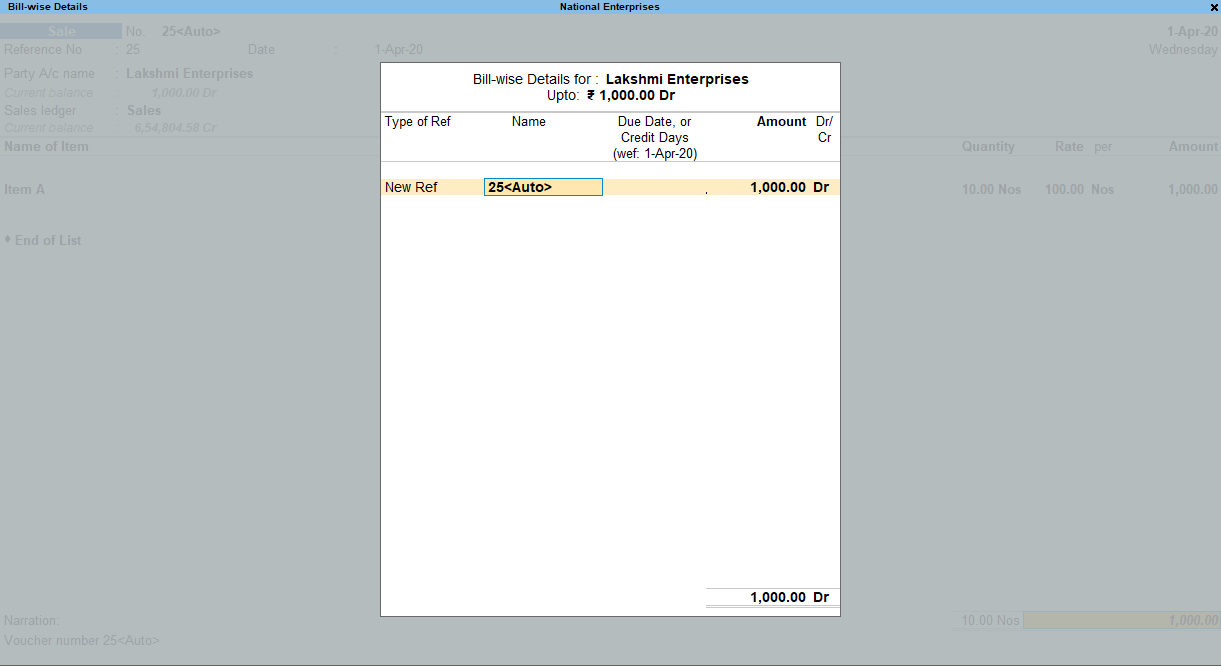
In order to eliminate this error message and avoid the re-acceptance of the voucher, you can use the option of Multi-User Auto Voucher Numbering. On enabling the Multi-user voucher numbering feature, the voucher number appears as 25<Auto> for all three users.
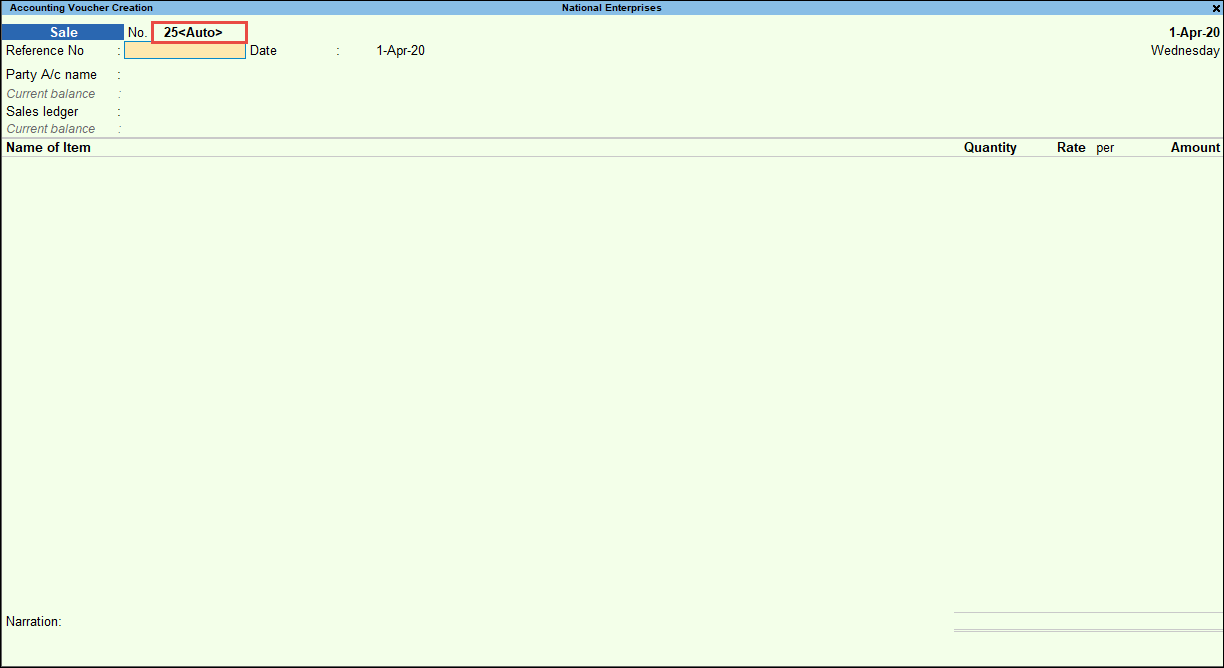
The bill-wise details screen and other relevant details will also be updated as 25<Auto>.
If the user mentions the voucher number in the Narration field, then on saving the voucher entry, the number in the narration field will be automatically altered to match the new voucher number.
Let us assume that Mohan saves the entry first. The assigned voucher number 25<Auto> will be saved as 25 in the data. A confirmation message indicating this will appear.
The narration field will be updated accordingly:
The bill-wise details with the updated Bill name will appear as shown below:
When Ram and Shyam save the voucher, the voucher number 25 <Auto> will be changed to the next available voucher number.
Note: The Multi-User Voucher Numbering is an extension of the Automatic Numbering method. It hastening the process without errors. However, this is applicable only in voucher creation and does not apply in the case of insert or delete of vouchers.
Restart voucher numbering
You can restart the numbering of your vouchers by entering the date from which you want to restart the voucher numbers.
- Gateway of Tally > Create/ Alter > Voucher Type.
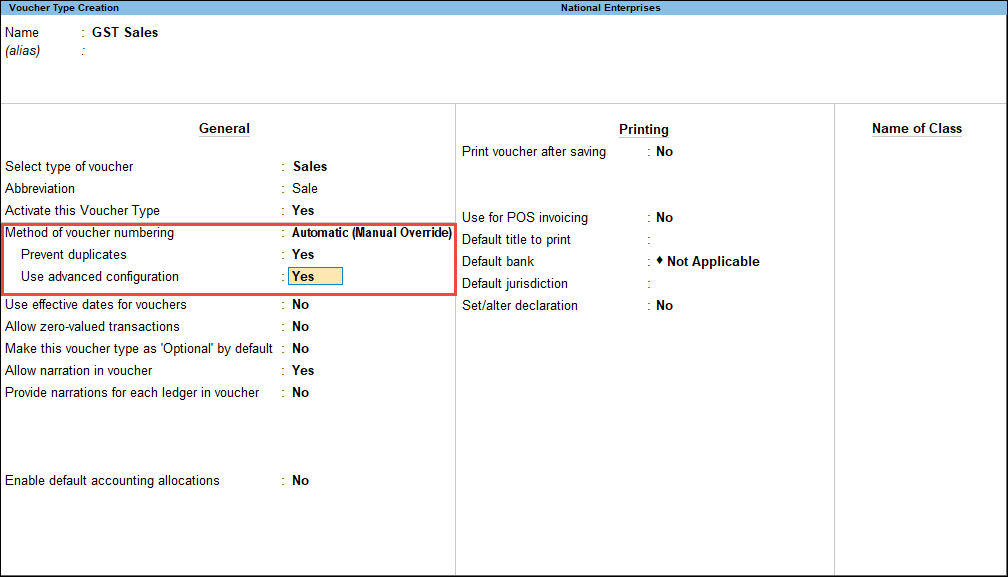
Alternatively, Alt+G (Go To) > Create Master/Alter Master > Voucher Type. - If you select the Method of Voucher Numbering as Automatic (Manual Override), you can auto-number your vouchers, and also manually override the auto-numbering when required.
- Prevent duplicates: Set this option to Yes, to ensure unique voucher numbers.

- Set the option Use advanced configuration to Yes, to open the Voucher Type Creation (Secondary) screen.

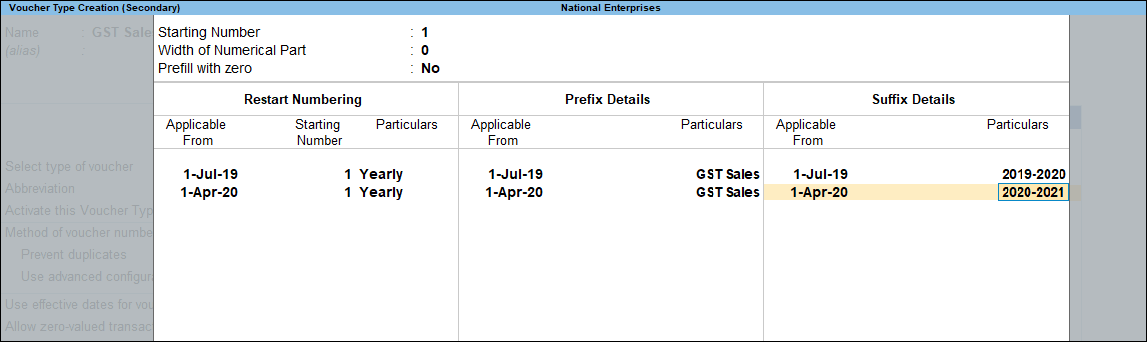
- Starting Number: Enter the Starting Number as 1, if you want a fresh batch of voucher numbers.
- Enter the Restart Numbering as required.
- Enter the Prefix Details and Suffix details as required.
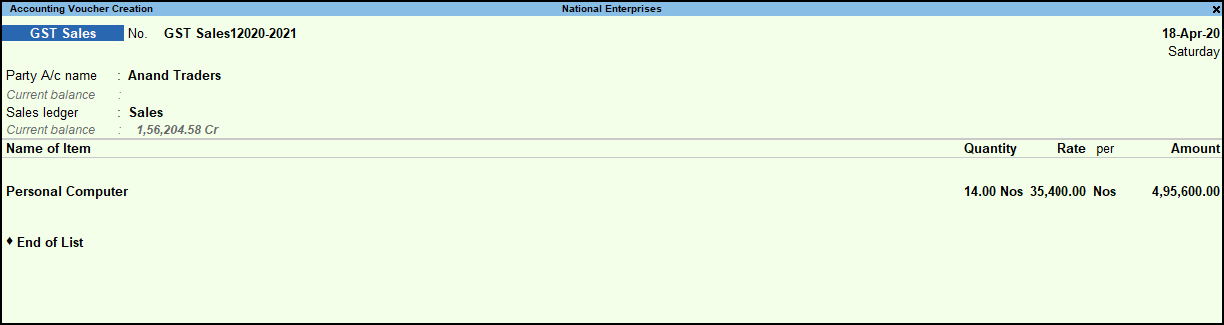
Now you can easily record your transactions with a new series of voucher numbers. The sales voucher appears as shown below:
Create Voucher Types
Based on your business needs, you can create the required voucher types in TallyPrime by grouping them under the pre-defined voucher types.
In this section
Sales voucher type
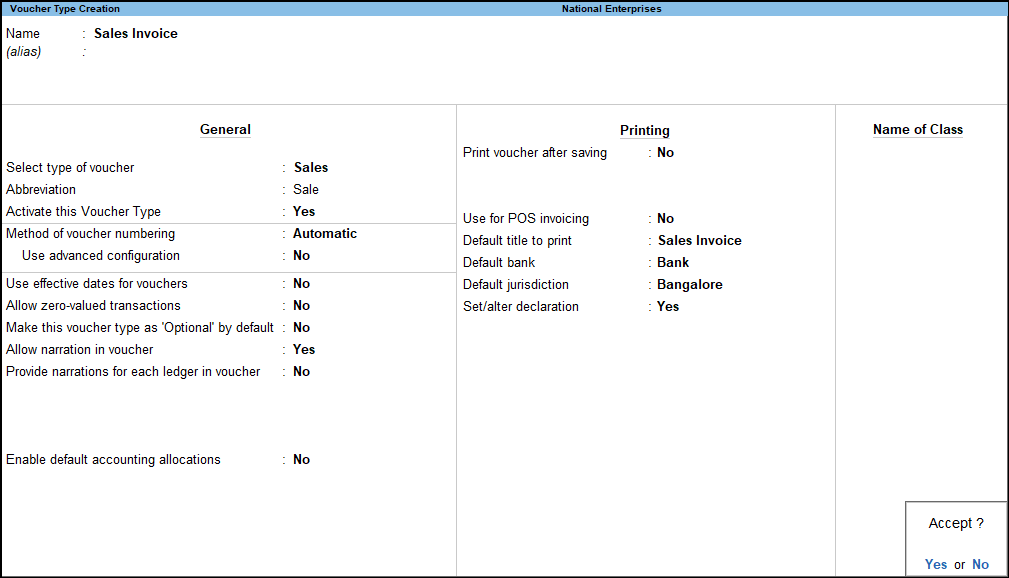
- Gateway of Tally > Create> Voucher Type.
Alternatively, Alt+G (Go To) > Create Master > Voucher Type. - Enter the Name of the voucher.
- Select the type of voucher as Sales.
- Enter the abbreviation in the Abbreviation field, if required.
- Select the Method of voucher numbering from the Methods of Numbering list, which appears as shown below:
Click here for more information on the Methods of Numbering. - Enable Use effective dates for vouchers to enter the effective dates for vouchers. This option is useful when you have recorded a transaction on a particular date, but the voucher comes into effect only on a future date. If the effective date is entered, the overdue/aging will be considered from the effective date and not from the voucher date.
- Set the option Allow zero-valued transactions to Yes if required. enabling this option will allow this voucher type to accept transactions without any value.
- Set the option Make this voucher type as ‘Optional’ by default to Yes if you want the voucher to open as an optional voucher by default.Note: For Memorandum and Reversing Journal voucher the option Make this voucher type as ‘Optional’ by default is not available. As these voucher types are optional by default.
- Enable Allow narration in the voucher to give a common narration for the voucher.
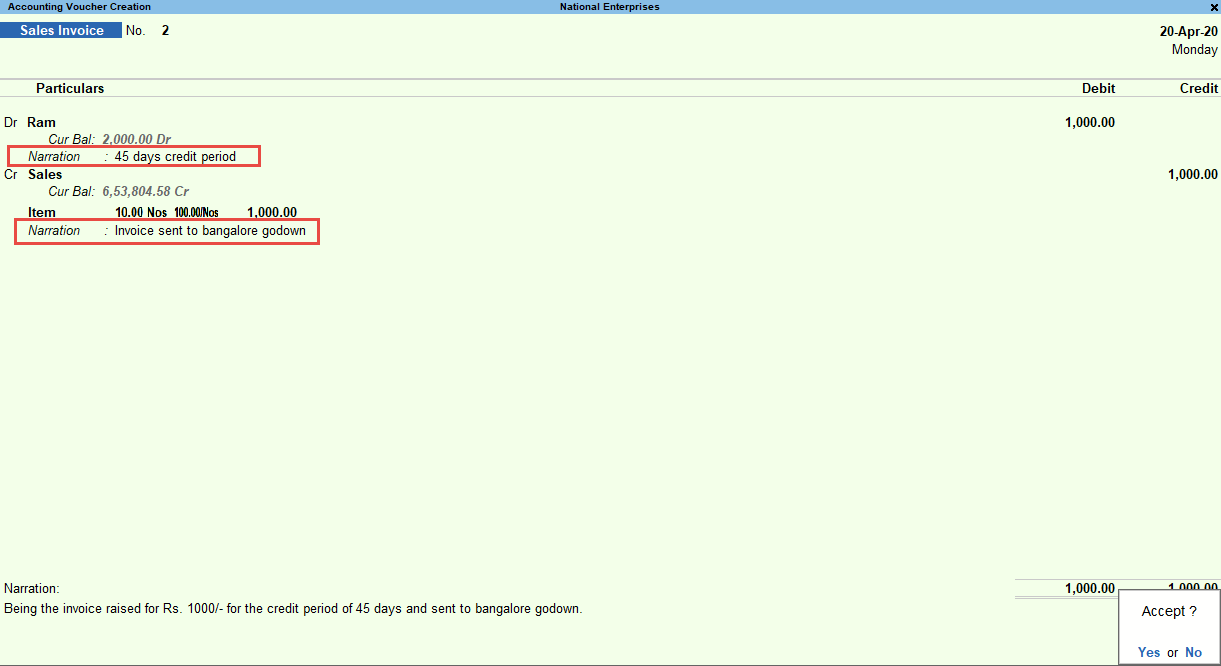
- Enable Provide narration for each ledger in voucher, if you want to give a separate narration for each ledger selected in the voucher. This will be useful when you want to provide specific details for each ledger.
For Delivery Note, Receipt Note, Sales Order, Purchase order, Physical Stock, Stock Journal, Rejection In and Rejection Out, the option Provide narrations for each ledger in the voucher is not available. - Set this option Enable default accounting allocations to Yes, for all item invoices (except for the items specified), if required.
- Enable Print voucher after saving to print every voucher immediately after saving it.
Note: Depending on the Type of Voucher selected to create or alter, different printing features appear in this field. For example, if you select Receipt as Type of Voucher, the option Print Formal Receipt after saving will be displayed. - Set Use for POS invoicing to Yes to use the sales invoice as POS invoice. If enabled for POS, set the Default title to print on invoice to print the same title for POS invoice.
Note: You can not enable this option for the default Sales voucher type, you need to create a new voucher type under Sales to enable this option. - Set Default title to print to Yes, to use the sales invoice default title name to print.
Note: Default title to print option will appear only in Sales Voucher Type. - Select the bank in Default bank option to print the default bank ledger when the option Print Bank Details is enabled in a Sales voucher.
- Enter the Default jurisdiction to be printed on the invoice if required.
- Set/alter declaration to Yes if required.
- Create a voucher class in the Name of Class field, if required.

- Accept the screen. As always, you can press Ctrl+A to save.
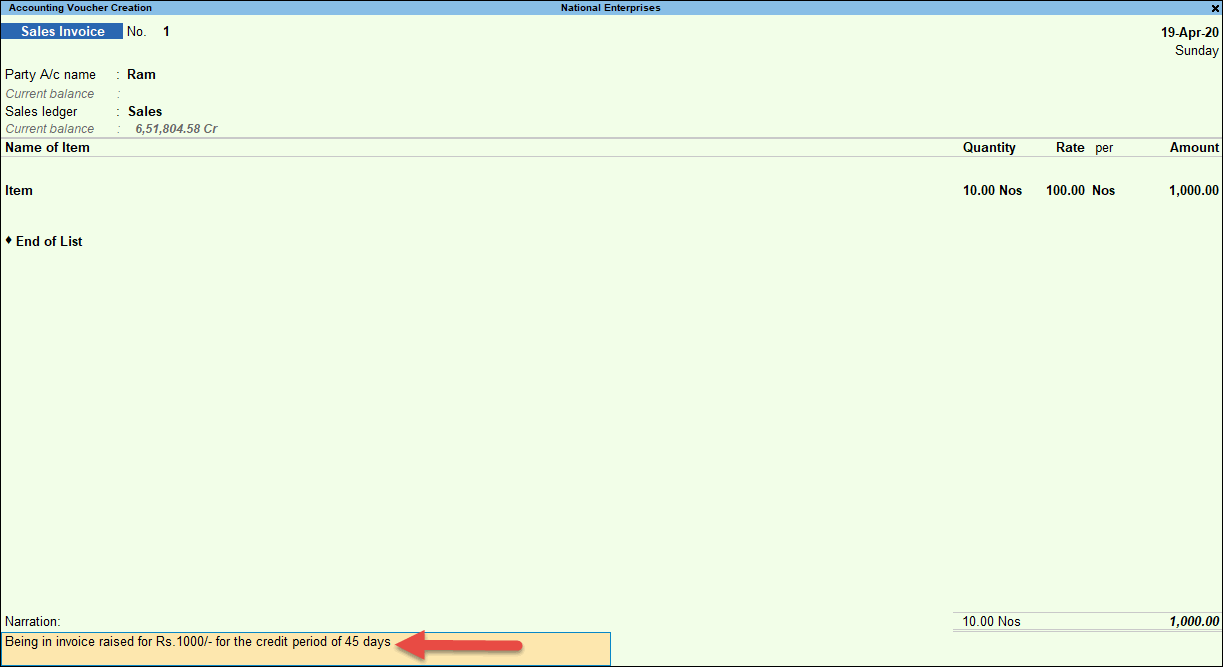
The sales invoice recorded with this voucher type, by entering:
Manufacturing Journal Voucher Type
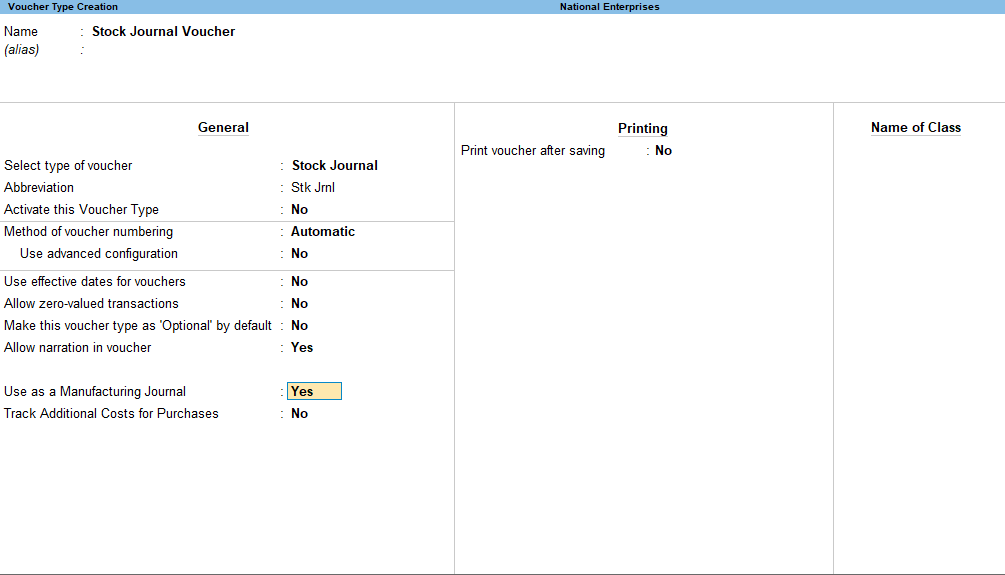
Enable the option Use as a Manufacturing Journal while creating a voucher type under Stock Journal as shown below:
Alter a Pre-defined Voucher Type
Pre-defined voucher types in TallyPrime can be altered to suit your invoicing requirements.
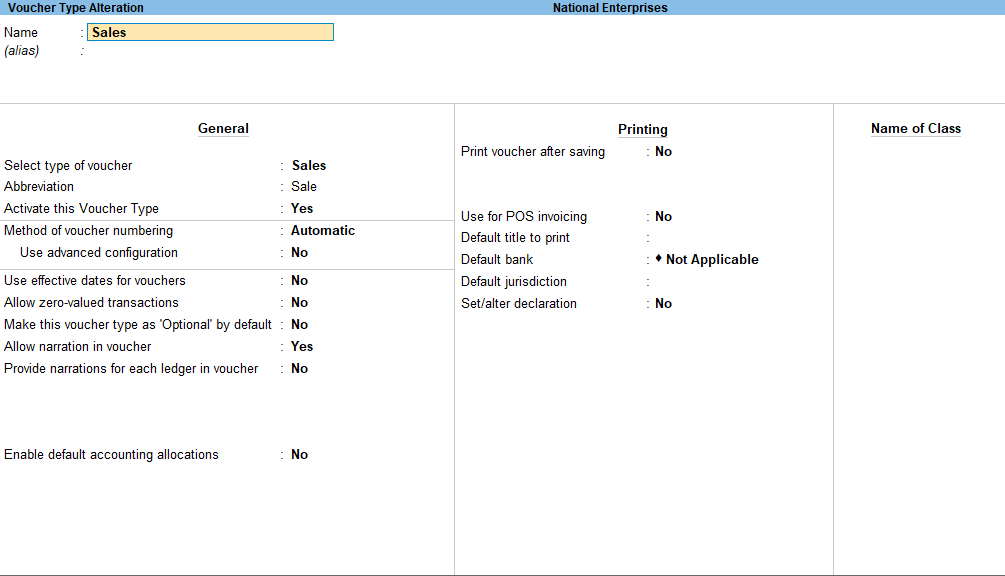
- Gateway of Tally > Alter > type or select Voucher Type > Sales.
Alternatively, Alt+G (Go To) > type or select Alter Master > Voucher Type > Sales.
The Voucher Type Alteration screen appears as shown below:
- Set the options as needed and accept the voucher type. As always, you can press Ctrl+A to save.
Voucher Class
Voucher Classes are used to automate accounting allocations in transactions. It is a table for predefining the entries to make invoice entry a simple task. This is useful in sales invoices where the ledger accounts to be credited for each item of sale are defined just once.
During the voucher entry, the accounting credits for items sold are done automatically. Additional accounting entries like tax, freight, and other charges, can be predefined to be carried out untouched during actual invoicing.
Voucher Classes are available for all major voucher types like Contra, Payment, Receipt, Journal, Sales, Credit Note, Purchases, Debit Note, Sales Order, Purchase Order, Delivery Note, Stock Journal, and Payroll.
In this section
- Voucher Class for debit notes and credit notes
- Voucher class for payment, receipt, and contra vouchers
- Voucher class for purchases
- Voucher class for sales
- Voucher class for POS invoice
- Voucher class for payroll
- Voucher class for stock journal
Voucher Class for debit notes and credit notes
Voucher classes for credit notes are similar to sales invoices except for one important inclusion. You can set the class for interest entries to enable adjustment of interest payable. If the Interest option is selected, the other sales invoice-like options will not be available. A separate class can be created for entries of Sales Returns. Debit Note classes can be set for interest entries only.
Voucher Class for Payments, Receipts and Contra
On using the voucher classes of payment, receipt, and contra vouchers, you can record the transaction in single entry mode instead of double-entry mode.
In this section
Create payment voucher class
You can either alter the existing Payment voucher type or create a new voucher type under Payment voucher type based on your requirements.
- Gateway of Tally > Alter > type or select Voucher Type > Payment.
Alternatively, Alt+G (Go To) > type or select Alter Master > Voucher Type> Payment. - Place the cursor on the Name of Class field. Enter a name, for example, Cash Payment. You can create more than one class.
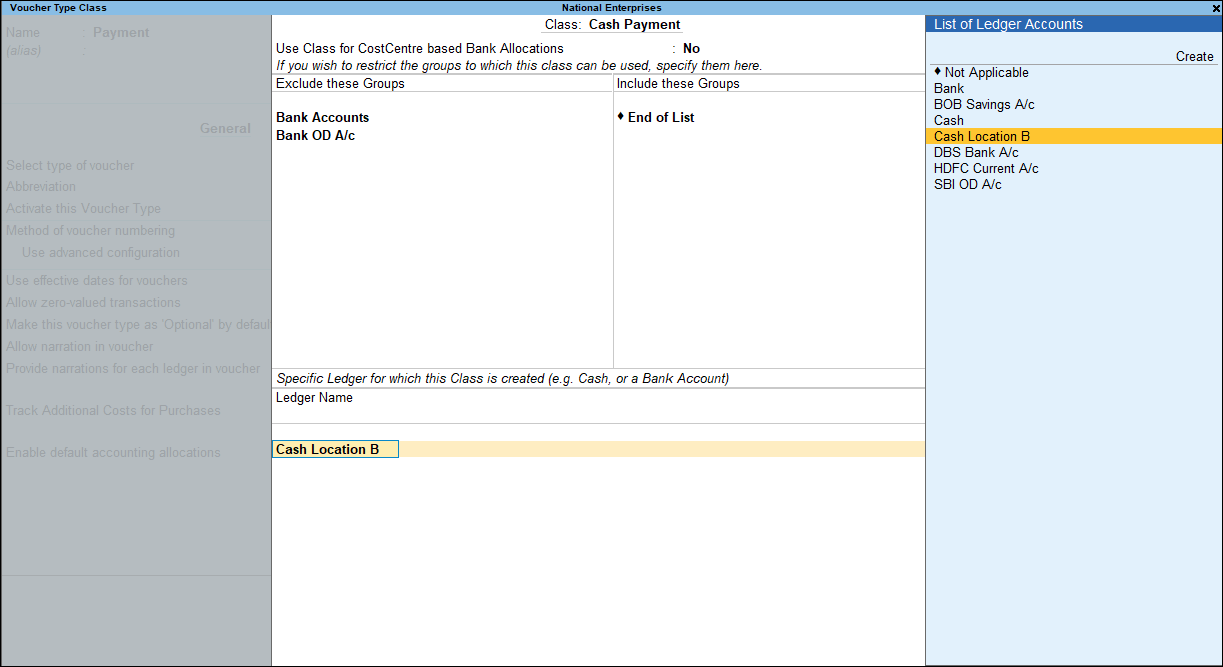
- Exclude these Groups and Include these Groups: Under these columns, you can select only those groups pertaining to the Class, which makes the entry simpler.
- Ledger Name: Select the ledger that will be used to pay out the money. This will eliminate the need to select the same during voucher entry. Instead of the ledger, if you select Not Applicable, the voucher will open in single entry mode and it will allow you to select the required ledger.
Note The groups selected under Exclude these Groups and Include these Groups will be useful only when you select Not Applicable under Ledger Name.
Record Payments using Voucher Class
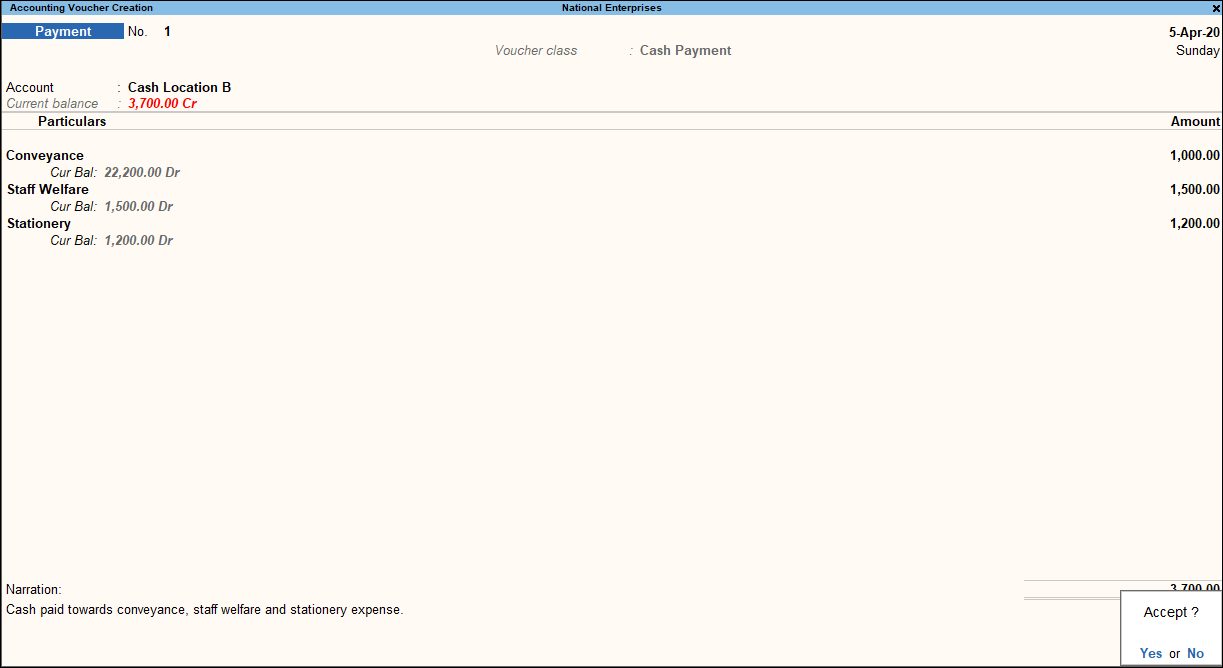
- Gateway of Tally > Vouchers > press F5 (Payment).
Alternatively, Alt+G (Go To) > Create Voucher > press F5 (Payment).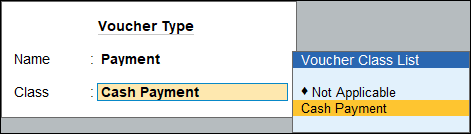
- Record the payment voucher.

In this example, the voucher class is Cash Payment. Once the voucher class is selected, the cash ledger gets automatically selected. You need to select only the ledgers to be debited.
Voucher Class for Purchases
Purchase Voucher Classes are templates where you can automate the selection of ledgers for items and expenses, and also restrict ledgers to be used in vouchers. You can either alter the existing purchase voucher type or create a new voucher type based on your requirements.
In this section
Create purchase Voucher class
- Gateway of Tally > Alter > type or select Voucher Type > Purchase.
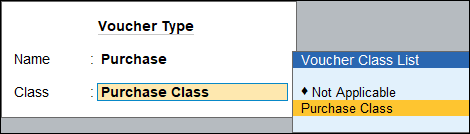
Alternatively, Alt+G (Go To) > Alter Master > type or select Voucher Type > Purchase. - Place the cursor on the Name of Class field. Enter a name, for example, Purchase Class. You can create more than one class.
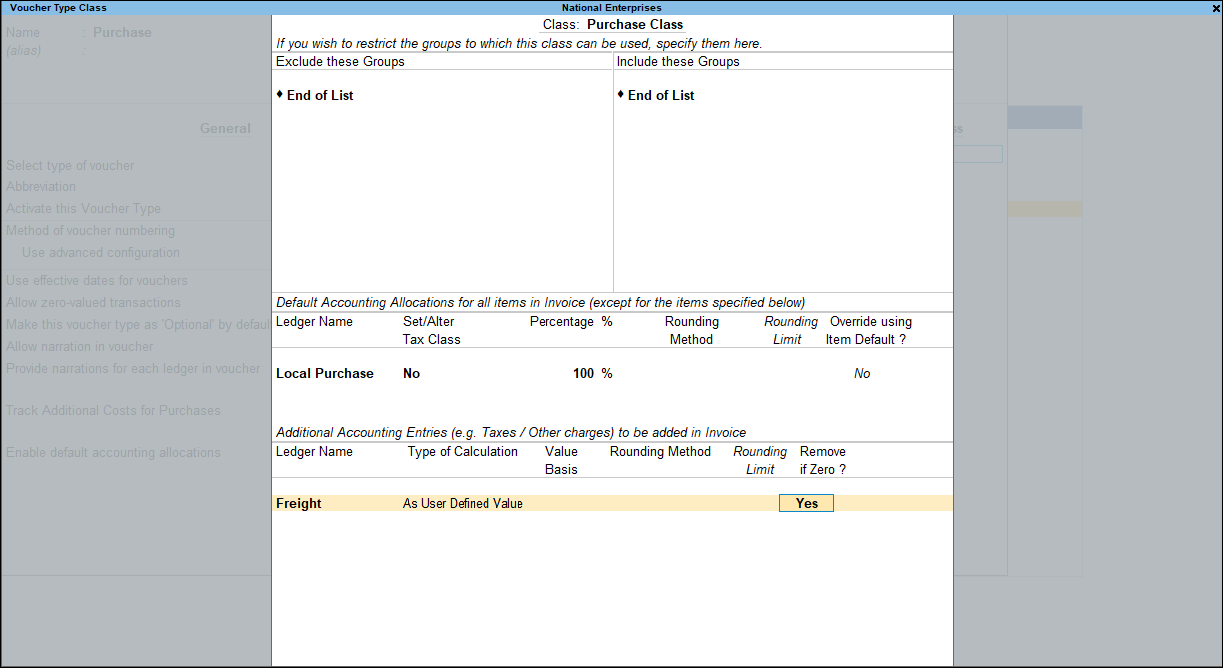
- Under Ledger Name, select the purchase ledger. All the stock items that will be entered in the voucher using this class, except for those specified in the Default Accounting Allocations for section, will be automatically allocated to this purchase ledger.
- Specify 100% in the Percentage field.
- Set Override using Item Default to No.
- Select the additional ledgers, as needed.
- Accept the purchase voucher type. As always, you can press Ctrl+A to save.
Record purchases using voucher class
- Gateway of Tally > Vouchers > press F9 (Purchase).
Alternatively, press Alt+G (Go To) > type or select Create Voucher > press F9 (Purchase). - Select the voucher Class.
- Select the Supplier Account.
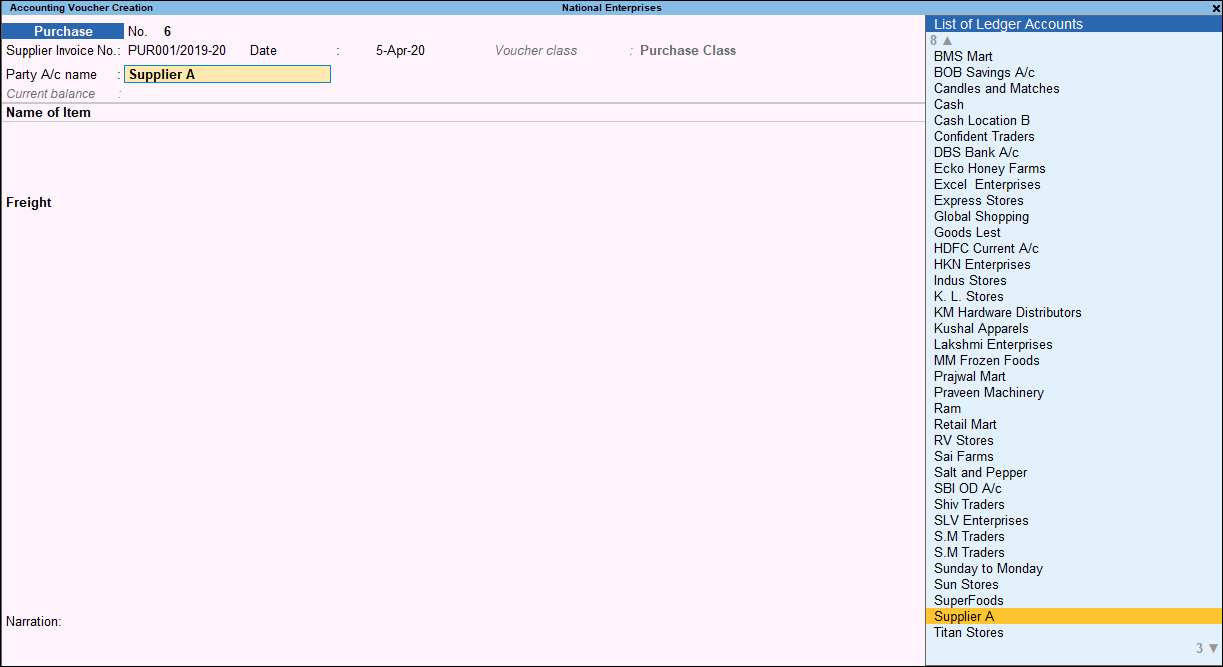
You will observe that the Ledger Accounts grouped under Sundry Debtors are also listed as you have not specified any condition to exclude Sundry Debtors Group. If you have specified Sundry Debtors under Exclude these Groups section, then these ledgers would not have been listed.
The Freight ledger gets automatically displayed and you can enter the value.
Once you select the stock item, specify the Quantity and Rate. The value will be automatically calculated, and the cursor will directly move to the Name of Item field, without displaying the Accounting Details screen.
Voucher Class for Sales
You may want to record sales by automating the appearance of only the required ledgers for faster data entry. You can do it using the Voucher Class feature. During voucher entry, you can select the voucher class, and view the predefined ledgers, including additional ledgers created for tax, freight, and other charges, without having to select them in the invoice.
In this section
Sales inclusive of tax with additional expenses
- Create a voucher class for sales.
- Gateway of Tally > Alter > Voucher Type > type or select Sales > and press Enter.
Alternatively, press Alt+G (Go To) > Alter Master > Voucher Type > type or select Sales > and press Enter. - Enter a name for the voucher class under Name of Class.
- Press Enter to view the Voucher Type Class screen.
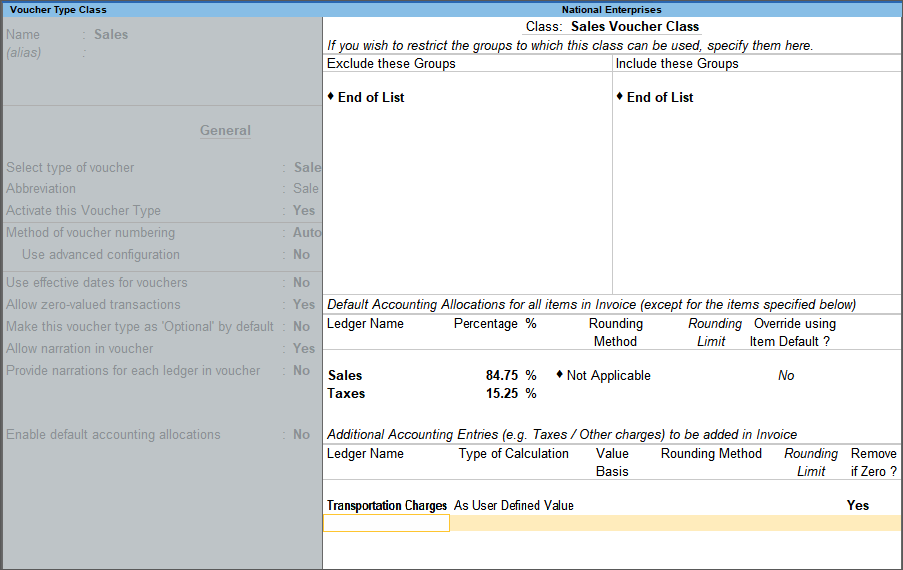
- Under Default Accounting Allocations for all items in Invoice (except for the items specified below), select the sales and tax ledgers.
For example, if the tax is 18% and the sale value is inclusive of tax, the sale value will be calculated as (100/118)*100 = 84.75. The tax value will be calculated as (100/18)*18 = 15.25 - Under Additional Accounting Entries, select a ledger created under Indirect Expenses.
- Accept the screen and the sales voucher type. As always, you can press Ctrl+A to save.
- Gateway of Tally > Alter > Voucher Type > type or select Sales > and press Enter.
- Use the voucher class in the sales invoice.
- Press Alt+G (Go To) > Create Voucher > F8 (Sales) > select the voucher class.
- Enter the sales details.
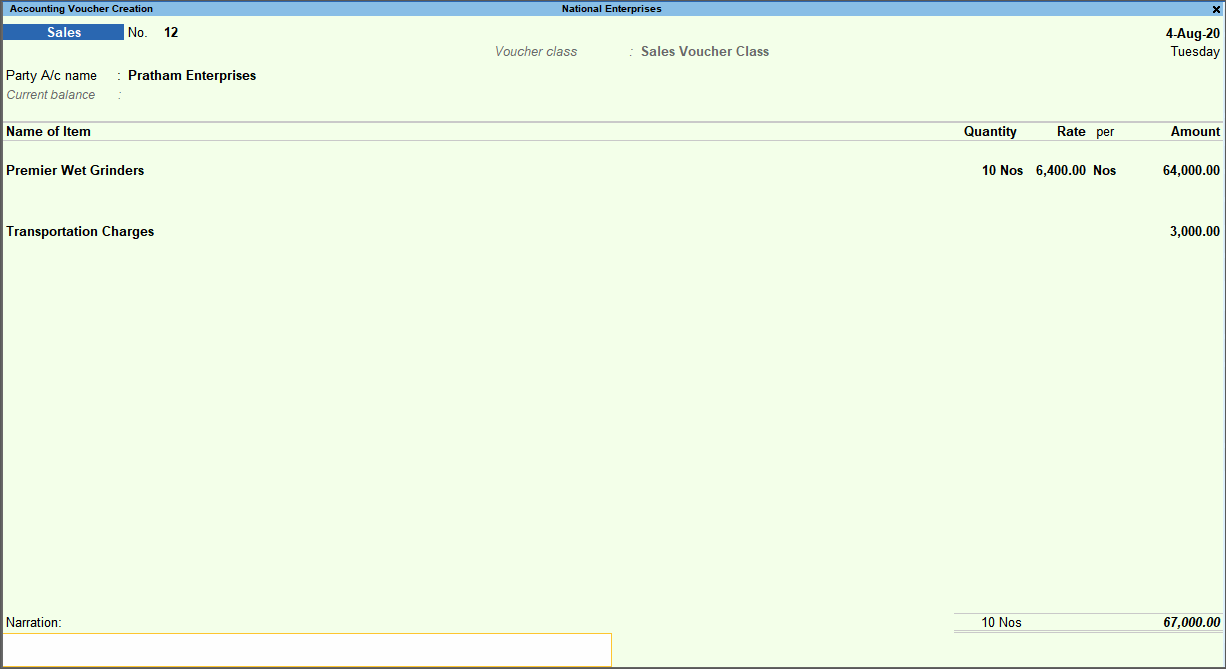
- Accept the invoice. As always, you can press Ctrl+A to save.
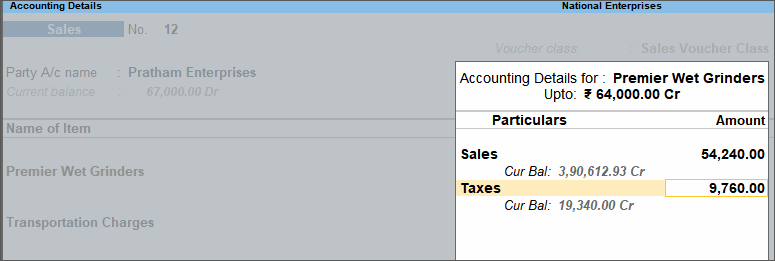
- Press the page Up key to view the invoice in alteration mode. In the Accounting Details screen, you can see the break-up of sales and tax amount.

Sales exclusive of tax with additional expenses
- Create a voucher class for sales.
- Press Alt+G (Go To) > Alter Master > Voucher Type > type or select Sales > and press Enter.
- Enter a name for the voucher class under Name of Class.
- Press Enter to view the Voucher Type Class screen.
- Under Default Accounting Allocations for all items in Invoice (except for the items specified below), select the sales ledger.
- Under Additional Accounting Entries, select the tax ledger and expense ledger.
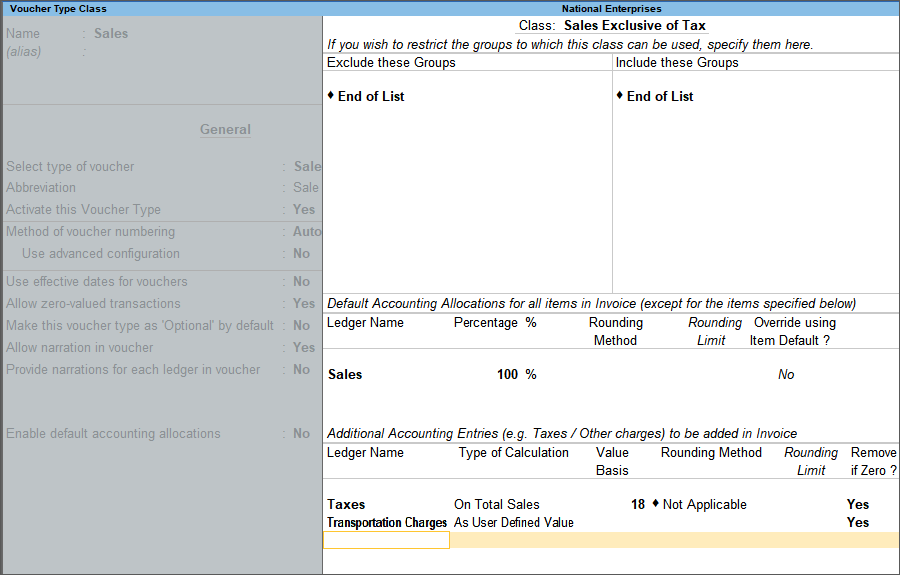
- Accept the screen and the sales voucher type. As always, you can press Ctrl+A to save.
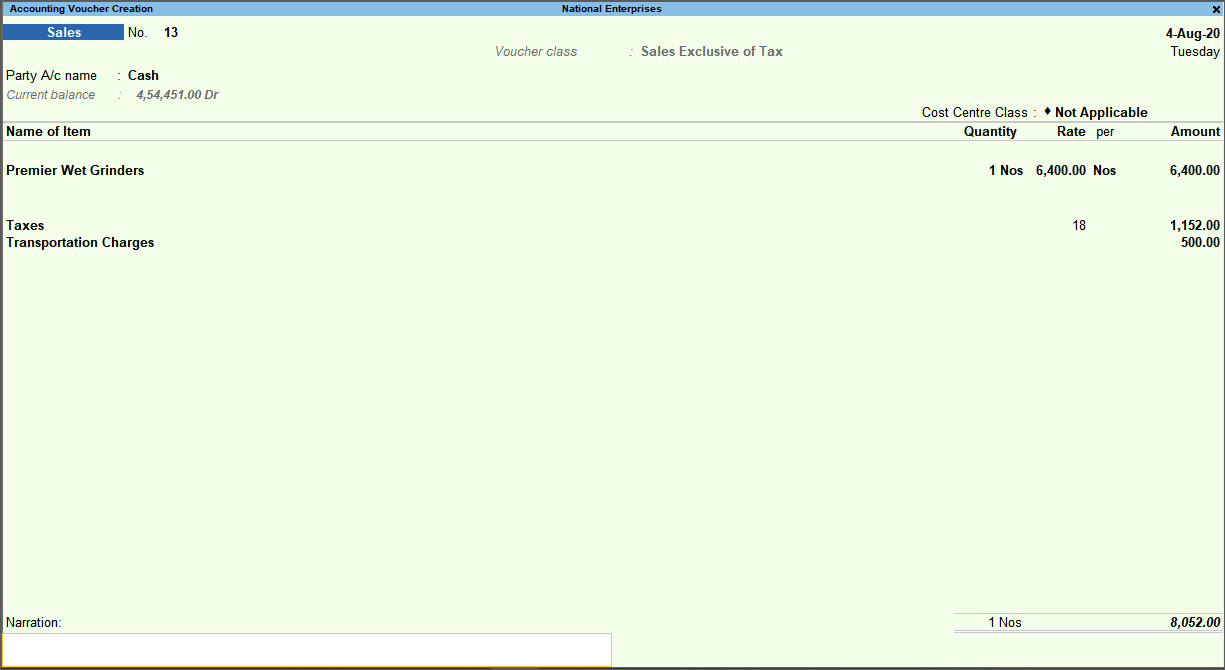
- Use the voucher class in sales invoice.
Voucher Class for POS Invoice
In TallyPrime, you can create a voucher class with the required modes of payment, which can be used to quickly record the transactions.
- Enter a name for the POS invoice voucher class.
- Gateway of Tally > Create (create a POS invoice voucher type, if not available) or Alter (to open the POS invoice voucher type if you had created it earlier) > Voucher Type > and press Enter.
Alternatively, press Alt+G (Go To) > Create Master/Alter Master > Voucher Type. Create/select POS Invoice. - Enter a name for the voucher class under Name of Class.
- Press Enter to view the Voucher Type Class screen.
- Gateway of Tally > Create (create a POS invoice voucher type, if not available) or Alter (to open the POS invoice voucher type if you had created it earlier) > Voucher Type > and press Enter.
- Define the voucher class details.
- The options Gift Vouchers, Credit/Debit Card Payment, Cheque/DD, Cash will be enabled.
- Select the ledgers for each.
- Gift Vouchers – Select the ledgers grouped under Sundry Debtors or Sundry Creditors.
- Credit/Debit Card Payment – Select the bank ledger grouped under Bank Account or Bank OD/OCC.
- Cheque/DD – Select the bank ledger grouped under Bank Account or Bank OD/OCC.
- Cash – Select the ledger grouped under Cash-in-Hand.
- Select the sales ledger to be prefilled in the invoice, and enter the percentage of allocation. Note: If you want to use this voucher class to calculate sale value inclusive of tax, you can enter a lesser percentage for the sales ledger and allocate the remaining percentage for tax. For example, if the tax is 14%, you can enter the percentage for sale as 87.72% (which is (100*100)/114) and the remaining percentage (12.28% (which is 100*14)/114) for tax ledger.
- Select any additional accounting ledgers to be pre-defined in the invoice, with the Type of Calculation. This is applicable only if you want to enter additional expenses, like transportation charges, which will be added to the item value.

- Press Enter to return to the Voucher Type Alteration screen.
- Accept the screen. As always, you can press Ctrl+A to save.
Voucher class for payroll
Payroll Voucher Classes are templates where you can automate the selection of ledgers, and also restrict ledgers to be used in vouchers. You can either alter the existing payroll voucher type or create a new voucher type based on your requirements.
In this section
Create Payroll Voucher Class
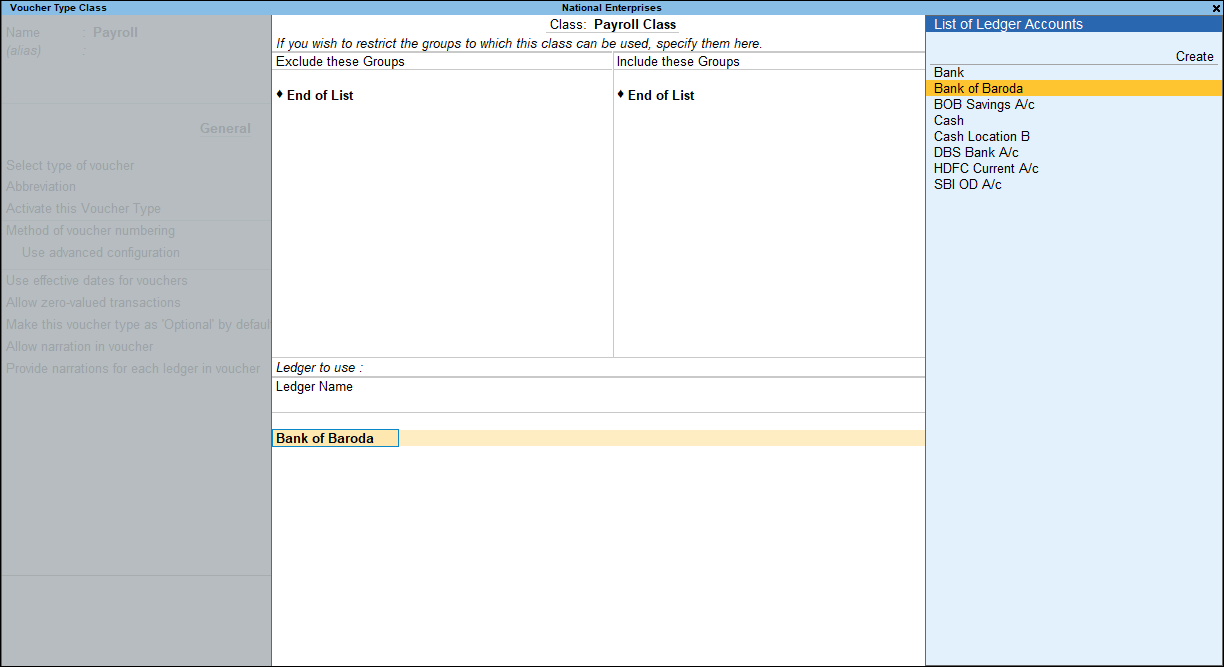
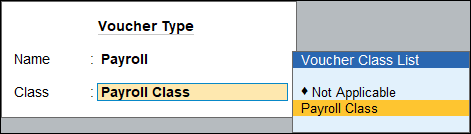
- Gateway of Tally > Alter > Voucher Type > Payroll.
Alternatively, press Alt+G (Go To) > type or select Alter Master >Voucher Type > Payroll. - Press F11 (Features) > Set Maintain payroll to Yes.
- Place the cursor on the Name of Class field. Enter a name. You can create more than one class.
- Select the Ledger Name.

- Accept the voucher type screen. As always, you can press Ctrl+A to save.
Record Payroll Voucher using Voucher Class
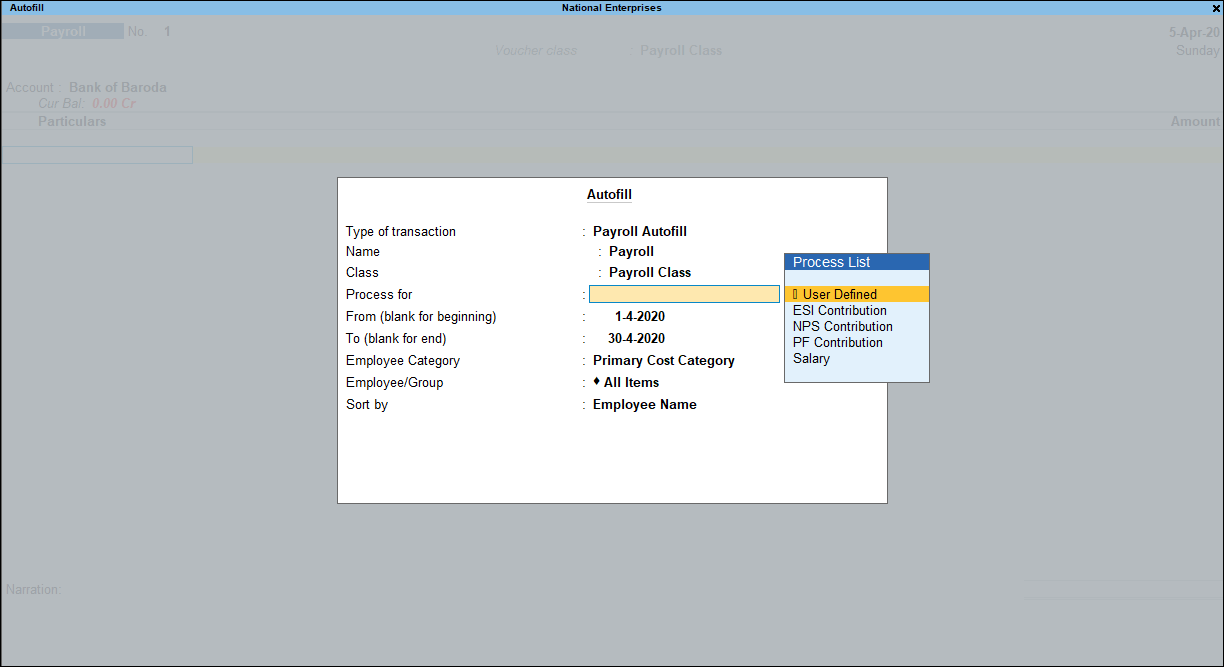
- Gateway of Tally > Vouchers > press F10 (Other Vouchers) > type or select Payroll or press Ctrl+F4 (Payroll).
Alternatively, press Alt+G (Go To) > Create Voucher > press Ctrl+F4 (Payroll). - Select the class from the Voucher Class List as shown below:
- Press Ctrl+F for the Payroll Auto Fill screen to appears with class.
- Enter the required details.
- Enter the Bank Allocation details.
The payroll voucher appears as shown below: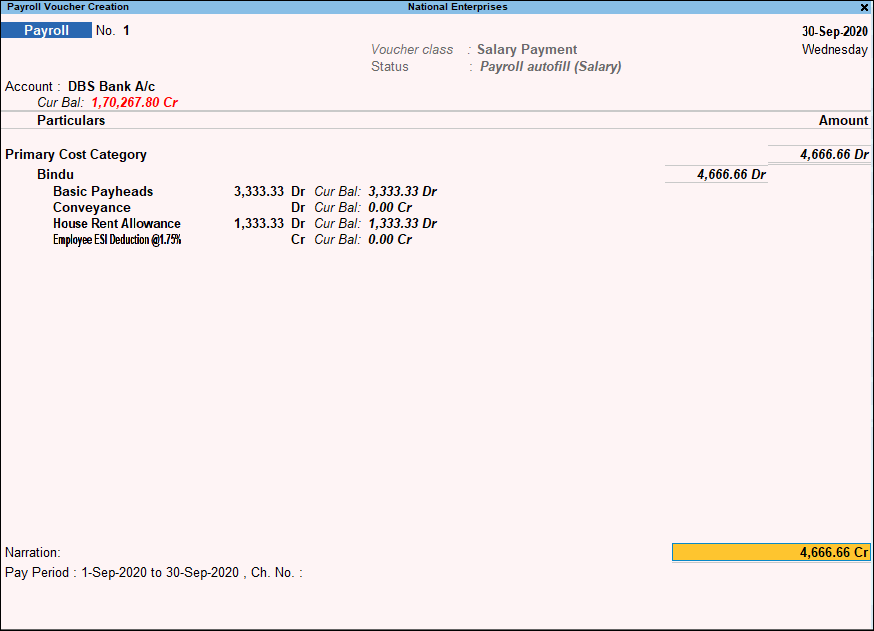
- Accept the voucher. As always, you can press Ctrl+A to save.
Voucher class for stock journal
Stock Journal classes can be used to account for goods transferred from one location (Godown) to another. This is useful for companies having inventory at multiple locations or at least two location/Godowns. Once the class is selected, specify the Destination and provide the list of items to be transferred. Through this class all items/batches thus selected will be exactly mirrored to the destination, including Batch Number, Rate, and Value. You can either alter the existing Stock Journal or create a new voucher type based on the requirements.
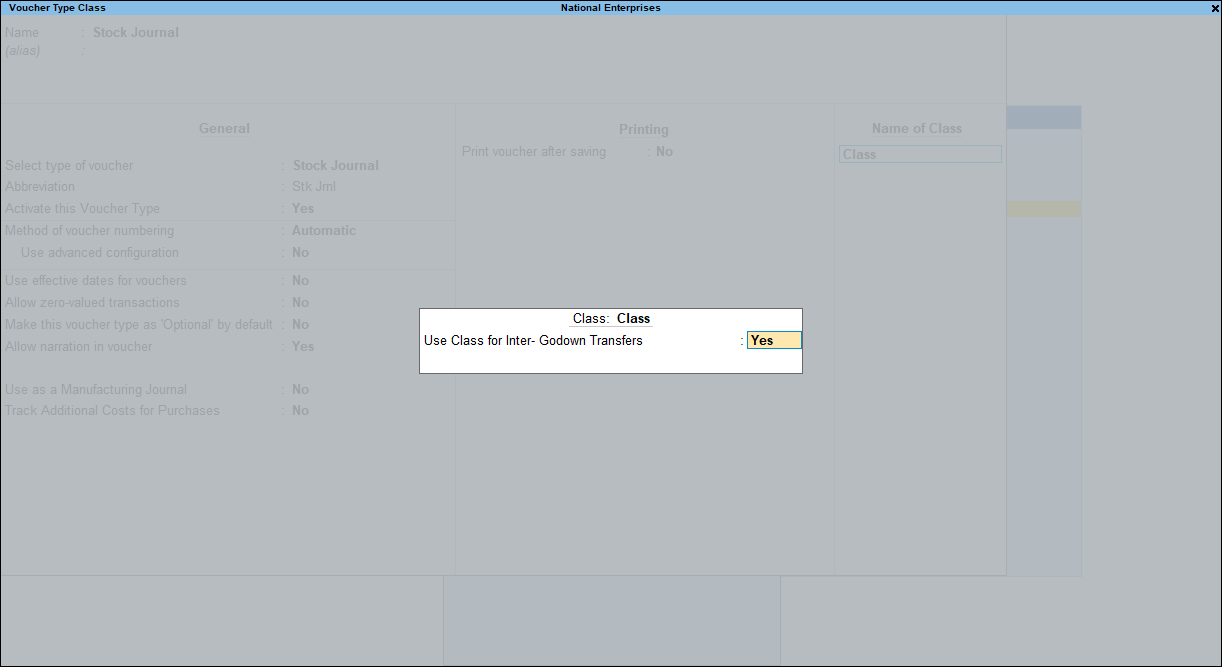
- Gateway of Tally > Alter > Voucher Type > type or select Stock Journal.
Alternatively, Alt+G (Go To) > Alter Master > Voucher Type> type or select Stock Journal. - Place the cursor on the Name of Class field. Enter a name, for example, Transfer. You can create more than one class.
- Set the option Use Class for Inter -Godown Transfer to Yes.
- Accept the voucher type. As always, you can press Ctrl+A to save.
Voucher Type Security
Voucher type security will help the business owner specify both individual Voucher Type (Contra, Payment, etc.) restrictions and activity level (Sales Department, Procurement Department, etc) restrictions for different users. The types of functions or activities for which the control can be set include being able to create, alter, print, or have full access to any particular type of Voucher. With the voucher type security feature, the administrator can:
- Create a department and role-based segregation of access for different users. For example, allow access based on sales, purchase, accounts, and payroll, etc. for employees in those areas of work.
- Provide or deny access to the level of activity that can be performed on a Voucher by different users. For example, allow User A and User B to create and alter a payment voucher, and allow User C to only view the same.
- Provide access to an entire group of vouchers like accounting vouchers, or inventory vouchers as a whole.
In this section
- Set up Voucher Type Security for users
- Security for pre-defined groups of vouchers
- Voucher type security add-ons and voucher type security
Set up Voucher Type Security for users
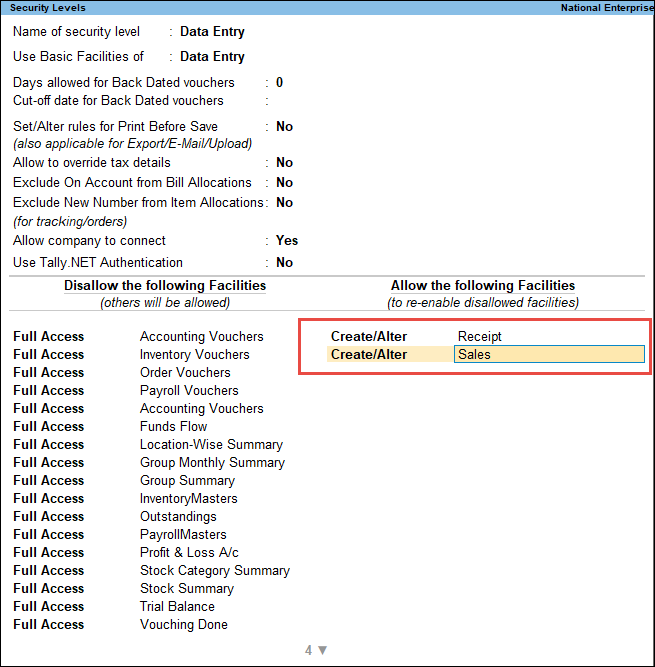
Consider the example of ABC Company having a user named Arun, who records sales and receipt transactions. You need to provide him with access to create and alter sales and receipt vouchers.
Gateway of Tally > Alt+K (Company)> select User Roles.
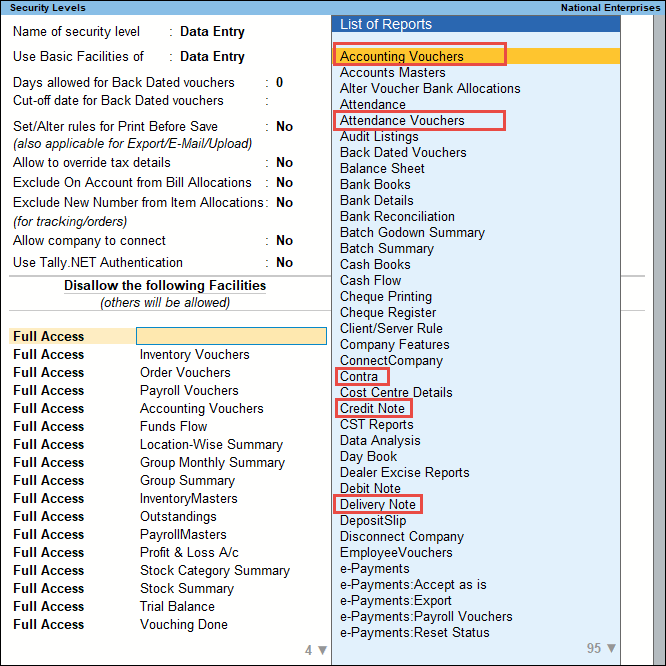
- In the Security Levels screen, include the voucher types and group of vouchers (Accounting Vouchers, Inventory Vouchers, Order Vouchers, and Payroll Vouchers) from the List of Reports, to set the Voucher Type Security.

Note: The aliases provided for voucher types will not be displayed in the List of Reports while defining the Voucher Type Security. - To provide access to Create/Alter sales and receipt voucher types, configure the Security Level as shown below:

- Enter Arun’s login details to open the Company.
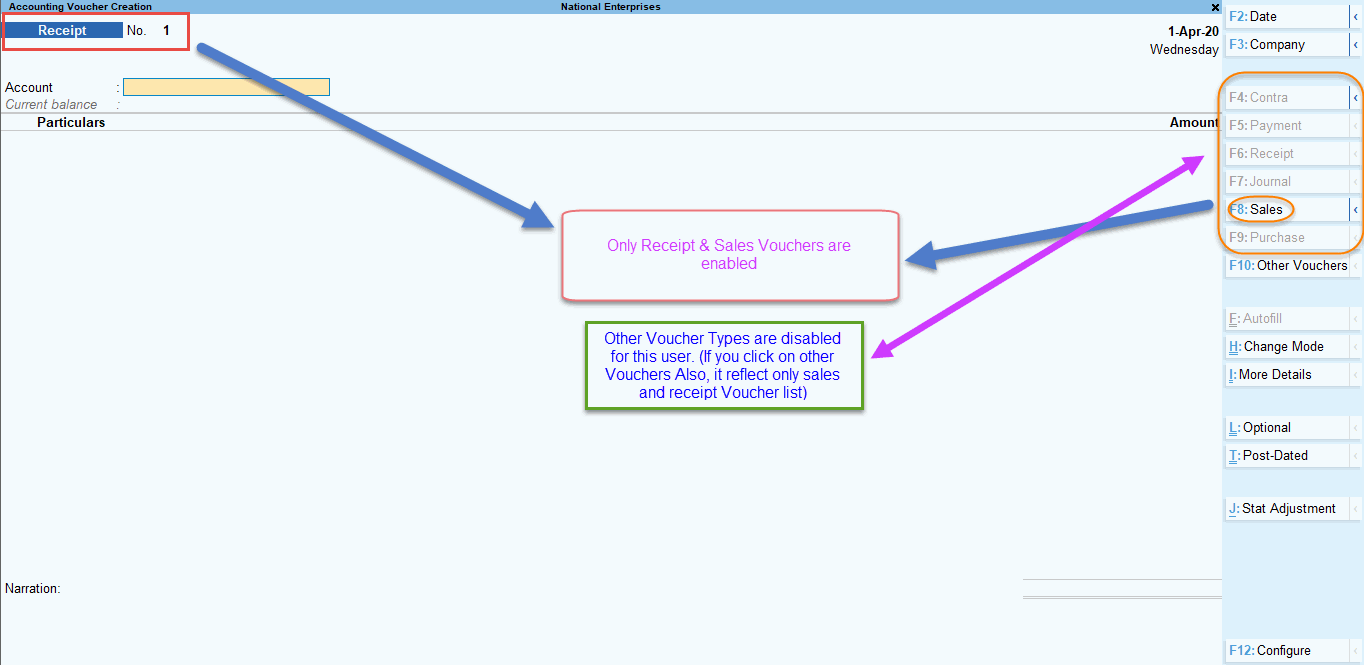
In Gateway of Tally, only the Vouchers option appears as shown below: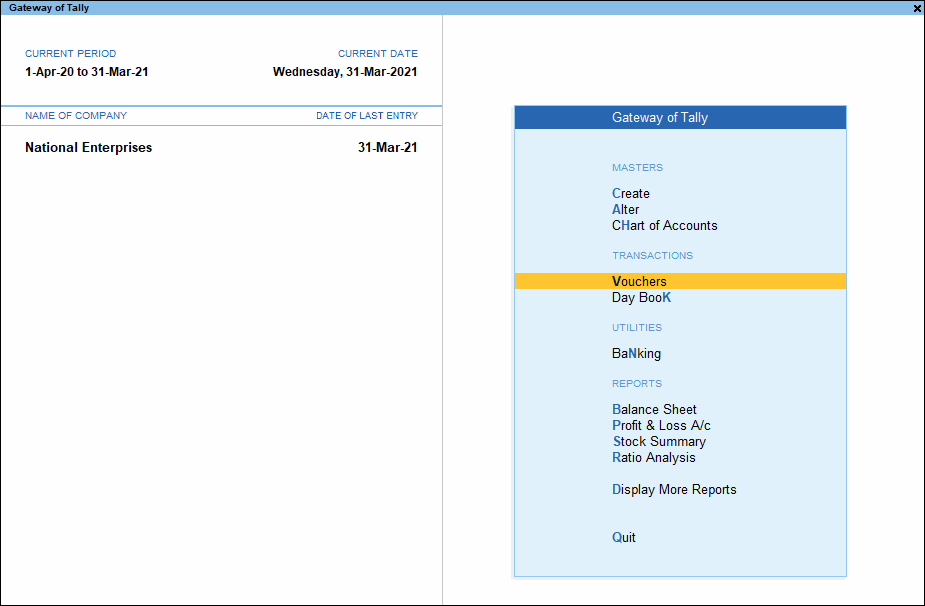
On navigating from this option, you can observe that only receipt and sales vouchers will be enabled for recording transactions.
If the user Arun navigates to Day Book, all the vouchers recorded during the period specified will be displayed, but the access to Alter/Print the vouchers will be restricted. If the user selects any voucher other than receipt or sales vouchers will display the error No Access Allowed!.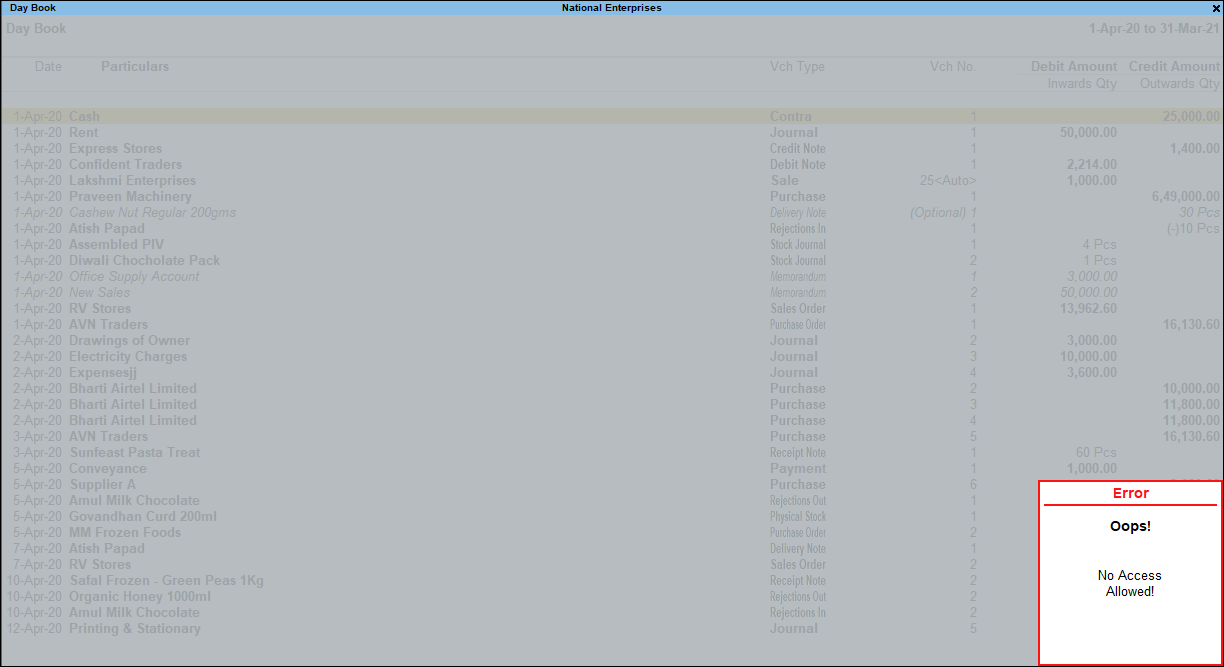
Security for pre-defined groups of vouchers
You can configure voucher security levels for four pre-defined groups of vouchers.
- Accounting Vouchers: Contra, Payment, and Receipt voucher types.
- Inventory Vouchers: Rejections In, Rejections Out, Stock Journal, Delivery Note, Receipt Note, Physical Stock, Material In, and Material Out voucher types.
- Order Vouchers: Sales Order, Purchase Order, Job Work Out Order, and Job Work In Order voucher types.
- Payroll Vouchers: Payroll and Attendance voucher types.
If users are Allowed/Disallowed access for any of the groups listed above, the voucher types listed under the respective group will also carry the same access configuration. Disallowing access to Voucher Types will not affect the user’s access to Create Voucher Types. To restrict a user from Creating Voucher Types, you need to disallow access to Masters.
As per the example given in the previous section, as Arun has been disallowed access to Payment Voucher, he cannot record transactions in Payment Vouchers. But he can Create a Voucher Type under Payment Voucher Type. To restrict Arun’s access for Creating Voucher Types underpayment voucher type, access to Accounting Masters has to be Disallowed.
Voucher type security add-ons and voucher type security
If an Add-on for providing Voucher Type Security is already in use:
- Access configurations defined using TallyPrime and the Add-on will be combined. For example, if Full Access to payment voucher is Disallowed for User A, and in the Add-on Full Access to receipt voucher is Disallowed, User A will not be able to access both payment and receipt vouchers.
- The Voucher Type Security configuration will override the Add-on’s configuration. For example, if Full Access to the group Accounting Vouchers is Disallowed for User A, and in the Add-on Full Access to payment voucher is Allowed, User A will not be able to access the payment voucher.