

Java compiler executes the code from top to bottom. The statements in the code are executed according to the order in which they appear. However, Java provides statements that can be used to control the flow of Java code. Such statements are called control flow statements. It is one of the fundamental features of Java, which provides a smooth flow of program.
Java provides three types of control flow statements.
- Decision Making statements
- if statements
- switch statement
- Loop statements
- do while loop
- while loop
- for loop
- for-each loop
- Jump statements
- break statement
- continue statement
Decision-Making statements:
As the name suggests, decision-making statements decide which statement to execute and when. Decision-making statements evaluate the Boolean expression and control the program flow depending upon the result of the condition provided. There are two types of decision-making statements in Java, i.e., If statement and switch statement.
1) If Statement:
In Java, the “if” statement is used to evaluate a condition. The control of the program is diverted depending upon the specific condition. The condition of the If statement gives a Boolean value, either true or false. In Java, there are four types of if-statements given below.
- Simple if statement
- if-else statement
- if-else-if ladder
- Nested if-statement
Let’s understand the if-statements one by one.
1) Simple if statement:
It is the most basic statement among all control flow statements in Java. It evaluates a Boolean expression and enables the program to enter a block of code if the expression evaluates to true.
Syntax of if statement is given below.
if(condition) {
statement 1; //executes when condition is true
}
Consider the following example in which we have used the if statement in the java code.
Student.java
Student.java
public class Student {
public static void main(String[] args) {
int x = 10;
int y = 12;
if(x+y > 20) {
System.out.println(“x + y is greater than 20”);
}
}
}
Output:
x + y is greater than 20
2) if-else statement
The if-else statement is an extension to the if-statement, which uses another block of code, i.e., else block. The else block is executed if the condition of the if-block is evaluated as false.
Syntax:
if(condition) {
statement 1; //executes when condition is true
}
else{
statement 2; //executes when condition is false
}
Consider the following example.
Student.java
public class Student {
public static void main(String[] args) {
int x = 10;
int y = 12;
if(x+y < 10) {
System.out.println(“x + y is less than 10”);
} else {
System.out.println(“x + y is greater than 20”);
}
}
}
Output:
x + y is greater than 20
3) if-else-if ladder:
The if-else-if statement contains the if-statement followed by multiple else-if statements. In other words, we can say that it is the chain of if-else statements that create a decision tree where the program may enter in the block of code where the condition is true. We can also define an else statement at the end of the chain.
Syntax of if-else-if statement is given below.
if(condition 1) {
statement 1; //executes when condition 1 is true
}
else if(condition 2) {
statement 2; //executes when condition 2 is true
}
else {
statement 2; //executes when all the conditions are false
}
Consider the following example.
Student.java
public class Student {
public static void main(String[] args) {
String city = “Delhi”;
if(city == “Meerut”) {
System.out.println(“city is meerut”);
}else if (city == “Noida”) {
System.out.println(“city is noida”);
}else if(city == “Agra”) {
System.out.println(“city is agra”);
}else {
System.out.println(city);
}
}
}
Output:
Delhi
4. Nested if-statement
In nested if-statements, the if statement can contain a if or if-else statement inside another if or else-if statement.
Syntax of Nested if-statement is given below.
if(condition 1) {
statement 1; //executes when condition 1 is true
if(condition 2) {
statement 2; //executes when condition 2 is true
}
else{
statement 2; //executes when condition 2 is false
}
}
Consider the following example.
Student.java
public class Student {
public static void main(String[] args) {
String address = “Delhi, India”;
if(address.endsWith(“India”)) {
if(address.contains(“Meerut”)) {
System.out.println(“Your city is Meerut”);
}else if(address.contains(“Noida”)) {
System.out.println(“Your city is Noida”);
}else {
System.out.println(address.split(“,”)[0]);
}
}else {
System.out.println(“You are not living in India”);
}
}
}
Output:
Delhi
Switch Statement:
In Java, Switch statements are similar to if-else-if statements. The switch statement contains multiple blocks of code called cases and a single case is executed based on the variable which is being switched. The switch statement is easier to use instead of if-else-if statements. It also enhances the readability of the program.
Points to be noted about switch statement:
- The case variables can be int, short, byte, char, or enumeration. String type is also supported since version 7 of Java
- Cases cannot be duplicate
- Default statement is executed when any of the case doesn’t match the value of expression. It is optional.
- Break statement terminates the switch block when the condition is satisfied.
It is optional, if not used, next case is executed. - While using switch statements, we must notice that the case expression will be of the same type as the variable. However, it will also be a constant value.
The syntax to use the switch statement is given below.
switch (expression){
case value1:
statement1;
break;
.
.
.
case valueN:
statementN;
break;
default:
default statement;
}
Consider the following example to understand the flow of the switch statement.
Student.java
public class Student implements Cloneable {
public static void main(String[] args) {
int num = 2;
switch (num){
case 0:
System.out.println(“number is 0”);
break;
case 1:
System.out.println(“number is 1”);
break;
default:
System.out.println(num);
}
}
}
Output:
2
While using switch statements, we must notice that the case expression will be of the same type as the variable. However, it will also be a constant value. The switch permits only int, string, and Enum type variables to be used.
Loop Statements
In programming, sometimes we need to execute the block of code repeatedly while some condition evaluates to true. However, loop statements are used to execute the set of instructions in a repeated order. The execution of the set of instructions depends upon a particular condition.
In Java, we have three types of loops that execute similarly. However, there are differences in their syntax and condition checking time.
- for loop
- while loop
- do-while loop
Let’s understand the loop statements one by one.
Java for loop
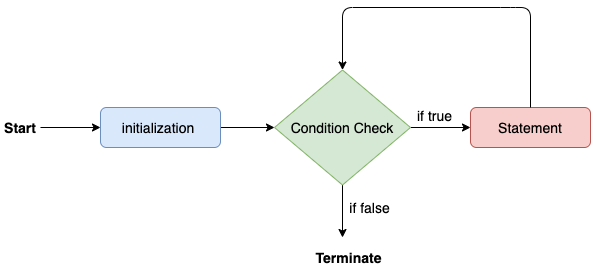
In Java, for loop is similar to C and C++. It enables us to initialize the loop variable, check the condition, and increment/decrement in a single line of code. We use the for loop only when we exactly know the number of times, we want to execute the block of code.
for(initialization, condition, increment/decrement) {
//block of statements
}
The flow chart for the for-loop is given below.
Consider the following example to understand the proper functioning of the for loop in java.
Calculation.java
public class Calculattion {
public static void main(String[] args) {
// TODO Auto-generated method stub
int sum = 0;
for(int j = 1; j<=10; j++) {
sum = sum + j;
}
System.out.println(“The sum of first 10 natural numbers is ” + sum);
}
}
Output:
The sum of first 10 natural numbers is 55
Java for-each loop
Java provides an enhanced for loop to traverse the data structures like array or collection. In the for-each loop, we don’t need to update the loop variable. The syntax to use the for-each loop in java is given below.
for(data_type var : array_name/collection_name){
//statements
}
Consider the following example to understand the functioning of the for-each loop in Java.
Calculation.java
public class Calculation {
public static void main(String[] args) {
// TODO Auto-generated method stub
String[] names = {“Java”,”C”,”C++”,”Python”,”JavaScript”};
System.out.println(“Printing the content of the array names:\n”);
for(String name:names) {
System.out.println(name);
}
}
}
Output:
Printing the content of the array names:

Java
C
C++
Python
JavaScript
Java while loop
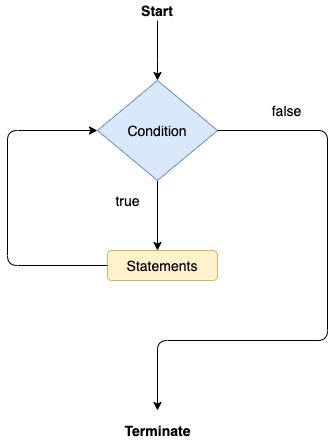
The while loop is also used to iterate over the number of statements multiple times. However, if we don’t know the number of iterations in advance, it is recommended to use a while loop. Unlike for loop, the initialization and increment/decrement doesn’t take place inside the loop statement in while loop.
It is also known as the entry-controlled loop since the condition is checked at the start of the loop. If the condition is true, then the loop body will be executed; otherwise, the statements after the loop will be executed.
The syntax of the while loop is given below.
while(condition){
//looping statements
}
The flow chart for the while loop is given in the following image.
Consider the following example.
Calculation .java
public class Calculation {
public static void main(String[] args) {
// TODO Auto-generated method stub
int i = 0;
System.out.println(“Printing the list of first 10 even numbers \n”);
while(i<=10) {
System.out.println(i);
i = i + 2;
}
}
}
Output:
Printing the list of first 10 even numbers

0
2
4
6
8
10
Java do-while loop
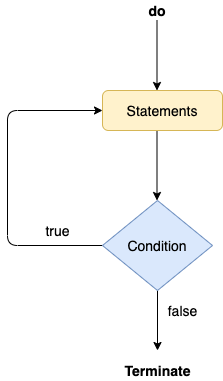
The do-while loop checks the condition at the end of the loop after executing the loop statements. When the number of iteration is not known and we have to execute the loop at least once, we can use do-while loop.
It is also known as the exit-controlled loop since the condition is not checked in advance. The syntax of the do-while loop is given below.
do
{
//statements
} while (condition);
The flow chart of the do-while loop is given in the following image.
Consider the following example to understand the functioning of the do-while loop in Java.
Calculation.java
public class Calculation {
public static void main(String[] args) {
// TODO Auto-generated method stub
int i = 0;
System.out.println(“Printing the list of first 10 even numbers \n”);
do {
System.out.println(i);
i = i + 2;
}while(i<=10);
}
}
Output:
Printing the list of first 10 even numbers
0
2
4
6
8
10
Jump Statements
Jump statements are used to transfer the control of the program to the specific statements. In other words, jump statements transfer the execution control to the other part of the program. There are two types of jump statements in Java, i.e., break and continue.
Java break statement
As the name suggests, the break statement is used to break the current flow of the program and transfer the control to the next statement outside a loop or switch statement. However, it breaks only the inner loop in the case of the nested loop.
The break statement cannot be used independently in the Java program, i.e., it can only be written inside the loop or switch statement.
The break statement example with for loop
Consider the following example in which we have used the break statement with the for loop.
BreakExample.java
public class BreakExample {
public static void main(String[] args) {
// TODO Auto-generated method stub
for(int i = 0; i<= 10; i++) {
System.out.println(i);
if(i==6) {
break;
}
}
}
}
Output:
0
1
2
3
4
5
6
break statement example with labeled for loop
Calculation.java
public class Calculation {
public static void main(String[] args) {
// TODO Auto-generated method stub
a:
for(int i = 0; i<= 10; i++) {
b:
for(int j = 0; j<=15;j++) {
c:
for (int k = 0; k<=20; k++) {
System.out.println(k);
if(k==5) {
break a;
}
}
}
}
}
}
Output:
0
1
2
3
4
5
Java continue statement
Unlike break statement, the continue statement doesn’t break the loop, whereas, it skips the specific part of the loop and jumps to the next iteration of the loop immediately.
Consider the following example to understand the functioning of the continue statement in Java.
public class ContinueExample {
public static void main(String[] args) {
// TODO Auto-generated method stub
for(int i = 0; i<= 2; i++) {
for (int j = i; j<=5; j++) {
if(j == 4) {
continue;
}
System.out.println(j);
}
}
}
}
Output:
0
1
2
3
5
1
2
3
5
2
3
5